A shortened "English #20" canoe

classic Classic list List threaded Threaded
8 messages Options
Neville Holmes Neville Holmes
Reply | Threaded
Open this post in threaded view
|

A shortened "English #20" canoe

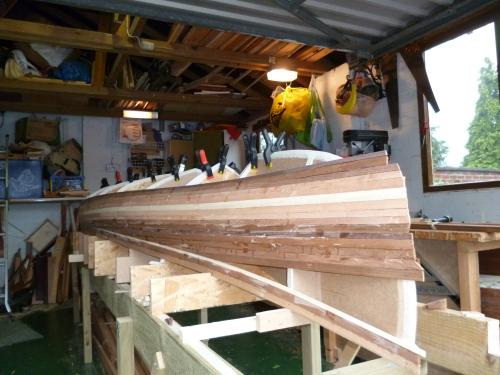
I have started makeing a wood strip canoe.  I have selected an English #20 design which I will shorten from 15'10" to 14'6" by omitting the centre frame and reducing the frame spacing to 11.75". I wish to build it as light as I dare to use as a solo canoe and the length is a comfortable fit in the gararge during construction. My intention is to use 3/16" strips and 200g/m^2 glass.

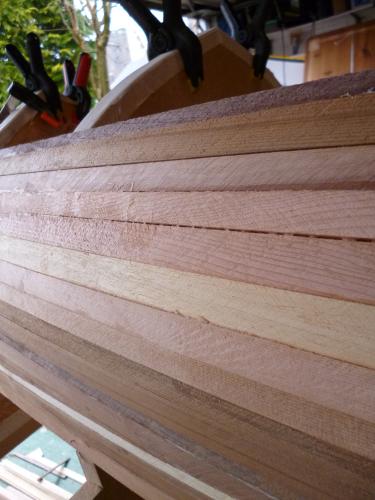
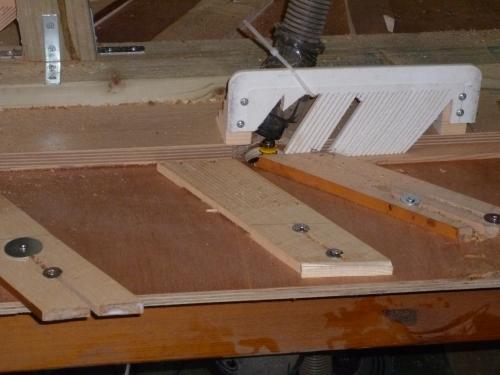
The strips are now cut with bead and cove. It has taken me 38hrs so far during which I had assistance for 7.5hrs.  It went more than twice as fast with two of us.  I had half a dozon sources of timber, of different thicknesses including some Obeche which has a white / straw colour and is cheeper and only slightly heavier than WRC.  The strips were sawn on the cheepest circular saw I could find which I clamped to the underside of the table top (temporary top!). I purchased a "thin kerf" blade for the saw. When the strips were good, I was able to cut 6mm +-0.4mm strips.  The feather boards were essential and when working well were great.Saw setup
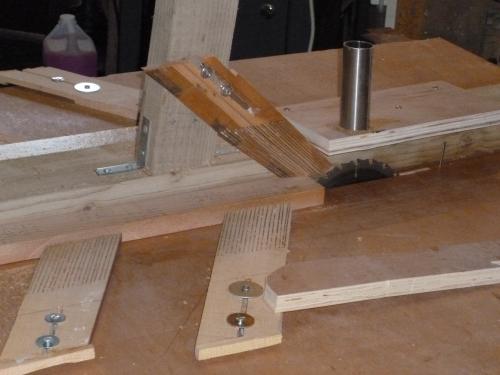
The one side of the strips went through a thicknesser (5.25mm+-0.15mm) and then past a $20 router bit from the USA via eBay to cut 5/32" radius bead and cove. Three featherboards were set up to try and eliminate snipe at the ends but without success.
So what have I learnt;
1. 30% of my timber ended up as chips on the compost heap!
2. I wasted many strips through poor timber quality, pushing past the router too fast and when cutting the strips the circular saw was intollerant to any imperfections in the timber (twists, missalignment of butt joints, glue ect) resulting in too thin strips.  I thought, never mind the next cut will be good but found that the thinning only got worse on the next strip!
3. Butt jointing at 45 deg to get full length strips was a waist of time.  The long lengths were difficult to handle and the joints failed.  I will not butt joint the strips as I fit them using CN "mitre glue", the cheep stuf from Screwfix.
4. The lowest cost planner / thicknesser from Screwfix was good.  Having seen how little time it took to thickness the strips I now wish I had planned both sides, 5.8mm then 5.25mm.  The outside strip would still be variable in quality but would probably take less sanding.
5. The thin kerf blade worked well, 1.7mm claimed, .0 +-0.2 achieved.
6. A long time taken to set up the work table and 'run in' , 'run out' planks took time but was time well spent.
7. Bead and cove is not essential.  I did some testing and square edge strips were OK, bead and cove was better in my tests. Comes down to personnal preferrence on the finish.
8. Good feather board and setting was essential to getting good strips.  My first set split, not enough to show but just enough to give me a set of wavy thichnesses before I worked out what was wronge.

This is what I have done.  It is not a recommendation.  The power tools used clearly had the capacity to cause serious injury at any instant.  The books all state that good strips are needed to produce a good canoe.  The tollerances given are from spot checks that I made.  I have no idea if they are adequate, just given as a guide as I could not find out what was intended as 'Good Strips'.
Neville Holmes Neville Holmes
Reply | Threaded
Open this post in threaded view
|

Re: A shortened "English #20" canoe

Another 17hrs and I have a mould built and ready for strips. 62hrs in total. I had plotted the 'half' frames onto paper and poked a pin through onto the timber sheet then flicked the paper over and pin marked the other half through the holes.  I cut the frames as a pair. To finish I turned one of the pair around to plane and planed as a pair only to discoverred that the shapes were +-2mm different. Oh well.

I am very pleased with the sleek lines of the mould.

So what have I learnt.
1. The offset table had a number of errors in it.
2. If I ever make anouther kayak / canoe, I will pin through the plans onto folded paper and make a sheet per frame, cutting the folded paper to get a symetrical template to glue to the timber sheet. I will also leave 2mm to plane off.
3. The hand JigSaw was quicker than the band saw. the JigSaw blade stayed in allignment on the curves.
4. Every frame set on the mould needed moving at least once to obtain a fair shape. So allow time and keep calm. When it looks a little out, it is a lot out.  Keep checking, checking checking. Check as many ways as you can think of (latts, string, sight from a distance, spirit level, measure, sight lines)

PS I DO intend to use Mitre CN glue to make long strips as I go along.  Sorry for the typo, I was in a hurry!
Timmo Timmo
Reply | Threaded
Open this post in threaded view
|

Re: A shortened "English #20" canoe

+/- 2mm... That's impressively accurate in my book! I know I have at least one boat where the difference from one side to the other would be measured in centimetres, not millimetres, only I don't measure it. It goes straight and so long as no-one notices It's fine (though I do try and do better next time.)


On 15 Feb 2013, at 08:30, Neville Holmes [via UK HBBR Forum] wrote:

only to discoverred that the shapes were +-2mm different. 
Neville Holmes Neville Holmes
Reply | Threaded
Open this post in threaded view
|

Re: A shortened "English #20" canoe

Thanks for the encouragement Timmo. I started the thread as I could not find out how accurate the construction needed to be for an 'adequate' outcome.
simplesimon simplesimon
Reply | Threaded
Open this post in threaded view
|

Re: A shortened "English #20" canoe

This post was updated on .
Neville
Whare did you get the plans from?  I've been googling to try and find a picture of what you're building, but failed so far. I know Bear Mountain used to publish them but not any more.

Best wishes
Simon
Neville Holmes Neville Holmes
Reply | Threaded
Open this post in threaded view
|

Re: A shortened "English #20" canoe

I have borrowed a book from a canoeing friend "Canoecraft" by Ted Moores and Merilyn Mohr.  The book contains Offset tables for 7 designs.  The book states that Walter Walker still makes this canoe from the origonal William English mould. Mind you, the book was first published in Canada in 1983.
The design is similar to the 'Peterbough' with a flatish sheer line and a small return at the ends with quite a sharp V entry.  When I get anouther half dozon strips onto the mould then I will include a photograph but I have family commitments over the next week or so and the glue is very slow setting in this cold weather.
Neville Holmes Neville Holmes
Reply | Threaded
Open this post in threaded view
|

Re: A shortened "English #20" canoe

P.S. I have just noticed that the book contains a photograph of Walter Walker,in the photograph he looks to be in his 70's!
Neville Holmes Neville Holmes
Reply | Threaded
Open this post in threaded view
|

Re: A shortened "English #20" canoe

In reply to this post by Neville Holmes
To Stain or not to Stain - Advice please I have less than half the strips fitted but am looking forward to when the sanding is done.  Should I stain with a water based stain, diluted say 50:50 or just keep the natural wood? If stain what shade goes well on Cedar?  I was thinking Mahogany or Cherry but do not wish to have a pink canoe, any advice?  I was trying to get a tie-die effect on the sides but the strips look very stratified.