Blue Moon

1 ...
891011121314
1 ...
891011121314

|
|
This weekends work:
First the steering controls were sanded, then two pieces of plastic were laid on the bench. Two pieces of 4inch square fibreglass cloth laid and resined on the plastic sheet. The controls placed on top and propped in place and two more pieces laid and resined on top forming a top hat shape. Then a little more reinforcing cloth was laid on where needed. Once set the fibreglass was trimmed into a D with the curve facing down. After a sand and fill they have received their first coat of paint. The main hatch which lives above the rudder, was sanded down, then painted white , the next day lightly sanded again and a second coat painted on, it may take another coat yet. The cockpit outer edge was painted white, I had tried varnishing but couldn't get the finish I'd like and it's a high wear area so I've gone for paint. The fore hatch was sanded repaired, One of the retaining edges had come off, the only problem being the top came off the glue bottle. Flooding the underside of the hatch. That was pushed to where needed, and when semi soft, the excess glue scraped off. This is a varnished hatch so next week it will be turned over sanded again then the first coat of varnish applied. At the moment I'm puzzling over the connection from the steering wire to the steering columns and beyond . The control columns need to attach to the passing wire securely, be adjustable, and not twist the wire in doing so.. |
|
|
This post was updated on .
Tell you what Q
It really is true that "A picture is worth a thousand words".... I may have missed the original text indicating some disablity; there have been occasional tenuous hints that you are making one or two adaptations for ease of use. Am I missing something; why is a tiller not sufficient? What about installing bottlescrews On the yoke? Chris |
|
|
Am I disabled NO, however, I do have a list of injuries from sport over the years, they are coming back to bite..
Damaged big right toe, someone landed on it while sailing, Damaged Knees, too much playing volleyball in the RAF, Damaged left elbow, washed off my laser at high speed, while still holding the mainsheet with my left hand bent the arm / elbow backwards. Damaged back, sliding into a base playing baseball in the RAF... Some idiot hadn't used a sand bag as the base but one filled with quick set concrete.. Damaged Neck , whiplash in a car crash about 1978.. All these old injuries healed at the time, but now 40 years later or more are getting more and more painful.. SO. The boat is sit in facing forwards, in an armchair.. I like to be comfortable.. Well actually it's a "mahogany a like" folding chair with arms.. (and very shortened legs) Sort of old fashioned F1 driving position before they started putting their legs up high.. With just a 2 ft wide cockpit. The head of the rudder is about 6.5ft behind me. So I need to get control of the rotational movement of the rudder to be brought forward to me. Having played with various ideas for controls, most were impractical or would do me an serious injury where it hurts when I try to get in or out. I'm not a racing snake anymore, I need to lever myself out.. The solution is a wire cable each side to get to each side of me, with a pull push control each side, the handle just above the chair arms. Controls each side so I can change hands as required, the area in front of me clear, so I can get in and out . To pull the "other control handle" in the opposite way to the one in use, a wire cable will go round the front of the cockpit out of the way Other than the mainsheet hanging from the boom just in front of me, all other controls need to be brought with in arms reach. So the jib sheets and jib furling gear will be attached to a self tacking jib, they will come onto the cockpit sides, Main halyard, topping lift / lazy jacks, cunningham and vang will come the centre of a cross bar just in front of the chair. I need to be able to drop the main while still on the water, as there is limited room on the club quay, she needs to be brought in slowly, and being IN the cockpit there is limited reach to stop the boat hitting the quay or other boats. The cross bar has a second purpose, it's so positioned I can pull myself up out of the chair with it.. I've tried that it works well. A couple of bottle screws are likely to be installed in the steering wires /cables to take up the slack.. As for the attachment to the control handles, since typing the other post this morning, I've some up with a simple solution, a loop on the end of the wire cables that slides over the handles with a collar on the handle arms to stop the wire cables sliding up or down. Thanks for your enquires, I'll see if I can get a couple of pictures, of the seating / rudder head when I get home in an hour or so.. |
|
|
Some pictures,
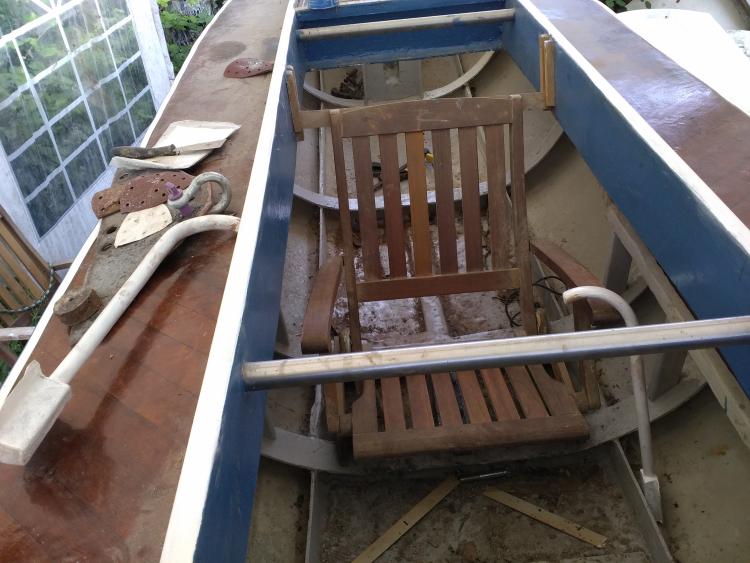 The first cross bar in stainless is that for the main halyard etc The one behind the chair is the horse for the mainsheet. You can just see a control handle propped against the port chair arm, almost in position, the other is sat on the side deck on top of the boat lifting plate. In the distance you can just see the bottom of the rudder box. Time I think to clean the inside of the boat. |
|
|
Picture 2,
The rudder head, temporarily, held in position with a threaded rod and big washers 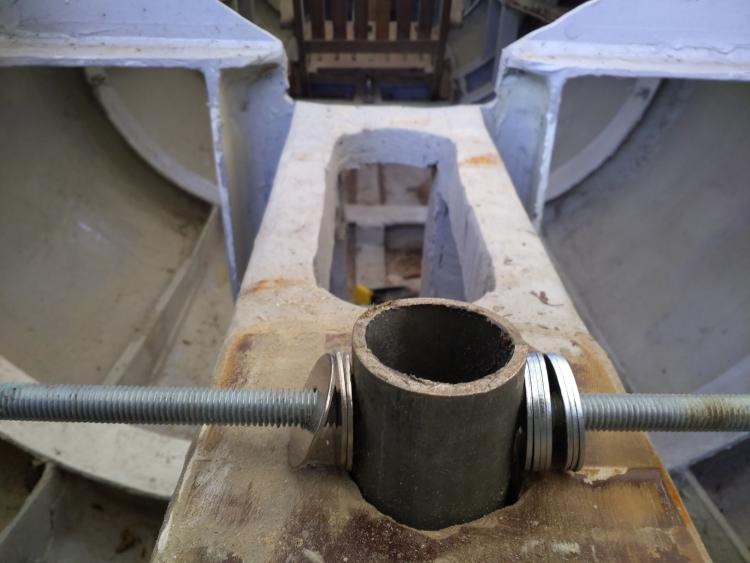 You can see forward to the back of the bottom of the chair. |
|
|
Picture 3
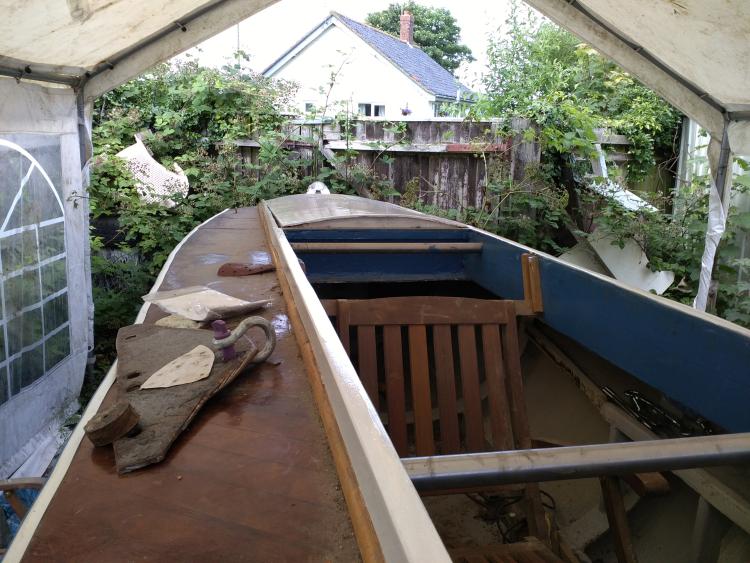 A slightly higher view looking aft the back hatch is in place. That needs another sanding and coat of paint. The aluminium poking up right at the back is not part of the boat but a step ladder pushed down. I thought out of shot.. |
|
|
Not a huge amount of work done this weekend, as I spent some time trying to fix an intermittent problem with the lawn mower.
Steering controls given a full coat of paint, Main hatch another Coat paint, Fore hatch varnished twice, Another hatch repaired sanded and a first primer coat put on.. And another thing going on a rescue boat refresher.. Not that I learnt much as I've been doing that for 40+ years. The reason for the refresher is new Saturday starts our regatta Week, Saturday Two race series on Black Horse Broad, each of up to 8 starts, Sunday 4 race series of up to 8 starts, Monday to Friday 23 race starts, in 4 main race series plus specials, such as waterboatmens trophy (people who work on the river) and the service and ex servicemans trophy. The 23 race starts may be split up into more, if too many sign on for a race, that's common among the juniors where the topper / oppie start may be split into 3. Also if more than 12 turn up in one of the keel boat races then they may be split as our river is a bit narrow.. https://youtu.be/uzaay1fRpss |
|
|
Some pictures of the week's events.
The slow river cruiser start circling before flags down. 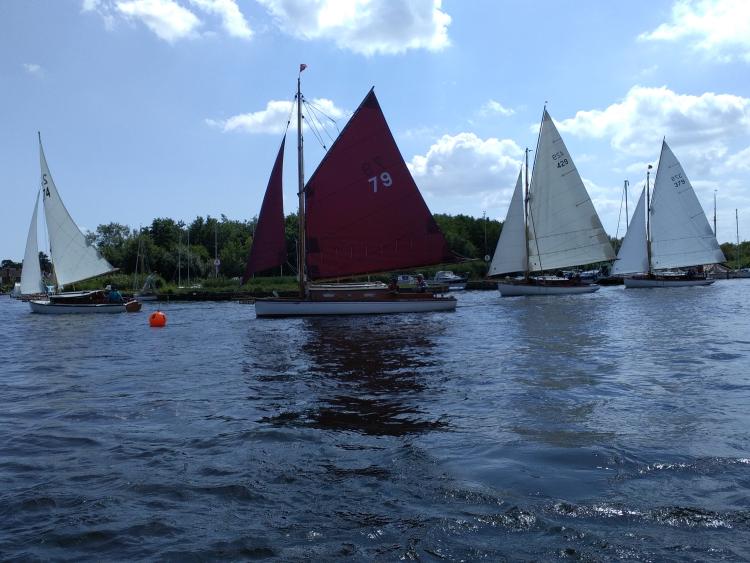 Two of the fast cruiser fleet with a 19ft Reedling keel boat coming the other way. 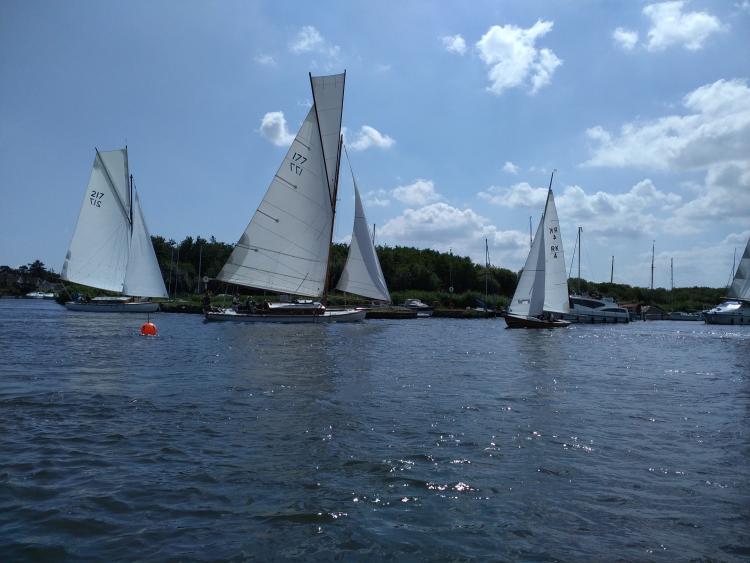 A picture from the club house at 06:00 as I have a coffee before getting the 4 rescue boats ready. 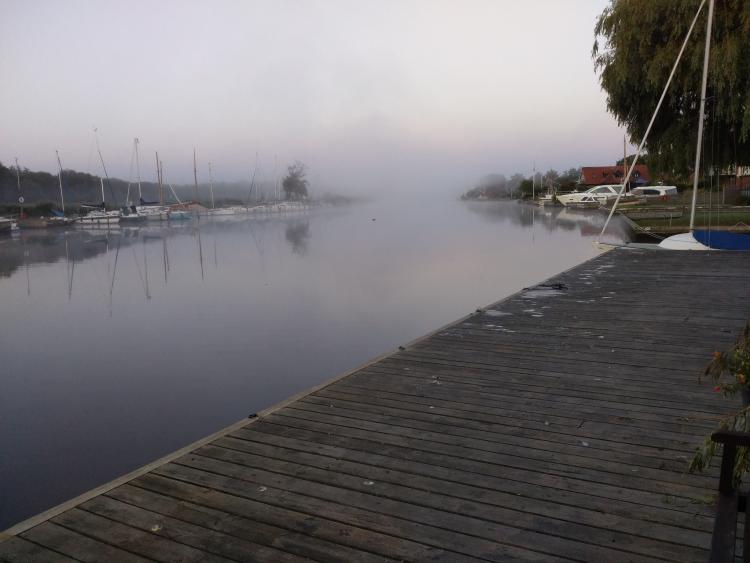 How to terrify the tourists, fill the river with sailing boats. The Yeoman fleet heading up river with two Reedlings heading back down to the club. 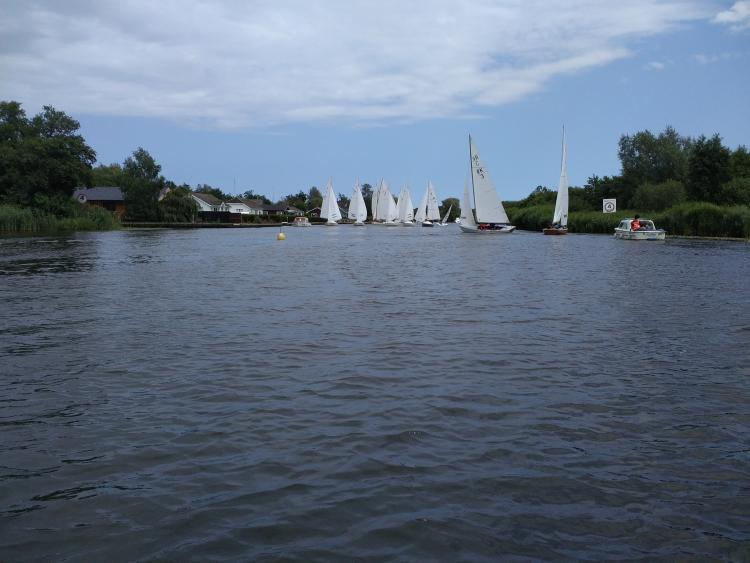 The Rebel fleet arriving with a sailing cruiser heading down river. 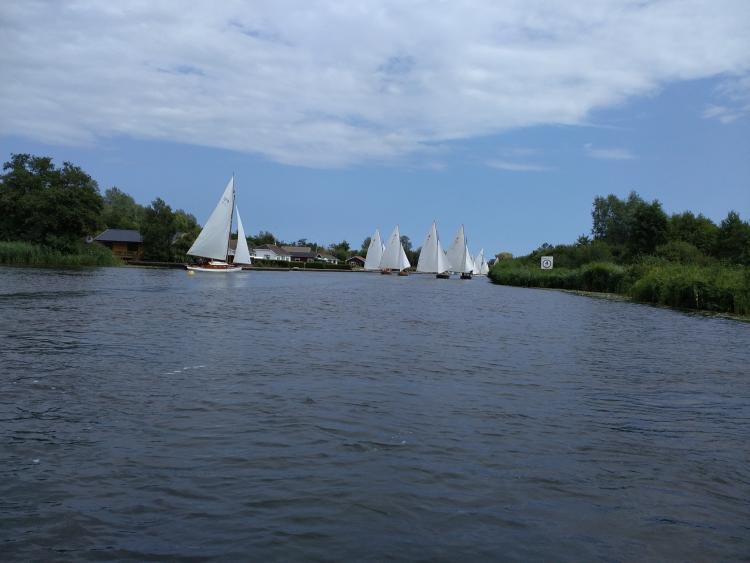
|
|
|
No boat work this weekend, it would not have been politically correct to work on the boat after having a week off sailing..
Work will resume next week. In the mean time.. much thought has been going on about two things. One involves mirrors for Blue Moon, sat facing forward, I won't be able to see what sneeky tricks other competitors are trying to pull behind me, So I've been looking at mirrors, the conclusion is I need two bicycle mirrors, of the type which insert into the handle bar ends, as I can drill a hole in the cockpit edge to mount them. They'll have to be mounted far enough forward to not be hooked by the mainsheet. So that either means either side of the mast, or either side of the front edge of the cockpit. Once the type is obtained, trials will need to happen on where to mount. The mirrors will be ordered tonight, there's a set in anodized Blue Aluminium to should look OK. The second involves some gadgetry for Blue Moon, the club uses a radio controlled clock for timing, so none of that setting of stop watches is required. Just a radio controlled watch or clock on board.. Since I'll have both hands in use, a separate timer on the bulkhead is required.. The choices are.. 1, A radio controlled battery powered clock, the price for that is about £22. 2, A bicycle GPS controlled Clock - GPS which would show time and speed, which would be handy for setting up the boat finding best performance etc.. £50 +. 3, A small Cheap Tablet computer with GPS, that can do Clock, Speed , mapping , etc £57 + a rubber case to protect it.. Once chosen somewhere needs to be found to mount it, close enough so I can see it from my chair , safe and protected from ropes and rain (though the bike computer is waterproof) |
|
|
SWMBO has donated an old tablet Computer to the cause, well I can use it for sailing, it's normally her music player..
After much loading, trying, deleting Apps I finally found one that does what I want.. " Sailfreegps". it displays both speed and real time on screen, whereas most apps display Speed and elapsed or countdown time. A few other apps had Real Time as well, but in too small a text. A wander round the garden in full sunlight shows it's readable, then parking it on a planter, then standing well back shows it's readable at 10ft, twice the distance I need.. A waterproof holder is now on order, when it arrives, I'll plonk myself in the seat of Blue Moon, and try it in various positions for visibility and safety of the tablet.. |
|
|
The waterproof Tablet holder hasn't arrived yet, but I tried the tablet in position on Blue Moon and It works well, easily viewed from the chair. The only thing will be to make sure halyards etc don't block the view.. A drop in position will be made for it with some protection from elements and boat type hazards.
Not a huge amount of work done, One hatch sanded and repaired, it's sitting with clamps on at the moment. Another hatch lightly sanded and a second coat of paint applied, Bow hatch another coat of varnish applied. Went to install the steering controls, but the two pivot bolts i bought have done a runner, can't find them anywhere, more ordered. Went to rudder, marked up for tiller arm.. But I cant get the drill in place to drill the hole in the confined space of the hull, so that will take another two hull lifts next week, to drop out the rudder, drill the holes then lift again to reinstall. |
|
|
Finally the two steering controls are installed, that went quite well except for the pain of grovelling around in the bottom of the boat, A trial sit and play shows about half an inch more needs to come off the handle end of the controls...
Played with rudder head and fittings... Fitting works.. but... I need a longer bolt.. 5mm by 70mm, bolt ordered.. Hatch one, another coat of varnish applied. Since I had the varnish out, I recoated the stern. Hatch two, not happy with finish, and it got rain on it before it set. Heavily sanded and repainted. Hatch three, excess glue removed, hatch sanded down, first coat of paint applied. Hatch 4, remains of previous hatch, now too large, cut to size, curved bearer off the waste section cut off, glued to section that's kept, now clamped up and left to set for a week.. Problem. Hit a screw with the blade.. Bosch nanoblade... They were £14 when I bought the last ones... Now £21!!! Price up 50% in a year, happy I'm not.. "Hug the bank" signs painted white the other side.. |
|
|
For a variety of reasons not as much work was done the boat as I'd hoped this weekend. The main reason is a dead tree in our garden's hedge row, it is no longer a 40ft sycamore , but a 20ft one as I was up and down the ladder chopping the top off.. It's didn't drop quite where I wanted it to drop, But more importantly It didn't drop where I didn't want it to.. Namely onto the model railway shed, which was in direct line of a normal South Westerly..
So.. Hatch one, another coat of varnish applied. Since I had the varnish out, I recoated the stern and the registration number board to hang under the jib club which had reappeared during the searches... Hatch two, . lightly sanded and repainted. Hatch three, lightly sanded down, Second coat of paint applied. Hatch Four, Heavily sanded and then a strip of ply glued on top so it will overlap Hatches 2 and 3. A second overlap strip will be glued on next week. Rudder head, Measured 3 times, careful marked up, then drilled for new tiller fittings. A temporary string was tied around the boats cockpit from the tiller head via the control handles, to check the Ideas work.. They do, but a couple of more bits needed, so they are now on order.. A search party (me) had earlier set out to find the boxes / jars of bits, from boats long since gone, unsuccessfully, SWMBO reckons she's seen them, so she will set out on a second search party this week.. Once they are found, they will be sorted into useful for this boat or back into the box. Fittings and fixtures are remarkably expensive, so saving buying more is a good idea.. |
|
|
Search parties for the box of boat bits have so far been unsuccessful..
A large part of the weekend was spent building more shelving, this time in the mobile home.. So what happened to Blue Moon.. Hatch 4 had another section of ply glued on, was heavily sanded then the first coat of paint was put on. The rudder head assembly was err assembled.. It's made of the shaft of the rudder, which is a scaffolding pole, some spring steel was used as "padding", The spring steel from the spring which once lifted the door open of a commercial microwave oven when it went ping. The tiller / bit that enclosed the shaft is a bracket that should hold lights on a stage.. A hole was drilled through the lot (holes through shaft were already there.) bolt inserted.. Now where did that nut go? I have no idea.. have to get another one. The steering was tried from the cockpit controls with the string tied to the tiller arm, Works OK, but a bit stiff, the shaft hasn't been greased yet, I don't want to grease it until I've stopped making dust that might get in there.. During the week I spent a lot of time working on the layout for the 12 bits of string that have to reach me in the cockpit, Sat in the boat and... hardly any of them of them would have worked. So after much thought and playing with a representative bit of string while sat in the cockpit, what has been settled? The 12, 1 Jib in furler ............Cockpit side 2 Jib out furler ..........Cockpit side 3 Jib sheet port .........Cockpit side 4 Jib Sheet Starboard .Cockpit side 5 Jib Halyard .............Cockpit forward face (I've found I can reach it from the seat, when not sat in a racing position) 6 Jib Vang .................Probably on a cockpit side though I've not worked out a exact spot for it yet. 7 Main Halyard ..........Cockpit forward face 8 Main topping lift ......Cockpit forward face 9 Main out haul ..........Already hangs from Boom in front of helm, 10 Main Cunningham ..Take round block back onto boom within reach 11 Main Vang .............Arrange so jammer is at top of vang within reach 12 Main Sheet ............Drops from boom in front of helm, will add switchable ratchet block to cross bar in front of helm. Moving the halyards to the front face of the cockpit now means I need to find a new safe home for the tablet computer, not worked that out yet either.. |
|
|
Q
I get a feeling that those controls mounted on the boom may be difficult to get a sufficient purchase on as they are so close to you and not necessarily facing in a 'pulling' sort of direction?? The boom vang would be a prime example, if reversed as you suggest. There are just four controls on Polly Wee and they're all on a small board right up under the forward edge of the cuddy, all except one having been 'turned' at the partners - 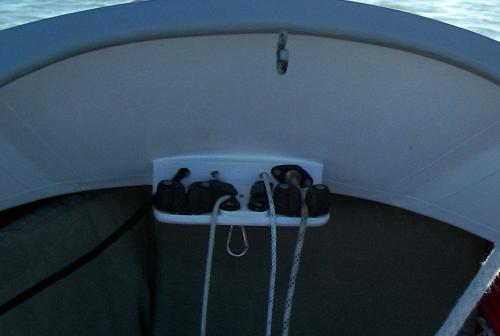 They work on the board itself with either clam (small), or cam (large) cleats for the halyard and preventer which can actually be used even when sitting in the sternsheets. That also applies to the mainsheet on a swivel block with cam cleat mounted well forward alongside the board case. Would you consider moving the cleats away from yourself, facing you but allowing 'pulling' room? I'll get back in my box now Chris W |
|
|
The main sheet Itself is about 18inches forward of my head as it drops, hence the need for a block on the rail in front of me so I can get a decent pull. Though in light weather it should be ok.
The Vang reaches the boom about 6 inches forward of that, so I think the pull from a few inches below the top should be OK. The pull itself is downwards with a standard vang block, then aft to jam it. It might be by putting a normal block on there, with a jammer on the underside of the boom I can pull back to me. This boom came with an internal outhaul, which appears out of the boom a few inches forward of the vang, it may need a small block to turn it in my direction. It has a block and tackle inside the boom so the pull is quite light. The Cunningham should be OK with it being a pull down and back towards me, I may add a small block and tackle on it if it's awkward to get a strong enough pull. The biggest problem I foresee, is I'm sat in the bottom of the boat with the boom wandering from side to side, while I'm reaching up to the boom a 6 to 12 inches above my head. I've tried to work out the layout of controls so the cleats themselves will be at full stretch while sat back in the chair. That will give about 2 ft of pull towards me. I seriously looked at a panel like yours for the controls, two alternative places, one on the forward Bulkhead like yours, but the vang would be busy trying to chop my arms off. Then on the rail in front of me, that would be a good place, but many of the control ropes would have to be routed round the cockpit to get there.. So that's why I came up with the list as shown. Though once it's installed you can expect something will have to be moved.. Keep up with the suggestions, all are welcome.. |
|
|
Meanwhile no actual boat work for two weekends. I've been visiting my parents for the first time for nearly 2 years due to covid.. 417 Mile drive each way, heavy traffic.. While there I've spent some hours working on the layout, getting sheets etc from the jib and all the other ropes to me, sat in the boat. Some measurement will take place this morning, after that some orders are going in. There will need some deck mounted turning blocks, and some through deck bushes though they will actually go through the cockpit sides. A pack of 10 identical cam cleats has been ordered for the general fit out. Also I've been hunting dyneema , for steering control lines, halyards, furling line. 4mm and 2mm will cover most of it. The jib and main sheets will conventional ropes as my tired paws need thicker ropes for comfort when actually sailing. That too will be ordered today after some measurements. A lady at SWMBOs weaving group has offered the use of an industrial sewing machine, so material for the boat cover needs to be ordered. As the cover is to be on deck, not over boom, the 4 foot width of the boat is easily covered by one width of the material, so I just need a 6 metre length for that . Plus a couple metres for sail covers. Tying on an overall cover is interesting, the only solution I can think of is to drop the ropes / straps under the hull. I've had eyes on / through / under, the gunnel before but this gunnel is rubber so eyes / loops / hooks are not an option. The bow will be laced, the stern, and mast a draw string. Time to get my overalls and get out there.. two weeks and the grass has gone mad, much mowing to be done. |
|
|
Well Saturday I fixed the mouse hole into the pantry by filling it with Mortar. That went well..
Mouse Hole? yep they climbed the outside wall somewhere came along the guttering ate their way through the facia board, then the ceiling and entered that way.. There was no triangle of mortar between pantiles and top of wall .. Now there is, so no way in.. The facia board will be replaced at a later date.. Then to extract the broken drain rods with scraper on the far end, I'd bought a tool that does the job and it did, it even found a very old wooden drain rod I didn't know was down there. Once extracted there was a big gurgle and the contents of the system disappeared down the pipe. Unfortunately my back went badly during this , nothing more could be done that day and I had to be careful Sunday. When.. One hatch was painted on top, and it will still need another coat, one end of two other hatches were painted. Then I sat in the boat with a cam cleat, some hardwood wedges, a bit of string and a pencil. After trying various positions I worked out where they would go and the shape needed for the wedge sides. Six sets of wedges (white oak) were carved and sanded to shape round the cam cleats, then varnished, the foredeck hatch and the forward registration number board were also varnished again. I couldn't finish the steering gear as we had a rainstorm, the rain was hitting the back of my neck while sitting in the chair on board, that's 7 ft up to my head and 9 foot under the marquee cover.. That's almost horizontal rain... So working at the rear of the boat would have been very soggy. The cover material has been ordered, Blue of course, along with Blue extra strong thread to sew it with.. White thread would show the errors too much.. |
|
|
Q,
It's interesting to read your build story. However like others I expect, without pictures I get a bit lost about all your wonderful achievements. HBBR thrives on pictures, as we all respect the effort and achievement that one photo imparts. As they say a picture is worth a thousand words. If you are struggling with Nabble's 1MB photo limit, use Microsoft Paint to resize images to about 1024 pixels wide which often reduces the filesize below 1Mb. (1024 pixels fits nicely across a laptop/tablet screen). I use Save As and append the photo size e.g. "RudderTop_1024.jpg" Then it's easy to identify and you keep the original. Keep up the hard work. Cheers Paul |
|
|
Yes I probably don't do enough pictures of the Boat work or come to that my model railway work on that forum.
It's partly I get paint and varnish everywhere and don't want to get it on the tablet computer I use.. Also partly I've never been much interested in Photos, and certainly not if I'm in them.. I think post childhood, the majority of Photos I've been in are either pass photos for work, Or tourists taking pictures of me when I'm sailing or on rescue boat duties and I can't hide.. Hopefully I'll take some pictures of the Cam cleats on wedges, and the steering mechanism next week.. I should have mentioned the wedges are to raise the operators side of the cam cleats way from the surface they are mounted on, so you can pull ropes into the jaws.. The photos I have done are from an Android tablet, where I have loaded a "resizer" to get the pictures from 4.8Mb down to something Nabble will accept. |
«
Return to General Discussion
|
1 view|%1 views
| Free forum by Nabble | Edit this page |