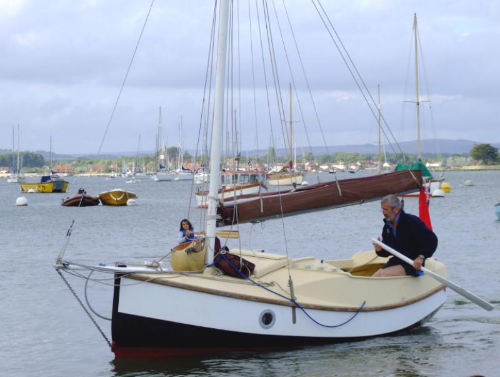
Blue Moon
123456
... 14
123456
... 14
|
|
At this moment, the nearest weather reporting station to home (Weybourne) is reporting 59mph winds, I'll see if the marquee has moved when I get home...
I spent most of Saturday grinding with the new angle grinder and a dremel in the corners, three areas between the frames working from the stern, are roughly done, and a patch coat of bilge paint used where required. Next week the join area and the forward half the cockpit.. During all of the above, a small fan heater was place in the cockpit by the mast step blowing down the hull, the added warmth enabling me to stay out longer than in previous weeks. it was noticble stepping into the marquee it was definately more comfortable. If I'm up to it after that, there is the little matter of crawling on my side into the bow compartment.. Also done Saturday was the start of a new tool box, this is for railway modelling. I'm fed up of digging around in the bottom of a commercial tool box looking for something. So this one is 2ft long 1 ft deep and 14 inches high, built of ply with some strip timber for corners and drawer bearers. A small tray at the top with a well at the back for blottles of glue and assorted small plastic jars. Below that some short Drawers for small tools and below that some larger drawers for bigger tools. So far the base back and sides have been assembled , a long way to go yet. |
|
|
This post was updated on .
Happy new year to you all..
The Christmas New Year break allowed more work to be done on the boat, not as much as I would have liked .. More grinding /sanding of the internals, plus 16 2.5 inch holes were cut into the tabernackle . From that I'm now suffering, as to do it I was lying in the boat across three frames, arms above my head , squeezing a drill with holesaw into the small space. That isn't quite finished yet as they need sanding and the bottom pair of holes need squaring off a bit to give access to the mast step adjustment pins. I was doing a good imitation of a snow man each of the two days of sanding. Full gloves, overalls, respirator, goggles and hat were worn!! the boat has been hoovered out , which took several cleanings of the filters the dust was that light it wasn't settling in the bin.. Also two days were spent sewing, the Kestral secondhand jib I bought, needed six inches cut off the luff at the bottom, going up to no removal at the peak. This was done some time ago and it was pinned up at the time. The orginal jib was only seamed up to the first panel join, above that it was a bare cut edge, it didn't appear to be heat sealed, So I've done the same. The old corner reinforcing was unstitched off the piece that had been cut off, and sewn back on the jib. Then instead of buying a hole punch and cringle insertion tools, I had some spare webbing so I've sewn on two loops .. Sewing through 5 layers of sailcloth and 4 of webbing where they meet at the bottom corner was difficult and definately required the use of an Awl first.. |
|
|
So far not a lot has been acheived so far this January, part of this and the last week end was spent helping clear a widows house (friend of SWMBO) of unneeded stuff left by her husband. This weekend it included a 3 ft square safe, and several railway sleepers.. Then also there was a power cut in the area, while I was mid sand of the boat...
Anyway, over the last couple of weeks I've been calculating keel size and weight.. Excell helps a lot!! it comes out as about 175KG, so when the power failed I went on the great lead hunt. I've been accumulating lead for many years knowing I'd need it. So it turns out I've got 116Kg of lead sheet and 119Kg of odd shapes, no doubt a few pounds will be wastage once I start molding. No I've never been on a church roof!! My current plans are.. The maximum keel depth is 3ft, there is no question about that, as it is the boat I sail now, also of 3ft draft, touches bottom occasionally when approaching river banks before tacking and leaves a brown mud trail when we start sailing each season on Black Horse broad... I've chosen a NACA0012 keel shape which just gives room for the keel bolts, while remaining fairly slim so as not to give too much drag.. The wooden keel will be assembled in slices, the top and bottom piece will shaped to a pattern, and all the pieces assembled onto the keel bolts (threaded rod). Then planed to the patterns. Once that is done it will be disassembled , the keel bolts mounted in the boat, then each keel section will be bolted and glued into place .. once that it all done a final sand will be needed. So the lead lump is 6 inches high, above that is 2ft of keel, a span 30 inches wide at the top and 22 inches at the bottom. Through which 7, 1/2 inch keel boats will be fed. (Only 5 all the way through) I'll shape a male mold from extruded polystyrene, the shape is quite complicated, It will be a "L" Keel with a small "beaver" tail. I can see extreme difficulty in moving a 175KG keel in the space I have, so the male mold will then be sliced into 6 pieces, each to fit in a wooden tray. Once the poly is waxed, it will be held down in a tray and plaster of paris poured around , and left to set. Once set and the poly removed, the tray will be baked to rid it of any moisture, ready for pouring. Each of the slices will have the necessary holes drilled through for the keel bolts and each nut will have a hollow so the nut can be left in place. then each slice will be bolted and glued into place one at a time.. So the lead lump is 6 inches high, above that is 2ft of keel, a span 30 inches wide at the top and 22 inches at the bottom. Through which 7, 1/2 inch keel boats will be fed. (Only 5 all the way through) Unless someone can come up with any better ideas? |
|
|
Boy have I got brain ache, while checking the figures I found 3 errors
The first is in the text above, the keel is Naca 0009 the Rudder is Naca 0012, Second i'd lost a foot of keel (fore and aft) in the many drawings and redrawings of the keel. Third I'd forgotten to take account of the bouyancy of the keel itself, which works out at about 2 cubic feet, that's 120Lbs (54KG) of water. I've spent the week going round and round the figures, then redrawing up the keel, checking and checking again.. Now I had been really pushing it to get the 175Kg of lead in the keel and keep the boat on it's lines, now I have plenty of leeway..I'll probably up the lead to 200Kg, with the option to add more later. (To me  or the boat). or the boat).
The Lead lump on the bottom will have to go to Naca 12 in order to get the weight in.. |
|
|
Gracious Q, that sounds sophisticated
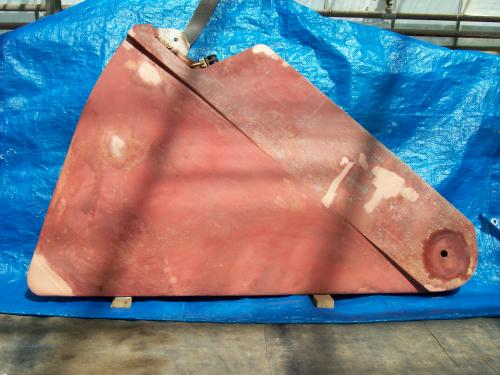
When I designed and built my little gaffer I really didn't do any intial work on the ballast versus buoyancy at all, never mind NACA. On first launch I had a few heavy things in the bilges, but she obviously needed a tad more forward -  Took about a third of a ton in total to settle her down -  Similarly, her centreplate was built-up based on six mm stainless sheet, with layered plywood cheeks, where I drew a line down each side 0.4 of the distance from front to back to identify the region of maximum thickness, (about 3", I seem to remember) and planed it down by eye -   It weighs around 52 kilograms The silly things we do Just for fun CW |
|
|
An interesting boat with a hint of Northumbrian cobble about it. I like the design
My boat too originally had a drop keel, first of 51kg then two ballast weights of 50kg each. With the boat being 2ft longer then, I now know it needed then a further 150-200kg of ballast. The original plate was 10mm galvanised, steel, the ballast weights vaguely aerofoil shaped. I've spent many hours wandering the net studying keels, the limitation of 3ft draft being the main problem. Various experts said for a non racer, just rounding the leading edge and a bit of thinning at the stern makes a big difference.. However I'm intending to race, the river can have two or three knots flow in either direction and wind speeds are often light. So I designed the boat to be easily driven through the water. With a long waterline length to hull length. Naca shapes are easily available on the net particularly here.. http://airfoiltools.com/plotter/index?airfoil=n0012-il and unless you're doing something silly with foils, naca 0009, to naca 0012 are recommended for general yacht use, If you're not dry sailing and able to polish the bottom every week. I've printed out the naca shapes I want and this weekend will stick the to appropriate bits of wood, then jigsaw and plane them to shape. |
|
|
I'm glad to note that you covered up for the angle grinding. Last week I was angle grinding without goggles (to save time - as if) and got some particles in my eye. It was so painful I could barely think. The local A and E sorted me out with anaesthetic and referred me to another hospital where I was repaired the next day.
It wasn't even a boat; just a plastic shed. |
|
|
I'm allergic to many anaesthetics or to be more precise, susceptible to malignant hyperpyrexia under anesthesia. I'm very cautious about anything dangerous..
|
|
|
Well, best laid plans and all that,
First I got lent on to produce an Inkle loom, SWMBO had borrowed one from Her weaving group, that now has to go back and she wants her own. I have a 8X4 sheet of 3/4 ply earmarked for part of the boat supports once on her trailer. so I cut the two hull shapes out and the carved out sections were then demolished into inkle loom shapes.. that took a considerable time.. Then I started cutting the wood for the keel, I found the jigsaw blade, end furthest from the jigsaw itself was trying to follow the end grain it was cutting into, no precise cuts. I have a nanoblade Bosche which is a mini chain saw, it worked wonderfully but ate blades, and at about £15 each that was not a workable proposition. I tried the electric plane... found it had a broken blade, went to where I left the pack of spare blades... gone.. replaced by woolly substances.... SWMBO has no idea where they went.. New blades ordered, as the assembley will still need planeing from the blanks when sawn. Next week, I'll dig out the table saw from it's place of repose, and do the major sawing with that.. |
|
|
I hope you all Survived Ciara...
I spent Saturday morning: Taking down the marquee sides, Wrapping the boat in plastic, laying various beams of wood along the decks, and over the middle. Then roping the lot down. Clearing any thing loose from the area into a shed.. Then took the Dog for his long walk before the really bad stuff arrived.. At it's peak Sunday afternoon we reached 70mph in our area, it's still showing 43mph Now.. Need less to say no physical boat work was done, the second side to the inkle loom was cut, and the blades on the plane replaced for recommencement of work.. Another set of drawings of the naca dimensions were produced for the keel, just stick them on and cut round.. |
|
|
The Marquee sides and roof have stayed off, with Caiara followed by Dennis, and almost a week later it's still blowing near 50mph out there..
I've also had a severe dose of the Lurgi so nothing has been done.. I did get bored and played with some sailing metrics calculators.. LOA = 16ft LWL = 16ft Beam = 4ft Displacement = 1100lbs Ballast = 385lbs Sail Area =130sqft Which gives. SA/Disp = 19.5 12 is regarded as low, >20 Generous, Disp / LWL = 122.1 <100 ultra light < 140 Light< 175 Medium Max hull Speed= 5.4 kts Motion = 15.7 Ballast / disp = 35 33 = average 40 = stiff Capsize resistance = 1.5 < anything less than 2 is good.. |
|
|
Four more days and it's still Blowing 50mph, so I've taken the decision to work in the garage. This required getting power in there, as it had been disconnected some time ago when the ELBO smoked due to an earthing fault in the house...
Temporarily it's been bypassed, and a RCD / Breaker has been ordered to replace it. Further checks of the garage wiring showed it has a 4 "wire fuse" distribution box, feeding 2 large failed Flourescents and 3 Sockets.. Unfortunately the sockets are in the lighting wiring!!! Temporarily over the work bench I've fitted a double unit low energy 4ft flourescent I got for free from work. This has allowed me to cut 4 pieces of timber for the keel, next week I'll dry fit them together, which will allow the cutting of two more pieces to get the right sizes and angles before glueing and screwing the lot together. After that it wil be carve to the hydrofoil shape.. Also during the week the new RCD should arrive, that with other stuff i've got in stock will allow me to remove the sockets from the lighting Circuit . install a double mains circuit for sockets. Thats one circuit "always on" for battery chargers and one circuit with a big switch by the door I can turn off for safety. |
|
|
Electrical work on the garage didn't happen ..
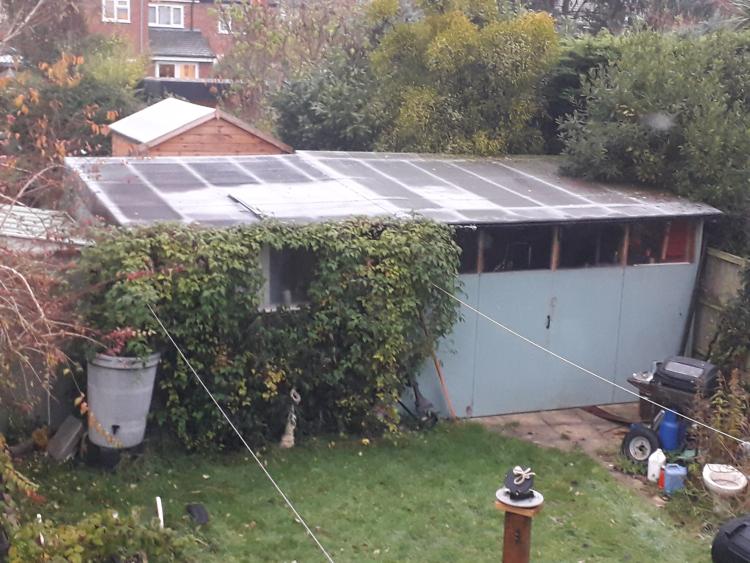
I found the garage very cold, this is because there is no infill between the corrugated asbestos roof and walls. Horhay was busy blowing a very cold wind through. I spent a considerable amount of time clearing Ivy first, then put expanding foam into the hollows. Both front and back walls, more needs to be done. Studying the roof, the asbestos sheets were secondhand, some of the patches put on old holes forty odd years ago have failed and I need to get up there at some point to fix them. I did roughly powerplane the hydrodynamic bits of wood to shape. Next week I'll use a hand plane to finish, a spokeshave will be deployed to finish the Dillet. I am however very happy with the shapes so far.. |
|
|
Filled the eaves of my workshop with expanding foam a couple of years ago. Instant improvement in warmth. Then the birds started burrowing into it. Cascades of shredded foam everywhere. Just redid the job in January, this time with a crumpled
ball of chicken wire shoved into the corrugation gap first. The birds have tried, but this time the foam's staying!
|
|
|
Hmm ... Thanks, Hadn't though of that, will look into covering the foam up somehow..
Just realised there is a post missing, basically into revisions of the design of the keel. Much further research was done into fixed keels, I happend into a couple of articles by Eric Sponberg and David Vacanti. They talk about the interface of the Keel root with the hull amongst other things. The water is happily with it's existance when along comes a boat first hitting it with the hull then the leading edge of the keel, at the interface of the keel / Hull the water responds by going into horseshoe vortex around the front of the keel and spiralling along either side. This effectively shortens the draft of the keel by making the top bit ineffective. They report that they with others, after much tank testing came up with a solution, extend the top of the hydrodynamic shape of the keel forward at the top gently sloping back to the keel. This "ramp" ( called a Dillet) allows the water to split gently and flow around the keel.. It's not needed on fast dinghies or those fast yachts with a torpeedo on a stick for a keel, as their excess power to weight ratio overcomes the horseshoe effect. But for a slower shallow draft displacement boat like mine it's important.. https://www.ericwsponberg.com/wp-content/uploads/keel-and-rudder-design.pdf Futher to that a beaver tail keel or any other torpedo shape shortens the effective keel span as well , so the Beaver tail L keel shape has gone from the plans, to be replaced by a Naca shaped, long horizontally, lump of lead . |
|
|
This post was updated on .
In reply to this post by Timmo
Bizarrely, I collect clean, dry non-recyclable plastics. I pack them into the roof space of my shed, held up with scrap plywood. Clean and dry avoids mould growth.
My family collect the insulation that comes with deliveries, often a fibre insulation. I also save the dreaded polystyrene. A band saw cuts polystyrene very cleanly with minimal waste - try it. Cut into smaller pieces it easily fills the 100mm eaves. Other plastics cut with scissors. I start at the lowest point, where gravity becomes your friend. I fix a wide strip of plywood, then push the plastics into the gap so that the whole 100mm is filled. The physics is the plastics trap air, just like any insulation. The proof that it works is this picture taken the morning after a light frost:  The wooden joists insulate, likewise the areas insulated with plastics. My theory is there is frost on the insulated areas because they prevent heat inside the shed escaping - hence the felt skin gets very cold and frost develops on it. The volume of clean dry plastic that can be saved is both remarkable and shocking. Cheers Paul Life is one big Physics experiment |
|
|
Idea duly pinched... will try that.
|
|
|
Once I've fixed the leaks in the garage roof, I'll be insulating it. I have got however, 3 rolls of 6 foot wide glass fibre insulation. This was saved from going into the skip, I was a maintenance man for Tescos and found them left over in the roof space after the extension had been built. .
As for other rescues, the company I work for now, gets big sheets of polyurethane foam , all prepunched, for various company made items, but with the sheet almost intact. When something needs to be dispatched the waste punchings are pushed out and put in the Bin, or rather they're not . I get all the 11 inch by 9.5 inch centres by 3 inches thick . Polyurethane foam is spongy and sealed against water ingress, I'll be using some inside the keel to fill the voids. Some will be collected shaped and bagged to provide flotation for the boat should a disaster happen. It is also very good insulator, but very flammable... Also from the current employer, came the previously mentioned lighting units of which I got 3 for the garage and 8 for the model railway shed. They have been replaced by LED units which are much quieter electrically speaking, important in a lab where we measure to 0.1 Part in a million on Voltage.... |
|
|
Some work was done on the Keel this weekend, limited in time by having to work on a Inkle loom for SWMBO and more Ivy clearance from the garage roof.
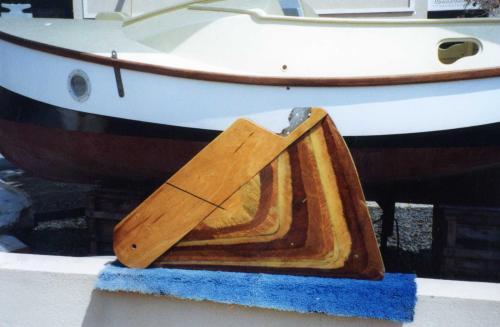
Anyway the Dillet was planed to shape and sanded down, the trailing edges of the top and bottom beams were similarly treated. Then the pieces cut so far were dry assembled with just screws. This allowed me to cut to size, two more pieces, which will form the majority of the leading edge of the keel. There will be a lot of planing needed there, then two skins of ply will be required.. Once all has been dry assembled and checked for fit, then strip the lot and glue and screw.. Next week I'll have enough of it built for it to be worth while taking a picture or two.. |
|
|
Again limited work was carried out on the keel this weekend
The leading edge of the keel was screwed together, then I started Planeing, one side is down to it's rough shape the other about half planed, before the plane let go in a big way, the rotating drum is jammed. The plane is around 30 years old, so it's paid for itself, parts are not available for all of it, so a new one will be purchased this week. I then started making bits for the inkle loom for SWMBO, looked at the keel skin, looked at the keel, looked at the keel skin, looked at the keel, looked at the keel skin, looked at the keel.. Something not right.. Held up skin to keel .. keel too big.. Yep I'd forgotton to take off the depth of the lead ballast weight, luckily with the keel only dry screwed together it was take all the screws out , cut the verticles to the correct length and reassemble. Recheck against the skins and... That's OK.. I was back working on the inkle loom when SWMBO looked in again.. |
«
Return to General Discussion
|
1 view|%1 views
| Free forum by Nabble | Edit this page |


