![]() ![]() |
Port-Na-Storm |
![]() |
Rob, The Royal Family can only afford to live here because they never pay for anything.
Oops have I gone off topic? |
![]() ![]() |
Rob Blackburn |
![]() |
In reply to this post by Rob Blackburn
Help needed. (you poor sods could do with a canoe over there in UK by the look of things)
I will lay out the problem but I suspect I know the answer. I have gone to a lot of trouble to build cambered deck beams to the same shape and pretty much are the same profile. https://goo.gl/photos/AdwbG7nFSMFeiZix9 But when you put the plywood to it and try to clamp/bend/form it up to the shape it just won't work. Is there a way to make ply bend in 3 dimensions ? The fact that I have curved deck beams is fine but the sheerline of the canoe makes it pretty much impossible ?? to get the sheer and the convex deck shape. What should I do wise people? Ideas... 1. use really thin ply. The pictures here have 3mm. I bought 6mm which is way off the mark. ie laminate two layers of ? 2mm? I think I can get it in Brisbane. 2. cut sort of tucks in the ply ? dunno how, to make it conform. I suspect it would look odd. 3. do the deck a bit like a lapstrake, cut the ply into long runs and work from the outside in towards the centreline making some sort of feature of the different levels. 4. flatten out the convex deck beam shape and have it with less dome in it. Probably the easiest 5. instal the convex shape deck in several bits, ie bow to back about 900mm one piece, then from there to start of cockpit another, then another change of angle at aft cockpit bulkhead through to stern. 5. er..? What should I do? Puzzled. |
![]() |
I went the lapstrake route for Ardilla. Her decks are both a slightly weird shape and removable so they were a special case but quite wide planks of 3mm ply easily conformed to that shape.
Would have been slightly more complex to install hatches in though. ![]() |
![]() ![]() |
Chris Waite |
![]() |
I always go for a straight king-plank
That's the shortest midline distance from the stem head to the forward edge of the cockpit, I'm sure you know - ![]() This one is quite short, but the same principle worked on my sixteen foot skiff ![]() Or you can do two straight lines with a hatch in the middle; it should then fit either way. Your friendly designer dogsbody Chris W. |
![]() ![]() |
Port-Na-Storm |
![]() |
In reply to this post by Timmo
Hi Rob.
You've probably worked this out but for the benefit of others here are a couple of pointers I found out the hard way when I was putting the cambered decks on my Whilly Tern, and helped when I was building Katie. The deck needs to be a section of a cylinder not a cone. So the deck beams need to all have the same curve/radius although they differ in length. The apex of the crown of each beam needs to form a straight line touching the top of the stem. In other words a batten laid across the top of the deck beams should touch the top of the stem. I seem to remember whittling away at the gunwale near the stem to get it all to fit. Having a crown in the deck makes it a lot stiffer so 4mm ply should be plenty thick enough. Have fun. |
![]() ![]() |
Paul H (admin) |
![]() |
In reply to this post by Chris Waite
Rob,
I concur with my good friends. Fit lightweight lateral beams, either one central king-plank like Chris did or two if you want to fit hatch(es). Then cut the sheet about 2in oversize to give yourself good access. . You will find this magically constrains movement to 2 dimensions...and yes ply has enough flexibility to follow mild changes in two axes. I like to screw the deck every few inches after first holding the shape roughly with some weights; if you are painting the boat screw holes are not a problem later. Also you get a strong fitting for an essential cleat. When you know the deck fits dry with screws you can add the epoxy and screw/clamp flush with the boat. You can judge this by eye, adding more clamps/screws wherever you can see a non-consistent gap or bulge. This becomes a traditional opportunity to show off your collection of clamps, with an artistic long shot of the boat! -Paul PS: Thanks for the moral support about the wet stuff. Some of us are sensible enough to live 30m ASL, or at least not tie our boats to their trailers. ![]() |
![]() ![]() |
Chris Waite |
![]() |
I would have thought tying your boat to the trailer should work quite well....
Isn't it equivalent to hobbling your horse? Christo the W |
![]() ![]() |
Port-Na-Storm |
![]() |
Down at the old Ancient & Vulnerable we keep our boats on their trolleys and tether them all together like horses outside a saloon.
![]() That's the poop barge heading down stream in the background. At very high spring tides the water reaches the back of the boathouse. ![]() The swans seem to like it. |
![]() ![]() |
Rob Blackburn |
![]() |
In reply to this post by Paul H (admin)
Advice has been followed.
Next sea trial has occurred and mast rake has been set. I suspect there is going to be a lot of reefing on this vessel. Won't be short of sail. https://goo.gl/photos/ic9u2vY5o9YS5Ngg9 The deck will work as cutting out the hatches and the coaming has released the ply (6mm!) to allow it to fit to the compound shape. So all good. The king plank idea made all the difference. Thanks chaps. Onwards... Rob |
![]() ![]() |
Paul H (admin) |
![]() |
Rob,
The windsurf mast plug-in socket is a great idea. Perhaps secure the base of the socket with blocks of ply or a ring of ply glued/screwed to the hull? It could suffer massive sheer stress. The top of the socket will be very strong when decked though. On Illusion I used a windsurf mast foot, minus UJ, that I screwed to a block glued to the hull. The block was also screwed from the outside to spread twisting/sheer forces along the hull. cheers Paul |
![]() ![]() |
Rob Blackburn |
![]() |
In reply to this post by Rob Blackburn
Bit has happened...
Name has been found... Awinya ... named after a lovely freshwater creek that comes out on the west coast of Fraser Island. https://www.google.com/search?q=awinya+creek&rlz=1CCHPZY_enAU631AU632&source=lnms&tbm=isch&sa=X&ved=0ahUKEwiqjOyQ1rzMAhWCqaYKHZUTC0wQ_AUICCgC&biw=1366&bih=633#imgrc=qO-Q4pkyEt2y4M%3A Deck on. Internals sorted 3/4 of the fairing done as she needed a bit Hatches done but I feel they are a bit 'high looking' but will wait a bit before going to the trouble of lowering them down with the 40 grit orbital. She is not getting any lighter either. Now to the rigging phase before painting. I have hit a snag in a way and wondered if anyone has any experience with running sheet lines under decks etc and around corners and out holes and back around and finally into the hand of the skipper? As the sail reefs around the boom the main sheet can't come from the aft end, return to the mid point of the boom and then down to the back of the centreboard case. That was my plan. School boy error it turns out. So really it has to be a continuous sheet and I am wondering whether to put in some copper pipe or something similar to run the lines from the aft deck behind the cockpit, forward under the side decks and then up onto the deck in front of the coaming and back around to cleats. Sounds like friction to me... Alternately have some small blocks under the deck and have them run that way or simply lie the sheets along the deck with some turning blocks... THat is the simplest by far and least complicated (and least attractive) but I have never been one to shy away from complication. I also have realised that I have cut the mast too short today when I did a trial rigging ... as the boom will hit me nicely on the ear. So have to get a plug for the bottom now. See photos. https://goo.gl/photos/FmJfCJPcgPz4eHoz9 Open to all suggestions on sheets.. Otherwise just some sort of fairlead under deck..? R |
![]() ![]() |
Chris Waite |
![]() |
This mainsheet problem
How about running it from a (rope) horse, or eye behind the cockpit, up to the aft end of the boom, through a block forward to the goose-neck and another block. Or are we talking balance lug - I don't remember? In which case, as far as the mast just below boom level, then through a turning block down to the 'partners', (isn't that what the hole in the deck for the mast is called).... And aft to the front of the cockpit? Am I understanding correctly And making sense? Chris W |
![]() ![]() |
Rob Blackburn |
![]() |
Of course... There was no way I was thinking that way. Weird... I was focussed totally at the other end.
Yes it will work easily. The sail is a balanced lug and as it rolls/reefs around the boom the turning block on the mast needs to be attached to the mast. That will be easy enough. Stainless saddle. eg... https://goo.gl/photos/XmU2F5NLAJZgs4r1A Thanks. I have the morning off so will attack it today. Cheers Rob |
![]() ![]() |
Rob Blackburn |
![]() |
For anyone who is interested the situation is getting interesting here. I suspect I will be launching this canoe in about 3 weeks.
Have rigged the bilge pump etc which I think might be a real necessity and have the topsides all done. All that really remains is to paint the bottom of the hull. Have bought myself a Wagner 585 spray gun and have watched all the Youtube content available and am now in theory proficient in the subject. Shall know on Saturday. I have been thinking of one of these for a while and after putting 5 coats on the deck to get it to cover nicely have thought this might be a better solution. Probably will mean different problems but will see. At this point I think I will flatten out the gloss enamel to get a semi matte/ work boat look. I have a bag of flattener powder whatever you call it and used it on the deck and the nice thing about the look I think is that it hides the imperfections nicely. You don't get the mirror like effect that really sticks out. I always said this canoe was to be viewed from 1.5m away. Here are the shots up until now. I have my mate the metal worker allegedly finished the roller reefer for the boom yesterday so shall go and pester him for it today. I think it will work well. https://goo.gl/photos/FmJfCJPcgPz4eHoz9 Rob |
![]() ![]() |
Rob Blackburn |
![]() |
I have just had to do 3 weeks at 50 hours a week for work so not much progress to report.
The spray gun turned out well finally. You should really paint a chook house or something first to work out how to use the basta@d. Turns out you need to do the following. Heat the room/canoe to about 24 deg c Heat the paint Thin the paint about 20% with spraying thinners Set the air supply at full bore. Reduce the needle valve opening to about 25% to maximise dispersion of the paint and minimise drop size. Cover everything of value with a sheet. Put canoe in shed out of wind Wear a good carbon filter mask... Then it does a great job. So painting is finished. Can you believe it? Couple of bits of overspray to fix and time to screw on the fittings. (bit of white to go on the rudder truth be known) Onwards and upwards. R |
![]() ![]() |
Paul H (admin) |
![]() |
Well done Rob. I've never done real spraying and stuck to the roller and light brush technique.
Did you use 2-pack paint? I used Jotun 2-pack paint on MilliBee. She is 10 years old and the paint is in great condition. ...apart from a few battle scars. Paul |
![]() |
In reply to this post by Rob Blackburn
Hi Rob. Following your progress with interest.
Like others I've never sprayed two pack, but like the idea. Have filed your notes below for future reference. Meanwhile I have a couple of questions to fill in the details... Were you using a normal compressor or an HVLP system? and what sort of spraygun, a gravity fed one (Paint pot above gun) or the other sort (pot under gun with paint drawn up by suction I guess)? Appreciate your suggestion of practicing on something less important. Looking forward to pics of the finished product. Tim.
|
![]() ![]() |
Rob Blackburn |
![]() |
In reply to this post by Paul H (admin)
I have used a two pack on the mast/boom/yard but decided to go with an oil/polyurethane product call Norglass Weatherfast. http://www.norglass.com.au/products/weatherfast-gloss
I have added 25gm per litre of flattening agent/powder to take the bright shine off it. I did that because I have a thing about the reflections/angles/chines on ply boats that really are accentuated with mirror like gloss. I also want to use the thing and be able to repair it easily. I had my 'big boat' the Core Sound done in 2 pack and it is a fantastic finish but I just knew I could not do it myself so went down the is road. I just like that older/softer/flat paint look on boats so you see the lines/sheer etc but not every ripple and reflection. Besides, I am a bit hard on my things at times and it would burn too much if I had to redo the whole thing because I scratched the 2 pack. R |
![]() ![]() |
Rob Blackburn |
![]() |
In reply to this post by Timmo
Like others I've never sprayed two pack, but like the idea. Have filed your notes below for future reference. Meanwhile I have a couple of questions to fill in the details... Were you using a normal compressor or an HVLP system? and what sort of spraygun, a gravity fed one (Paint pot above gun) or the other sort (pot under gun with paint drawn up by suction I guess)? Wagner 585 ... http://www.wagneraustralia.com.au/catalogue/diy/sprayers/flexio/flexio585/#/overview I also bought the 'brillant pot' with a finer needle valve for smaller droplets. https://www.bunnings.com.au/wagner-600ml-brilliant-spray-attachment_p1560424 It is a low pressure high volume system. It works as you say by venturi effect. 
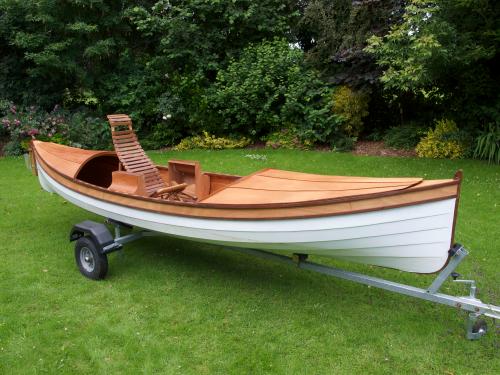
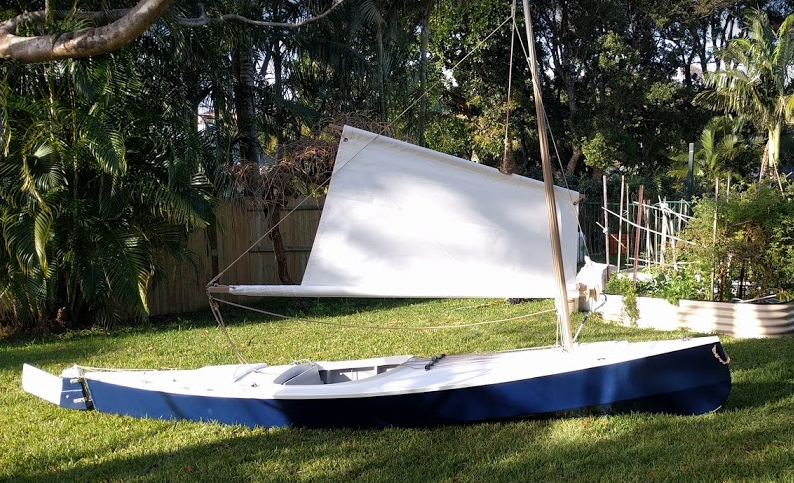
I reckon if I was to give it one more coat, knowing what I know now then it would be 9/10 finish. I used 800 wet and dry with water and one drop of dishwashing detergent to half a bucket of water to rub it back between coats as there was some big droplets in a couple of areas. But I can't be bothered as it is good enough. I keep telling myself after a couple of weeks of use this will all be forgotten and not to obsess. Appreciate your suggestion of practicing on something less important. 
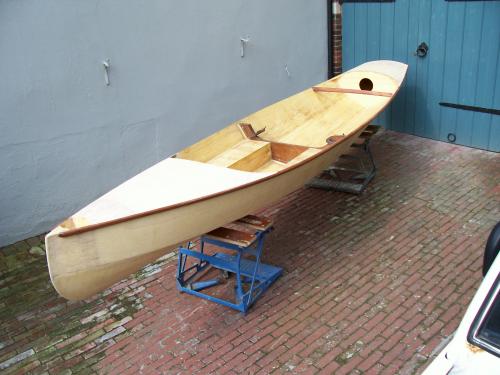
Well, maybe just build another canoe or something next...? Looking forward to pics of the finished product. Stand by... Rob Tim. > On 18 Jul 2016, at 20:44, Rob Blackburn [via UK HBBR Forum] <[hidden email]> wrote: > > I have just had to do 3 weeks at 50 hours a week for work so not much progress to report. > > The spray gun turned out well finally. You should really paint a chook house or something first to work out how to use the basta@d. > > Turns out you need to do the following. > Heat the room/canoe to about 24 deg c > Heat the paint > Thin the paint about 20% with spraying thinners > Set the air supply at full bore. > Reduce the needle valve opening to about 25% to maximise dispersion of the paint and minimise drop size. > Cover everything of value with a sheet. > Put canoe in shed out of wind > Wear a good carbon filter mask... > > Then it does a great job. > > So painting is finished. Can you believe it? Couple of bits of overspray to fix and time to screw on the fittings. (bit of white to go on the rudder truth be known) > > Onwards and upwards. > > R > > If you reply to this email, your message will be added to the discussion below: > http://uk-hbbr-forum.967333.n3.nabble.com/Katie-Beardie-as-done-in-Australia-tp4028760p4029567.html <http://uk-hbbr-forum.967333.n3.nabble.com/Katie-Beardie-as-done-in-Australia-tp4028760p4029567.html> > To start a new topic under Builds in Progress, email [hidden email] > To unsubscribe from UK HBBR Forum, click here <http://uk-hbbr-forum.967333.n3.nabble.com/template/NamlServlet.jtp?macro=unsubscribe_by_code&node=1558041&code=dGltb2NAYnRjb25uZWN0LmNvbXwxNTU4MDQxfC0xMzAzNDU5MTk1>. > NAML <http://uk-hbbr-forum.967333.n3.nabble.com/template/NamlServlet.jtp?macro=macro_viewer&id=instant_html%21nabble%3Aemail.naml&base=nabble.naml.namespaces.BasicNamespace-nabble.view.web.template.NabbleNamespace-nabble.view.web.template.NodeNamespace&breadcrumbs=notify_subscribers%21nabble%3Aemail.naml-instant_emails%21nabble%3Aemail.naml-send_instant_email%21nabble%3Aemail.naml> |
![]() ![]() |
Rob Blackburn |
![]() |
Finished.
What fun but I am also glad that it is over. It just took a long time. In the end I started to see why more than one person has named their boat Perseverance. I used way more epoxy than I thought and only 2 pencils. Says something doesn't it? Launch next week after I get back from a trip down south. Thanks to everyone who took the time to give me some advice... and especially to Chris and Graham. Full report next weekend hopefully. Rob. ![]() https://goo.gl/photos/FmJfCJPcgPz4eHoz9 |
Free forum by Nabble | Edit this page |