Skin on Frame rowing boat

1234
1234

|
|
Hi Alan, Re your scarf joint, if sounds as though the glue hasn’t fully cured, if it has stayed stuck to the wood but pulled apart. Check the mix ratio, is it 2:1 or 5:1, how much thickener did you use if any, what temperature was it curing at. I know some people have got it to cure down to around freezing point but it takes a mighty long time. If the other joints seem OK then shrug and move on. I’m finding it difficult to fully understand your problem with the stringers. I presume the stringers have to stay permanently attached to the frames? Are the frames bevelled to provide a surface to glue/screw the stringers on to? If so why not just glue and screw the first laminate using suitable screws and leave them in place? Then glue and clamp the second laminate over the first. If you don’t like the idea of buried screws how about using glued dowels? Or am I missing the point. Regards Graham. Sent from Windows Mail I now have two problems:
One scarf joint fell apart when bent around the top of the frames. It could be due to not cleaning the wood with cellulose thinners, or improper curing. Any ideas? There is epoxy visible equally attached to both halves and it came apart with stringy bits, and failed slowly. Also, how do I laminate my stringers in situ? If I do it off the boat they will be under much greater stress when attached to the frames and this is what I am trying to avoid by making them in two layers. But if I laminate in situ (which I must) I won't be able to remove the screws which fasten the first layer! I did think of taping the stringer with masking tape and just gluing the second layer over, leaving a small piece of tape embedded at both sides of each frame position. But tape would not provide enough tension to hold the twist at the stem. Other people laminate stringers so there must be a way but I'm all out of imagination - suggestions wanted! If you reply to this email, your message will be added to the discussion below:
http://uk-hbbr-forum.967333.n3.nabble.com/Skin-on-Frame-rowing-boat-tp4027800p4028182.html
To start a new topic under Builds in Progress, email [hidden email]
To unsubscribe from UK HBBR Forum, click here. NAML |
|
|
Sounds definitely like an epoxy cure problem.
There are really only a couple of things that cause cure failure in epoxy. Firstly, as Graham has pointed out, getting the mix right is very critical. Get it 5% out and the epoxy won't cure to anything like the specified strength. Get it more than 10% out and it may not properly cure at all. The other major problem is using having too low a temperature or too high a humidity when using epoxy. The initial cure phase needs a temperature of at least 15 deg C, ideally higher, in order to kick off the reaction, although once the cure reaction has kicked off the temperature can drop to maybe 10 deg C without major ill effects. I never, ever, use epoxy below 18 deg C, and often warm things up a bit more than this to be safe. Also, the relative humidity needs to be quite low, ideally down around 40%. Anything over about 60 to 65% is too humid to get a good cure with most epoxies. |
|
|
MilliBee was built during the winter in the back garden underneath a plastic tent I built from a 2x2 frame and polythene builders sheets stapled to the frame.
The advice from my epoxy supplier was to provide heat for 2 hours to kick off the reaction, after that it would look after itself. I used a small fan heater on the lowest thermostat setting on a mechanical clock timer. I covered everything with large dust sheets to seal the air gaps and set the timer for 2 hours. Every joint was fine the next day, during very cold weather it just passed the thumbnail test but I knew the reaction had started. The heater also reduced relative humidity, as per Jeremy's comments. When Epoxy cures it is an exothermic reaction. It generates enough heat for the reaction to continue - however you need to kick start the reaction with 2 hours of heat above 10 deg C (for a typical medium hardener). Also in cold temperatures it takes at least one week for the cure to reach full strength. -Paul |
|
|
Graham, you're missing something because I left out some essential info. All the sub-assemblies will be screwed together so that, in theory, I can easily take it apart in the future; so curved, twisted stringers will be removable sub-assemblies. But, I've just had the idea that I can maybe laminate the two layers together while screwing them to the frames; I'll try it with a few and see how it goes.
All, I'm using UK epoxy resin at 2 to 1 mix and I think that your consensus that the mixture ratio might be wrong, is probably right. I'm weighing out the contents on a digital balance, but pouring accurately from the containers is very difficult, maybe I'll get some disposable syringes. Does anyone use pumps fitted to the containers? As for humidity, I'm mixing in the garage which is probably close to outdoor humidity and using in the conservatory which must be somewhat drier - it's mildly heated and a haven for cacti and succulents which don't need much water. Thanks for advice, I will also keep a thermometer handy in future too. |
|
|
I am a fan of pumps when mixing epoxy, have always worked well for me, especially for West which I think is a 5:1 mix, needs more care (not something I'm renowned for) to get right on scales.
Measuring by volume without pumps is problematic. First it's difficult getting an exact volume in the measuring pot. Second, some is always left in the measuring pot... more innacuracy. Weighing mkes lots of sense when its a 2:1 mix. Take your point about pouring. The syringe idea would work. You can get big vetinary ones very cheap (I bought a box of 100 a few years ago, can't remember where, but that box will last me many years yet.) If you warm the containers the epoxy componants will flow more smoothly and might be easier to pour in a controlled manner. I presume you are placing the mixing pot on the scales (cheap set of digital kitchen scales wrapped in clingfilm is my solution,) zeroing the scales, then adding the epoxy components directly into that pot. If you are than it's possible to watch the scale and if a little too much of one component goes in you can add a little more of the other to keep the ratio right (though small amounts will be easier with those syringes!) West published a design of storage they suggest you build to keep their epoxy at the right temperature. Basically a cupboard with an incandescent light bulb as a heat source. Haven't tried it yet (my epoxy lives on a shelf above a thermostatic heater in the workshop) but seems a sound idea. Can't remember what ratio your scarph joints were on the joints that failed. Clearly the thinner the timber the longer the joint needed. But I'm sure you have that covered. Regarding laminating stringers... I've had success with whipping twine to hold a joint in place. The twine did stick but I used a spokeshave, rasp and sandpaper to make it go away. Tim
|
|
|
Thanks for the clarification Alan, I get it now. Make sure to cover everything you don't want glued with parcel tape.
I have used UK Epoxy successfully for years and it is very forgiving. It has a 2:1 ratio which gives quite a bit of leeway. I use the pumps they supply, combined with a variety of other bits and pieces. I've calibrated the pumps with a felt tip pen so that I can mix smaller amounts and avoid waste, seems to work fine. The tubs pasta sauce comes in are great mixing pots and can be re-used quite easily. I also use a great big packet of ice lolly sticks for stirring and if you leave the stick in the pot and let the epoxy go off, a quick twist usually brings the whole lot out in one piece like a misshapen toffee apple, leaving the pot nice and clean. I also have a box of the blue nitril gloves used by medics which are supposed to be much better than the latex ones at keeping the epoxy gremlins at bay. And when it all goes horribly wrong, a heat gun is your best friend. Have fun. |
|
|
In reply to this post by Alan
Hi Alan, just to say "Good luck with SOFty in the New Year"! I shall be following her with interest.
Regards, Mike |
|
|
In reply to this post by Alan
I meant to add . . .
 . . . . . .
Epoxy - I have no pumps or measuring jugs. My epoxy (MAS) and hardeners go into the older-fashioned ketchup or brown sauce squeezy bottles with flip lids and very small holes in the top. I have 2 tiny cheap modern electronic taring scales, a 50g and a 500g (also a 3000g but I use that more for weighing boat components). I don't waste much epoxy, for small jobs I can make mixes as small as 1g, quickly and accurately. For small mixes I use a lot of cut-off alu beer cans for mixing in, they help to dissipate the heat of the epoxy, if needed, even floating the can on cold water, if necessary, or on warm water if it needs warming up (or I use a hair dryer). Having tare-weighed the resin batch I multiply that x 0.45 to get the hardener weight and then add that. (It's a 2:1 ratio system by volume.) I love this system, I would never, ever, ever, go back to weighing by volume. PS: I use MAS Trade Epoxy A (aka Blue Dolphin) with fast and slow hardeners (cheaper than retail epoxy if I buy more, it stores for ever). I often use e.g. 70% slow, 30% fast hardener, or whatever, to get the setting speed I want. With tare-weighing it is easy to do this for each individual mix. Other than epoxy, for joints/laminations with no end grain and no gap I often use Everbuild Lumberjack Polyurethane glue which comes cheap from the Builders' Merchants in a handy 750ml squeezy bottle. I use both the 5-minute version and the 30-minute version. I can unclamp the 5-minute version after 30 minutes, to be on the safe side, and it has full strength in one hour. For appropriate joints, it is better than epoxy, e.g. I use it for bare unprotected woodwork outside in the yard or wherever, where epoxy would crack up in the first wet-and-frost unless well protected with paint or whatever. But if there are gaps, forget polyurethane, the foam has no strength, whereas epoxy, filled, is a structural filler. Regards, Mike |
|
|
Some cracking tips there. I've a collection of squeezy honey pots, they now have a use.
One question... the Blue Dolphin epoxy is advertised as having a brown colour when cured, how brown is that? If used for sheathing cedar strip would it then need painting, or is it still translucent enough for varnish?
Tim.
|
 . . .
. . .
|
|
On Thu, Jan 1, 2015 at 5:48 PM, Timmo [via UK HBBR Forum] <[hidden email]> wrote:
It's like a dark varnish, still translucent and would be excellent for cedar strip, in fact nicer than clear IMHO. I have 6L languishing in the garage, purchased for a giveaway price at Beale last year. The most important tip that was drummed into me by all the knowledgeable epoxy workers was to make sure you have a large clock with a sweep second hand. Install it at your mixing station. Now mix constantly for 180 seconds, going right into the corners of the mixing pot. It's boring, but that's what is needed! Also, don't use mixing cups with ridges or indents. The hardener will just sit in these and, if mixing small batches, it throws out the mix ratio considerably. Never had a batch failed yet although I've only ever used 35L of the stuff. After epoxy has cured, pull or peel off the epoxy left in the mixing container. If it's sticky on the bottom or inner surface you didn't mix properly :-) HNY PP |
|
|
In reply to this post by Timmo
Tim, In the Epoxy A system, the Resin and Fast hardener are clear-looking. The Standard, or as I call it, the Slow hardener, is brown. So the exact shade of brown depends on the mix.
There is "varnish" as in 1950s-like oil-based varnish and there is "varnish" as in modern 2-part polyurethane varnish, the former being warm yellow-to-brown, the latter being almost colourless, I think. I never got hooked on the latter, in aesthetic terms, so the exact colour of the epoxy when used as a coating is not too important to me. What is important to me is that all the MAS hardeners are non-blushing when used in sensible dry-ish/warmish working conditions, and that as a coating, the MAS system will last for years with no varnish or paint on top whatsoever. Peter Johnson at MAS UK has a mast that has been 100% outside for 6 years and it is fine. As my boats probably spend under 1% of their lives outside, I don't feel the need to overcoat MAS epoxy, unless I want to, and I often just use 3 coats of it, but preferably 4. Incidentally the hardeners sold with the Trade version are compatible with the hardeners sold with the Retail version. Regards, Mike |
|
|
In reply to this post by mike160304
Thanks so much for all these useful comments. I just checked the temperature in the garage and conservatory and got 14*C and 17*C respectively, very low as it seems a warm day today. I'm going to modify the forward frame to make it wider today so I've turned up the heat in the conservatory. I like the idea of squeezy bottles; I'll see what we've got lying around. And I'll look into syringes.
|
|
|
Nice 12' sail and oar skin on frame craft on this blog. Thought you might enjoy looking over her.
https://sites.google.com/site/helium12sofsailboat/ And a lovely 16' SOF craft from Germany http://forum.woodenboat.com/showthread.php?184225-16-SOF-row-sail-Boat-quot-Hela-quot |
|
|
Thanks BrianP. I couldn't see the 12' page but the 16' boat looks very impressive. I liked the double sided abrasive stick for fairing the stringers to the stem. I'm going to have to steam some ribs into my boat so I will probably have to buy some wood; you can't steam teak and I don't fancy laminating it in place.
Today I am gluing a cheat piece to the stem, to fair the front of the keelson, and using a fan heater to accelerate the cure as I hope to add a couple of pieces to thicken the stem. These extra pieces will cut away to provide lands for the stringers. |
|
|
Try this route to the 12' SOF http://forum.woodenboat.com/showthread.php?186425-Design-and-Performance-of-Skin-on-Frame-Sailboats
|
|
|
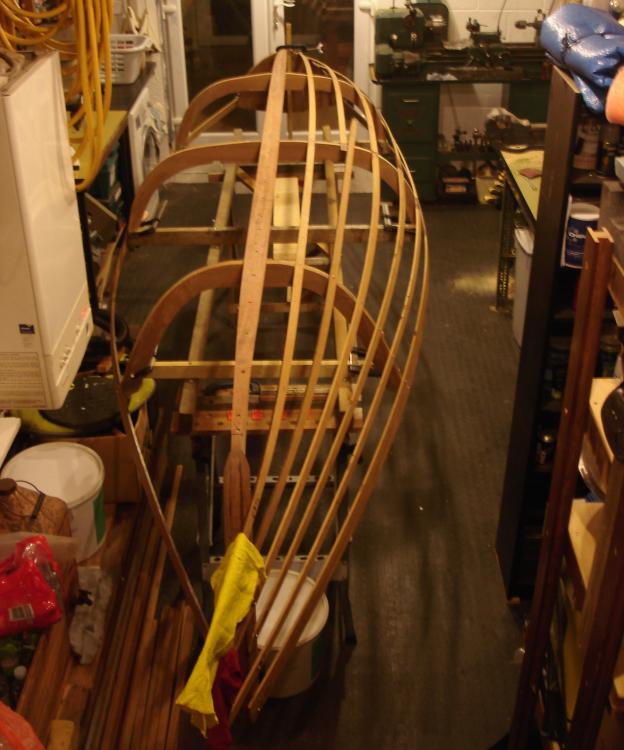
About time I posted an update. I dismantled the boat from the conservatory (plants guaranteed to be damaged), made the forward frame an inch wider each side and added some thickening pieces to the stem which were then shaped prior to marking and chopping out rebates for each stringer. Then I set it up again in the garage which is rather cramped now, especially for access to the washing machine (top left in picture below) but the plants are safe. You can see that another scarf has come apart, but at least i know what to do about it now.
 Anyway, I'm troubled by the problem of laminating stringers in situ in a way which allows me to remove them; and also by chopping out notches for the stringers, and a few other things. So, I'm considering abandoning the idea of a dismantle-able skin on frame, and going for strip planking - in teak as that is what I have got. It would mean adding at least one former between each frame and then cutting a huge batch of strips, a lot of scarfs, but I might end up with a better boat. What does the team think? By the way, the shape is much better with the widened frame; and I have found a supplier of epoxy specifically for teak, details next post. |
|
|
Hi Alan, I have had these semi-start-again dilemmas and I feel for you.
Never done strip planking, but at the risk of stating the obvious, teak is very heavy, strip planking is usually done with cedar, the lightest suitable wood available. I had a quote from Robbins last year for planed-to-size cedar strips, for a project that I did not pursue, and the quote was fair, I thought. All depends on whether you want a heavy boat or a light one. Regards, Mike |
|
|
In reply to this post by Alan
PS That does look like a nice SOF build that is well on the way, and "epoxy handling" problems can be overcome, e.g. maintain a workshop temperature over 15 degrees C, get an e.g. 300 gramme electronic taring scale for accurate weighing, and so on. Scarphing is the classic way, but butt straps on the inside are an easier alternative. Just a thought,
Mike |
|
|
Thanks Mike, I don't mind a heavy boat and I think 8mm of teak (before fairing) will not need glassing. But I haven't made a decision yet. I bought some syringes for accurate dispensing of epoxy but forgot to use them!
Here is a link to epoxy for teak: http://www.makewoodgood.com/oak-teak-glue-wood-glue/ |
|
|
Hi Alan, please don't take offence at any of the following, but as you are asking for comments, I can only give my honest opinion.
Have you actually experienced a boat as heavy, in terms of weight per size, as a boat strip-planked with 8mm teak will be? It is something of a U-turn compared with the SOF boat you have shown us so far. Secondly, for the small epoxy mixes that are often required in our stop-go, DIY building of small boats, measuring containers are tricky and messy and syringes sound attractive, but in practice I have found them very messy. Pumps are awkward for small mixes unless you have laboratory-size pumps. [I sometimes use syringes for applying the epoxy mix but not for metering the resin and hardener.] As I have tried everything, and now actually enjoy mixing epoxy, the following is my take on the issue, copied from a previous thread. Regards, Mike Epoxies can be mischievous. Either you are in control, or the epoxy is in control. I mix Epoxy by weight, not by volume. I use no measuring containers, syringes or pumps. My epoxy resins and hardeners go into the older-fashioned ketchup or brown sauce squeezy bottles with flip lids and very small holes in the top. I have 2 tiny cheap modern electronic taring scales, a 50g and a 500g (also a 3000g cheap kitchen scale and a 16 kg luggage scale with remote display, but I use these more for weighing boat components). I don't waste much epoxy, for small jobs I can make mixes as small as 1g, quickly and accurately. For small mixes I use cut-off alu beer cans for mixing in, they help to dissipate the heat of the epoxy, if needed, even floating the can on cold water, if necessary, or on warm water if it needs warming up (or I use a hair dryer). For larger mixes I use baked-bean tins, etc. I discard all cans after use, I never clean them out. My resin systems (MAS) are 2:1 ratio systems by volume. Having tare-weighed the resin batch I multiply that x 0.45 to get the hardener weight and then add that. I love this weighing system, I am in control and there is no mess. I would never, ever, ever, go back to mixing epoxy by volume. If you mix too much epoxy, one trick with epoxies in general is to put the mixed epoxy into the fridge or freezer to delay its setting. After hours or days, it can be fetched out, warmed up and used. |
«
Return to Builds in Progress
|
1 view|%1 views
| Free forum by Nabble | Edit this page |