Blue Moon
1234
... 14
1234
... 14
|
|
I'm Back...About 4 years ago I joined this forum to document the rebuild of my boat, and possibly join in on visits to the broads.. However at that point life got in the way, or rather two deaths.. But that has no real part in the story other than a delay..
Way back in the very late 1970s very early 1980's there was an outbreak of small single hander mini twelve meters and one or two boats of a similar style not following the metre class rules.. I wanted one, but couldn't afford to buy, so I cleared a patch of land .. started to get ready and... The RAF Posted me to the Outer Hebridies. Life and the RAF then intervened for many years. Till some time later in1996 I was working in Saudi (not in the RAF) and not fifty feet from my accommodation, there were two people building their own boats. After about three months of Drawings, scrapped ideas, and two plasticard models. I came up with some plans.. Yes I'm mad enough to design my own boat.. The principles of the design were: Two seater, tandem seating 16ft LOA, maximum draft 3ft. Style to be very roughly that of a Yare and bure one design http://www.ybod.org.uk/ So work commenced on a design, which had departed from looking like a white boat.. The beam was to be 4 ft, and I've put a retroussé stern on the design. At this point I came home on Holiday and found the class I intended to race in had disappeared (allcomers under 17.5ft). So the design was extended to 18ft 6 inches with parallel sides to enable the extra to be cut out later if required.. So back in the sun a bit of sand next to the other two boat builders was claimed, some old target towing banners were rigged up to cut the sun (as the others had) and work commenced.. I'll leave the story there for the next posting, but some years later Back in the UK I found FREESHIP a boat design programme. The Figures were entered and I found they matched my hand calculated figures. Below is the hull drawings produced by that programme. 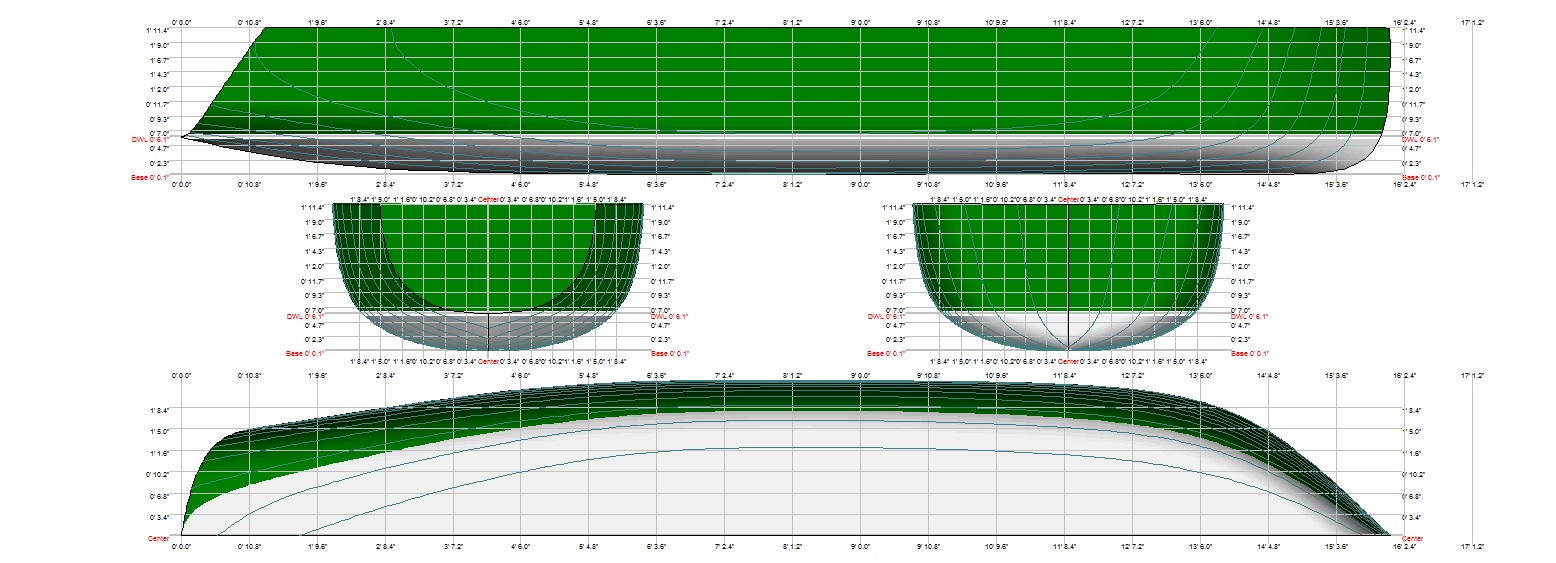 |
|
|
I Arrived in Saudi a week after the tower block the American military were living in was blown up, so with security so tight, I didn't risk a camera, so there are no photos of the build..
I was taking advice from those already building, as they had been touring the area finding where to get stuff. One guy had already built a small wharram catarmaran, to then discover his home port is Cyprus said.. 2 hulls two fees...So he sold that and was building a double ender of about 20ft ( Selway Fisher design?) . The other guy was building a 30ft seagoing long keeled boat. Both of these were in their upside down plank the hull stage, when I arrived.. So a few notes about materials etc.. Epoxy resin, it's made locally for the lining of raw oil tanks with glassfibre to prevent corrosion, and to make glassfibre tanks, it's extremely cheap. 5 litre for less than £10.. Glassfibre, imported not cheap, limited range available compared to the UK, Colloidial silica for thickening, very cheap, a full size bin bag full for 10 riyal.. (£1.67) Plywood, marine not available, a poor WBP, was available. Hence covered both sides with glassfibre when used. 40 mile round trip to get this... Solid woods, quite a good range available, but you had to watch they didn't palm you off with duff stuff. The wood yard was only a hundred yards away, unfortunately there was a dual carrigeway between so a couple of mile round trip... Marine parts not available, stainless screws of variable quality, hence the use of strange things, which will be reported later.. Tools.. you had to be very carefull, a lot of fake big name stuff around, but when you found it, a good tool was cheaper than the UK.. Working area and Conditions. 30C mid winter, 50C mid summer IN THE SHADE. Ground solid under a foot of sand and sawdust, we had to put up no smoking signs after someone threw a fag end into the sand and it caught fire.. There was that much sawdust in it.. No point clearing the sand away.. it just blew back in.. Humidity could be HUGE we were within sight of the coast, on the bad humid days the resin would turn into rubber instead of solid, so you would have to chisel off and start again.. We were issued with 10 Pairs of overalls, the guys working on the flightline would go through half that in a day.. Me I worked in a lab 90% of the time so I didn't have to wash them overnight, just put them in the laundry.. Each working on the boat day, we each would take out with us a 2 gallon insulated container of water /Ice / Lemon, we would drink that and more.. I was a shift worker, giving lots of spare time, I wish I had that now.. |
|
|
The Q,
On this forum you are not mad for designing your own boat! Is she a bit tender with a beam of 4ft? The water line beam looks to be 3ft 4in in the Free Ship calculations - but maybe she has a lot of weight/ballast? Do you have any pictures of her? regards Paul |
|
|
Pictures will be following when I catch up a bit more on the story, however, there are none of the original Build.
As for ballast, yes, I think about 150-200KG. I've got a strain gauge for my crane and I am intending to give the hull and gear another weighing this weekend to work out the final amount. As I'm nearing the end of the rebuild except for painting / filling / sanding / painting / filling / sanding / etc. It's time to have the keel core made ( a welded steel T) then start construction of ballast weights in a suitable shape.. A little more of my design thinking. If you've seen the International 2.4mR https://heikkae.kuvat.fi/kuvat/Purjehduskuvia/2.4+mR+World+Championships+2015+Rauma/Friday+14.7/ and the Illusion class https://www.facebook.com/Illusion-Class-248612339896/ That was the basic philosophy on how I'll sit and control the boat. But I wanted something little bigger and to accomodate SWMBO in tandem as well, so instead of the 12ft for the illusion or around 14ft for the 2.4mR I've gone for 16ft ish or the design was to be two lengths of ply long. I didn't want the pregnant whale shape of the above two classes. I spent many hours playing with shapes and drawings looking at the central cross section from a 3 ft nearly flat bottom with a sharp bend to the bilge, to a complete semi circle section. Eventually I settled on a 1 foot flat then 18 inch radius curve then a 9 inch verticle planked hull sides.. The shape of the hull also altered the overall weight of the boat each time as well, and I definately wanted a keel boat not a ballasted dinghy. Going wider also increases broads Tax, 18inches wider means £26 more a year... Topping the hull a 1ft wide side deck with a slight slope up to a 3 inch high cockpit combing.. In the foredeck a hatch to allow for a tabernacle and counter ballanced mast. My eventual design comes out at 350kg+ me+ SWMBO, against 2.4mR of 260kg + crew or an Illusion of 160kg of lead+ boat + crew. Going up a bit, I sail a Yeoman in the winter, that's 20ft and weighs 750Kg ish.. As it is SWMBO is no longer able to sail, So I'm able to up the ballast..and turn it into a single hander.. Draft There is no ifs or buts about this, maximum draft 3 ft, I sail on the broads and anymore would be extremely limiting. As it is The first sailing on Black Horse broad each year leaves a brown trail of mud by all the other boats in the club.. |
|
|
So having designed it all I came home to find Allcomers B class had disappeared, yep, no under 17.5ft sailing at the club, that is no dinghies...
So on return to Saudi the design was extended to 18.5ft .. A set of trestles were set up in the sand, very carefully lined up and leveled With the help of blocks screwed to the trestles two 6inch wide, 18ft long ply planks were set on edge, 2ft apart, but sown together at the bow ( very strong woven string) . On a wooden work bench I got given, but heavily modified by me, a set of ring frames were made, outside edge 1/4inch inside the perimeter of the hull, inside edge 3 inches inside that, most having a central 3 inch wide pillar. 3inch wide strips were inserted inside the frames, and a fillet of filler both sides to bond the pieces. Note two 1/4 inch deep one inch wide tabs were left on the outside in line where the 3 main planks and the deck would be. These were interlocked onto the planks on the frame, along with the blank stern piece. Then two more strips 18ft long 3inches wide, were interlocked at 2ft spacing at the top opposite the planks on the trestles. These strips were of course curved to follow the hull lines.. Interlocking.. Two slots cut where each piece crossed each other half way through each. Then the bottom plank 1ft wide tapered at the ends was sown onto place on top of the skeleton. The two main side decks were clamped into place and then sown on. This was followed by the two 9 inch wide side planks. After much checking of alignment, All joins were then filleted with the thickened resin.. Then the side planks were offered up, 4 inch wide, placed and clamped on. Then a pencil run along the overlap at the ends, the excess cut off, then the plank sown and filleted on. Each side alternately of course. Getting up into the bows was hot work. The boat was then sanded down on the outside, filled, sanded etc, this removed the string. Then two coats of fibreglass cloth was resin ed on. Then some frames were made to hold the boat and then the whole thing turned over. Part two next time.. |
|
|
This post was updated on .
I am looking forward to Part two! Are you in Saudi now? I worked in various parts of Saudi Arabia as an airconditioning engineer during the 1980's. I expect it has changed a lot since those days, although probably there are still big changes to come. I do remember the dhows that were still carrying cargoes along the Persion Gulf, one of my jobs was right on the coast and several would pass by during the course of a day. Unfortunately I dont know where they came from or where they were going and I did not get the chance to look at them close up in harbour. They were very traditional style wooden boats and although they were by then fittted with engines they still had sailing rigs, perhaps to help with loading/unloading. Surely all that must have gone by now? Your mention of epoxy resin at less than £10 for 5 litres, and other low prices for materials would almost make it worth me going back to Saudi for a holiday, but I am not sure that is easy to arrange. I do remember petrol and diesel being so cheap that forecourt attendants never bothered to look at the meters on the pumps - they just stuck the filler in your car, switched on the pump then waited until fuel was freely pouring out on the road before switching it off, then they asked for a nominal few riyals. It was joked that petrol was cheaper than water and if you brought water in bottles it may well have been. Is it still like that? Anyway good that you are designing your own boat, no reason why not and a very satisfying way to carry out a boat building project. The computer image you show probably does not give a good idea of the finished boat, for one thing it does not show the keel, also I wonder if you will actually shape the bow quite like that (looking in the view from above). |
|
|
When I left Saudi in 2002 a litre of petrol cost about 3p, 3 litres of Coca Cola cost 16p
A center plate box was built and inserted, as was a box for a cassette rudder. The whole of the inside was glassed over. The foredeck with hatch for mast to tilt through, was completed. Lids were made for each compartment of the boat, only the aft one over the rudder and the foredeck hatch will be sailed with. When i came to make the rig, it was conveniently about the time one of the others was about to make theirs, we trundled off in a company minibus and came back , with five pieces of spruce, 2inches thick, 8inches across and up to 20ft long. All tied on the roof with ropes going through the windows.. For my mast, I cut it down the middle length ways, spun one half round and over. Then hollowed out about 1.5 inches semi circle in each. Then glued them face to face. Except for the bottom three feet, it was the marked up and planed into an octagon , then to sixteen sides then to a circle. The gaff was half of 1, 12ft length, that half cut in half lengthways spun round and glued together. Then rounded off. The jaws were made from some iroko type wood lined with leather. The mini bus came into use again as the above piece of iroko was much larger, 8inch wide, 2inch thick , and 16 ft long. This piece was cut lengthways, many times to produce 3/8ths wide strips intending to plank the decks and stern with the strips. The strips were put to one side to continue on another day. When I came back, one piece had tied itself into a figure 8. All the others were severely bent.. The best were selected for the stern and the deck kingplank. Much clamping and weighting was required to epoxy the pieces into position. I had intended to plank the deck lengthways, but this was now impossible, so after a few trials I selected 45degree, planks , so they are only just over a foot long, so I could recover more of the wood. This was the sanded down and varnished. A trailer was made for me by a guy in the same accommodation building, the hubs etc came from scrapped bomb trollies. A steel drop plate and two ballast weights were made by a local fabricators. Flat Sails were made by a car cover makers ( covers for cars are popular due to sun and sand). The boat was licensed, using the one sailing club kit.. You are required to have on board even for a windsurfer, a Saudi flag, flares, first aid kit, life raft and various other bits. The sailing club kit just went from boat to boat as licensing was required.. It was the launched, sailed twice it needed more ballast, and a bigger rudder. And then.... We got moved to the mountains, it was never sailed again in Saudi. When I came back it was put into a container, and shipped home. I was told six weeks... Two weeks later a phone call from felixstowe.. It had arrived, rush round to hire a tow truck, actually a Luton van with tow bar, as the rest of the container had all my stuff in it... Part 3 coming up. |
|
|
A week or so after I came back I was told someone needed a crew on a yeoman http://www.yeomankinsman.org.uk/yeoman/yeoman.shtm he had just bought, so for the last 18 years, I've been sailing with him each winter, though not this winter coming.
Last week he was helicoptered to addenbrookes hospital after a major motorcycle accident. He has, a fractured skull, smashed wrist and ankle. Fractured pelvis, broken femur. He hit the front of a tractor, after hitting a pothole first, the police say it's not his fault.. I also began sailing yeoman every summer, so the boat got stuck in a shed. I ended up as national chairman of the yeoman fleet with out ever owning one.. About five years ago my last summer yeoman owner sold up. I decided to restore the boat. By this time the sailing club had started a sailing school. 80kids learning every Thursday evening, and some adults.. We now have a large below 17.5ft class. The below 17.5ft class has 4 races every Sunday, the above 17.5 ft classes only have one allcomers race each Sunday . So the decision was made to return the boat to around 16ft. The boat was pulled out of the shed and placed along side. I marked out the hull round the middle to have 28inches cut out, also marking the places of the stringers. A week later I measured it all up again, it matched, and so I cut out the skin between the stringers. Then.. SWMBOs aunt and uncle became ill in turn, we lost 18 months, travelling 400 Mile return journeys to visit before they died ( about a year apart.) Meantime the boat was just left.. So the story of rebuild will be in part 4. When the photos start.. |
|
|
A request was made to see the keel, It's not built yet , part of it is on the work bench at the moment ready for cutting next weekend (10mm plate steel). So here is a sketch of the general arrangements of the side view with the rig up with keel and rudder fitted..
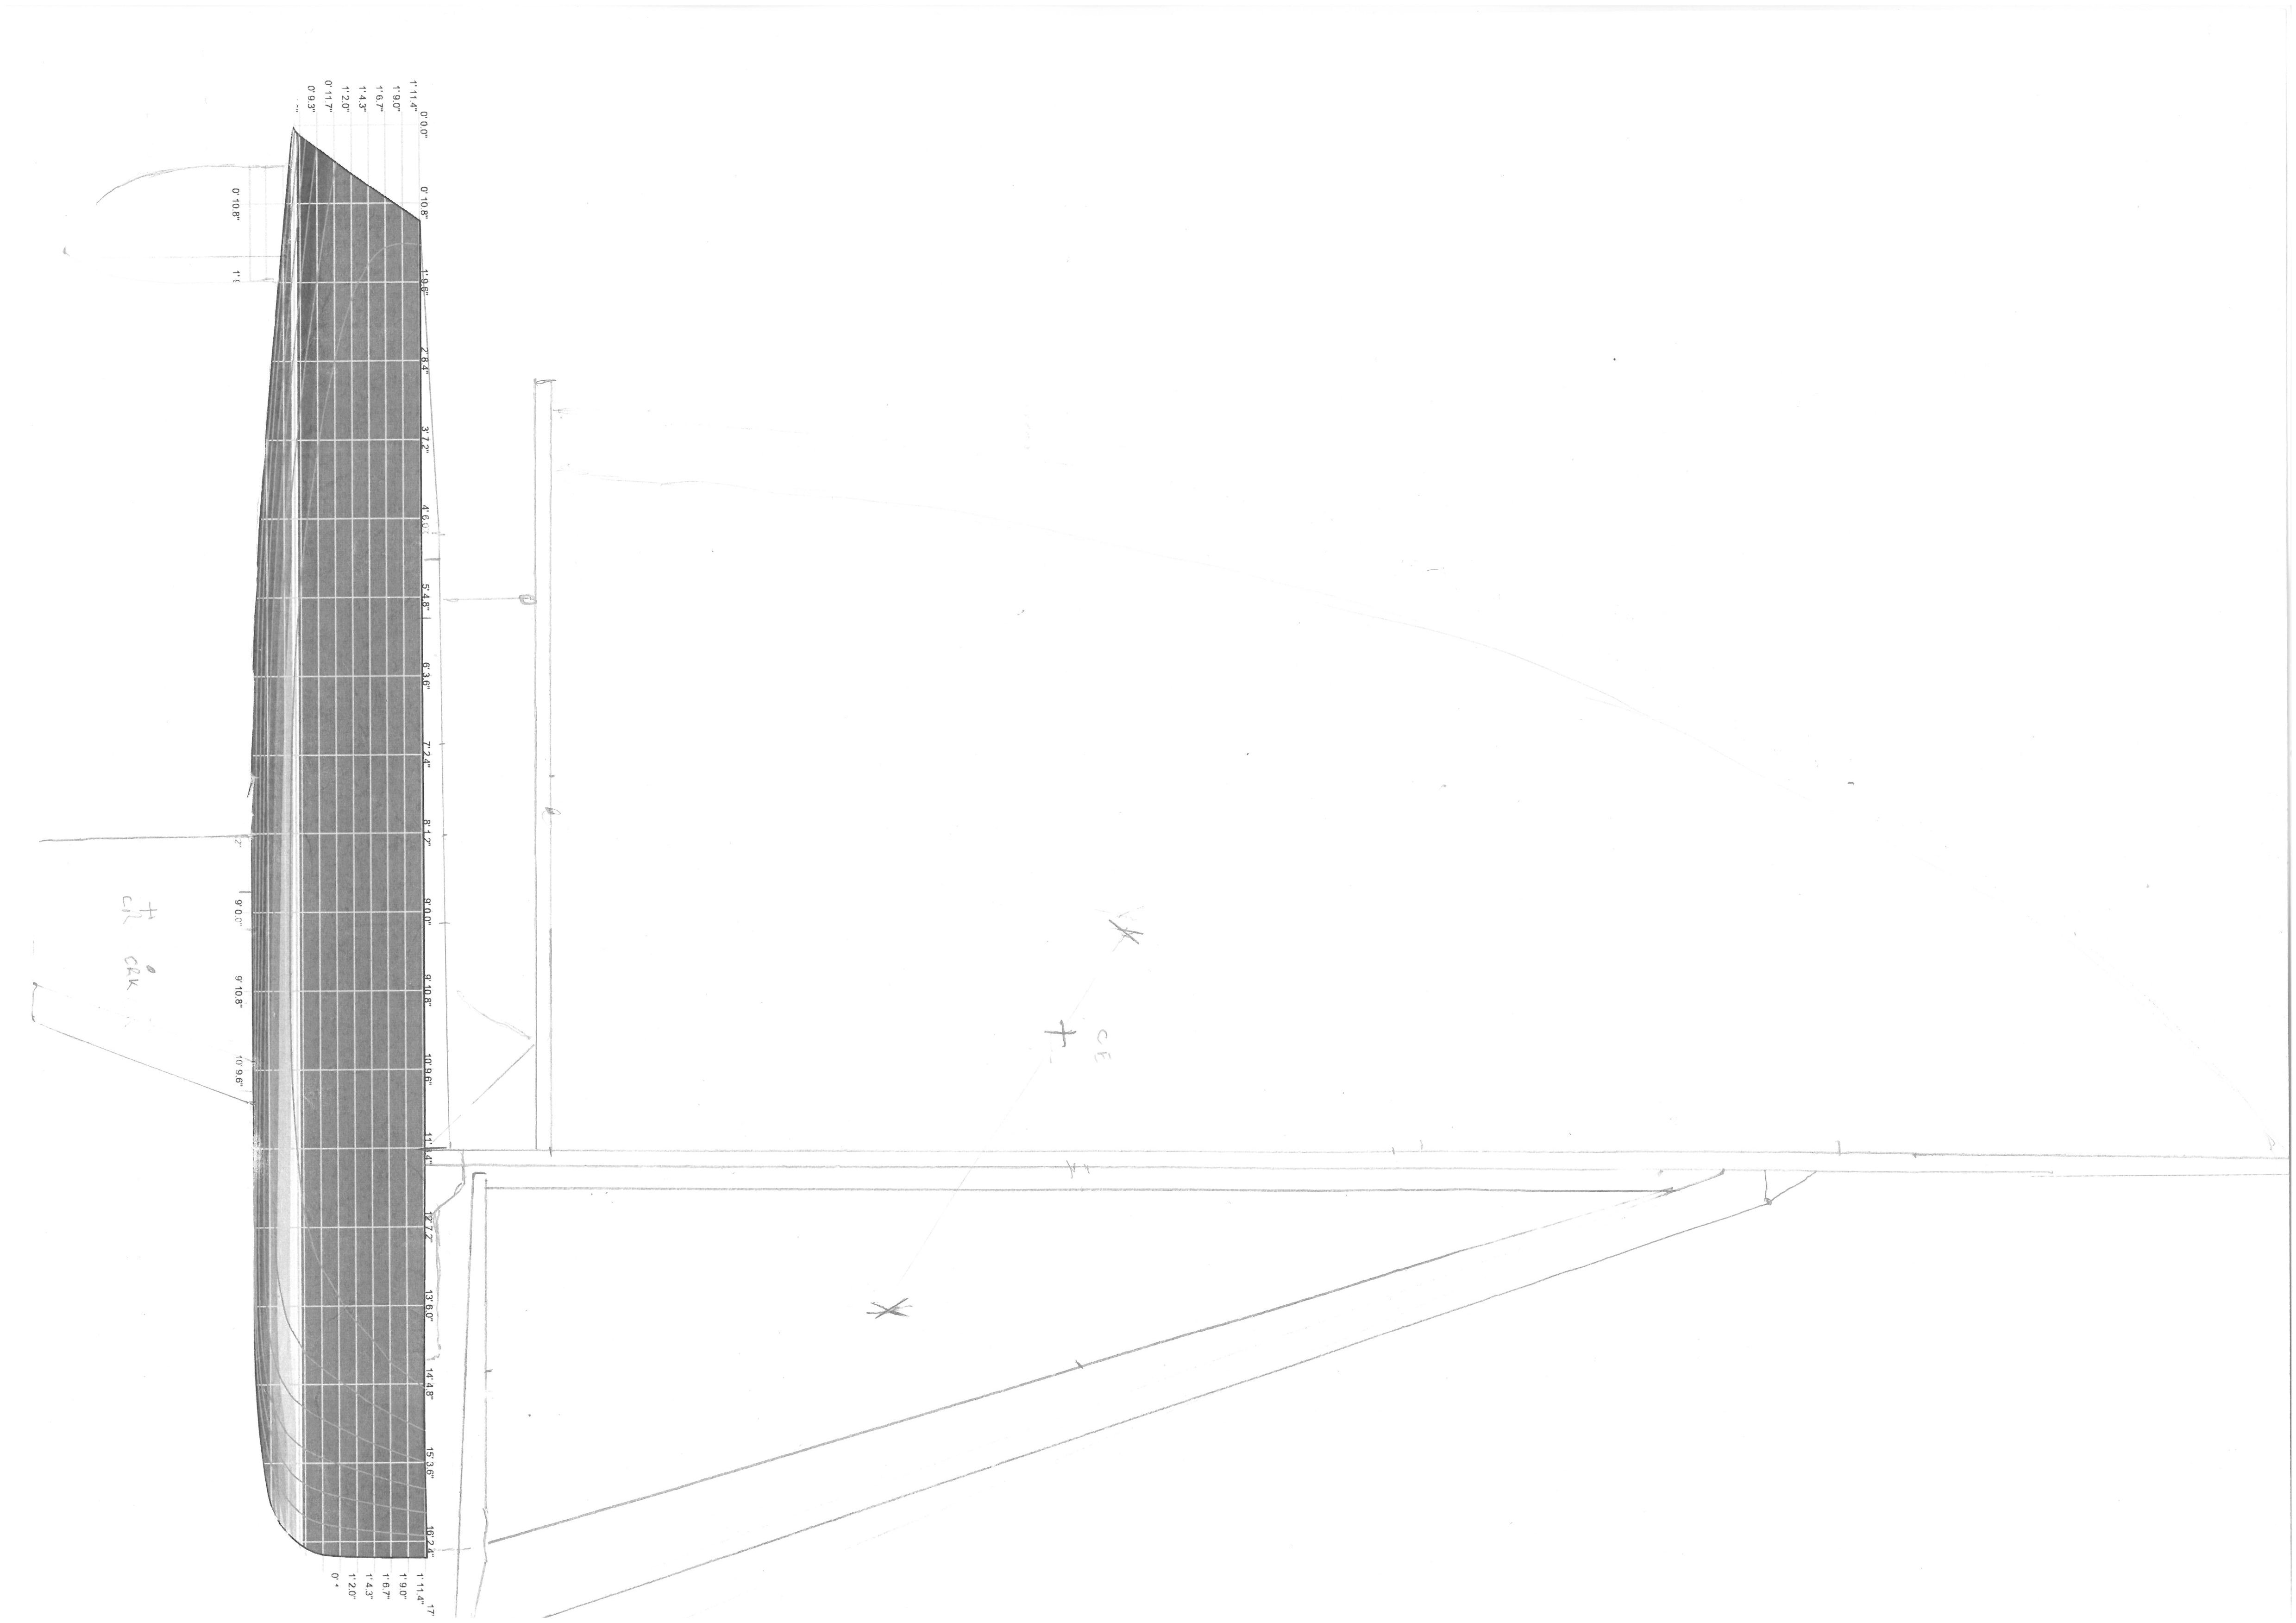
sorry its not come out well. |
|
|
In reply to this post by The Q
And so last year I came back to the boat and this is what I faced.
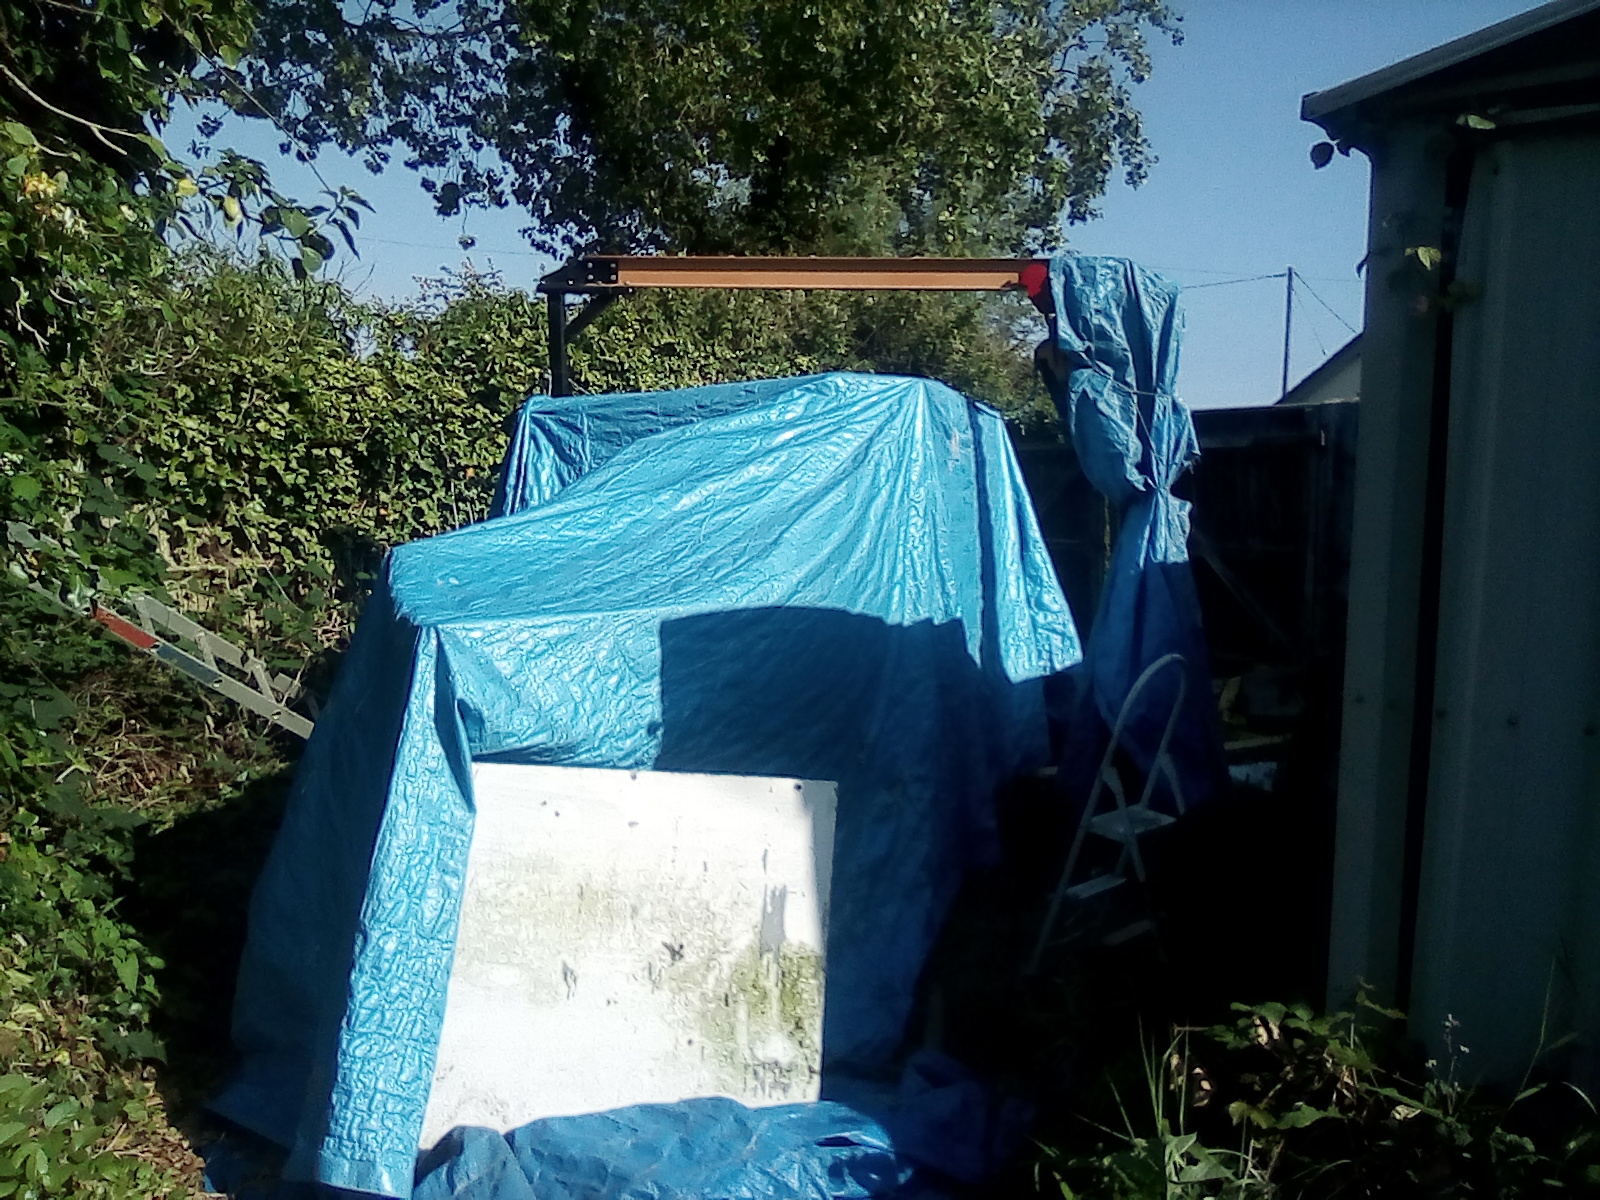 The jungle encroaching from the farmers field next door and a lot of clearance work before starting again.. |
|
|
And So to Part 4,
The jungle was cleared back, the covers removed and the temporary " box" above everything removed. The White plate at the front of the boat is the original Drop keep without it's weights which would be bolted on. I moved that plate onto a bench Sunday ready to start altering it. The hull was then marked up for the next set of cuts, these being staggered by up to just over 2 ft. If you were facing the side of the boat with the bow on the left, the first mark was from where the hull meets deck. Forward for over 2 ft (to a convenient deck plank), down the line of the deck plank to the cockpit combing, then back aft along the bottom edge of the combing about a foot, then through the combing. Inside the main stringers were cut a few inches forward of center. for the moment the centre box was left as is. The same was done the other side, then a week later I came back,measured and checked the markings, All was OK. Time to cut, much was cut with a jig saw (and many blades), in some tight spaces a Japanese style pull saw and a dremel with a disk saw in some really tight spaces. Then when all was removed and I had room to mark up the centre board case it came in two parts.. First was two vertical cuts in line with the skin removal, many jigsaw blades were used as the case was layered up with glassfibre, ply and tufnol sliding surfaces. this finally destroyed the jigsaw as well, it had to be finished cutting by hand. It was gratifying when the final cut was made there was only a creak but no real movement of the now two halves of the boat. Four 6inch wide 3in inch deep and 1 and a bit inch thick pieces of wood were made each with a pair of matching 10mm holes. four 1M treaded rods were fed through one pair of blocks with nuts on. Fitted one top on bottom of the remaining centreboard case and their supporting frames. I then sat in the back added the other two blocks and Nuts.. Then with large spanner started tightening each nut a turn at a time , every so often there would be a creak and the two halves would approach each other.... Many turns later i inserted a board in the closing gap to keep the remaining bits of centreboard case in line.. once the first edge touched, there was much measuring, and once I was happy, a grinding bit in a drill was passed round the joins, leaving a perfect 10mm gap. Then the final winding of the nuts... Time to fix it all together... I stripped the hull of resin / filler / glassfibre on the outside about a foot either side of the join, this was then bandaged up with glassfiber and resin. Transfering to the inside, liquid resin was soaked into the joins before being covered by, cut to fit, glass fibre resined pads . A couple of layers on the sides, 4 on the bottom.. The stringers were doubled and glassed.. After another weeks break allowing that all to set, l lay uncomfortably in the bottom chiseling off all the old filler fillets. This was followed by making more fillets of thickened resin. . Then the cockpit sides were doubled over the join, but this was only in the forward cockpit area between frames. All set it was time to remove the two centre sections of frame supporting the remaining bits of centre board case. This time I got out the angle grinder, and a diamond disk. I wish I had used that before, with a bit of smoke it was through in a few minutes. The disk was then changed to a sander and the lump on the floor ground down to level with the two frames. Two more doublers were fitted on the cockpit sides, where the centre frames were and the former aft cockpit. When set, this was trippled with a full length plank glassfibred over. Since then 3 Oak keel bearers have been made and bonded into place. Right there should be pictures tonight of various bits, I can't do them at the moment as they are not on this computer. With any luck I'll also type in last weekends work and we'll be up to date.. |
|
|
In reply to this post by The Q
I'm having fun the images are split between two computers and a network server, thanks to a lightening strike a couple of weeks back the router had to be swapped, as did everyone else's in the area, So I've got to get them all talking to each other again..
Meantime Lets have a go at the first picture, this should be from inside the hull from the stern, you can see up forward, one of the blocks used to pull the two halves together still in place with the threaded rods holding the boat together. 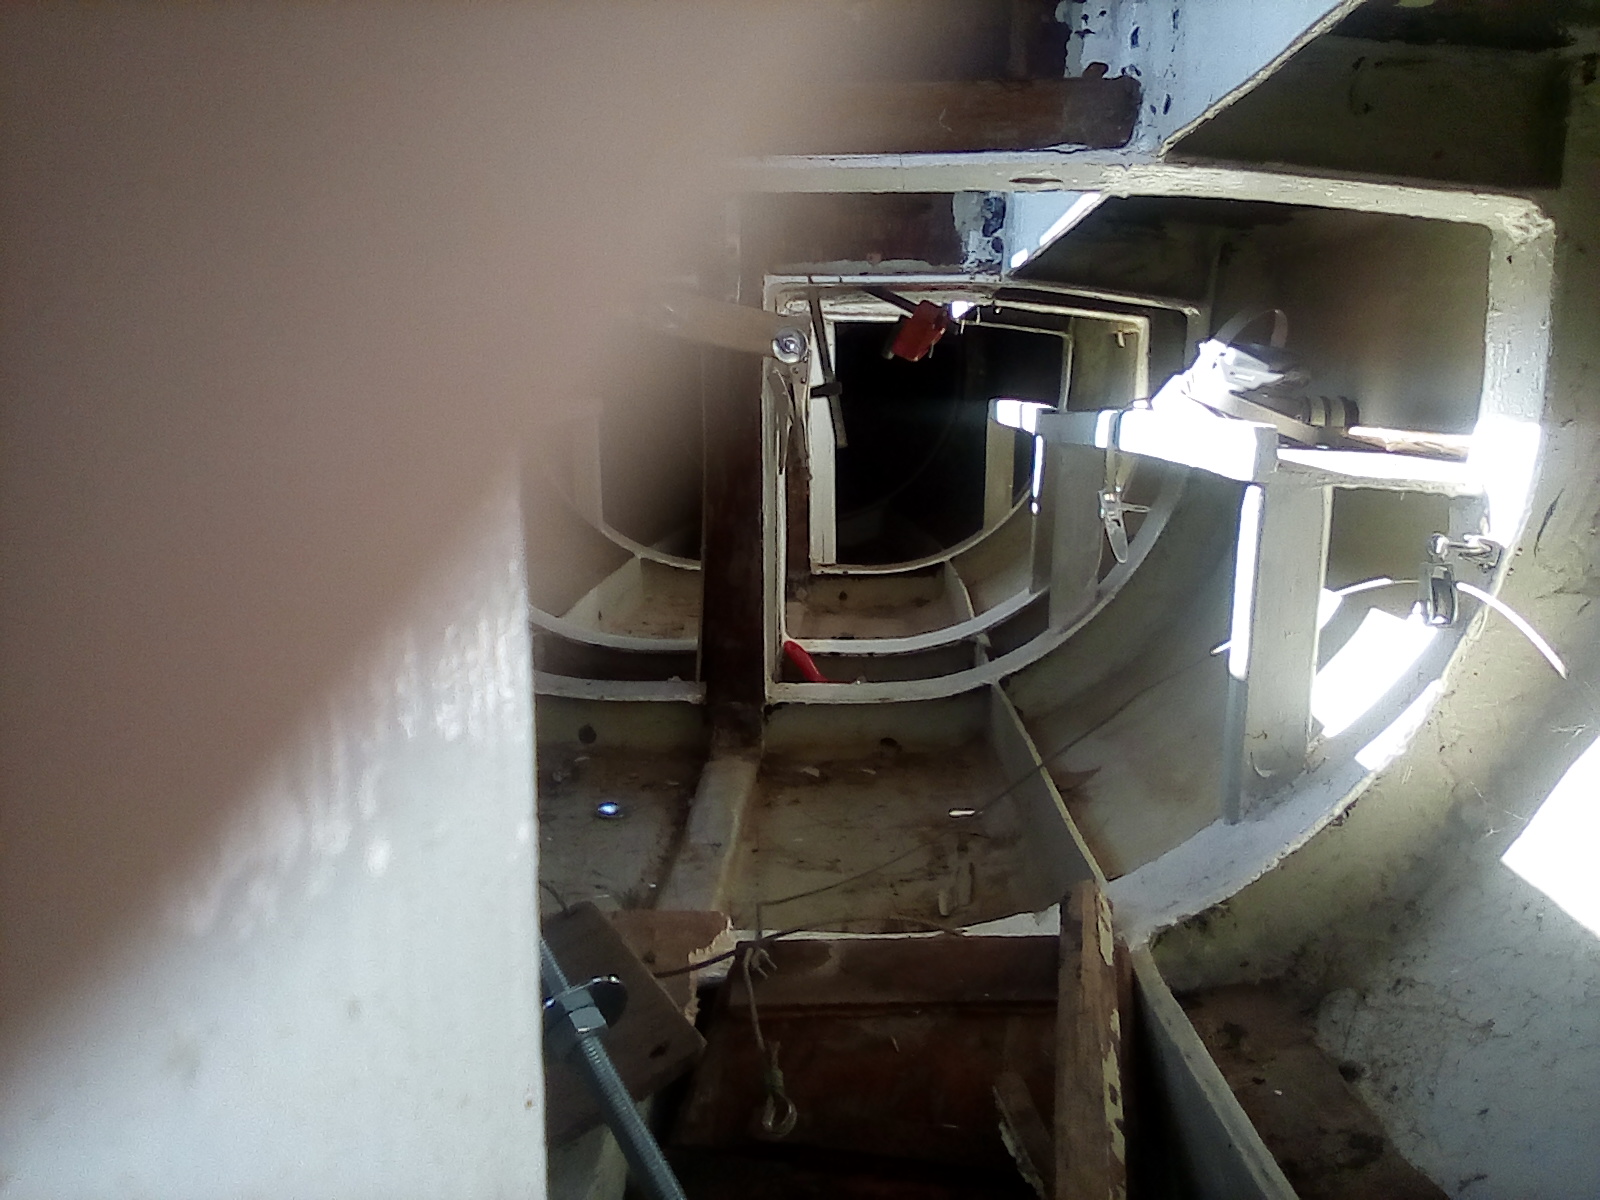 Well that worked sorry about the finger in the picture. |
|
|
This post was updated on .
The cover pulled back after the two halves had been pulled back together, not all the jungle had been cleared at this point,, Note the old tall tabernacle to allow the old mast to tilt without hitting me on the head..
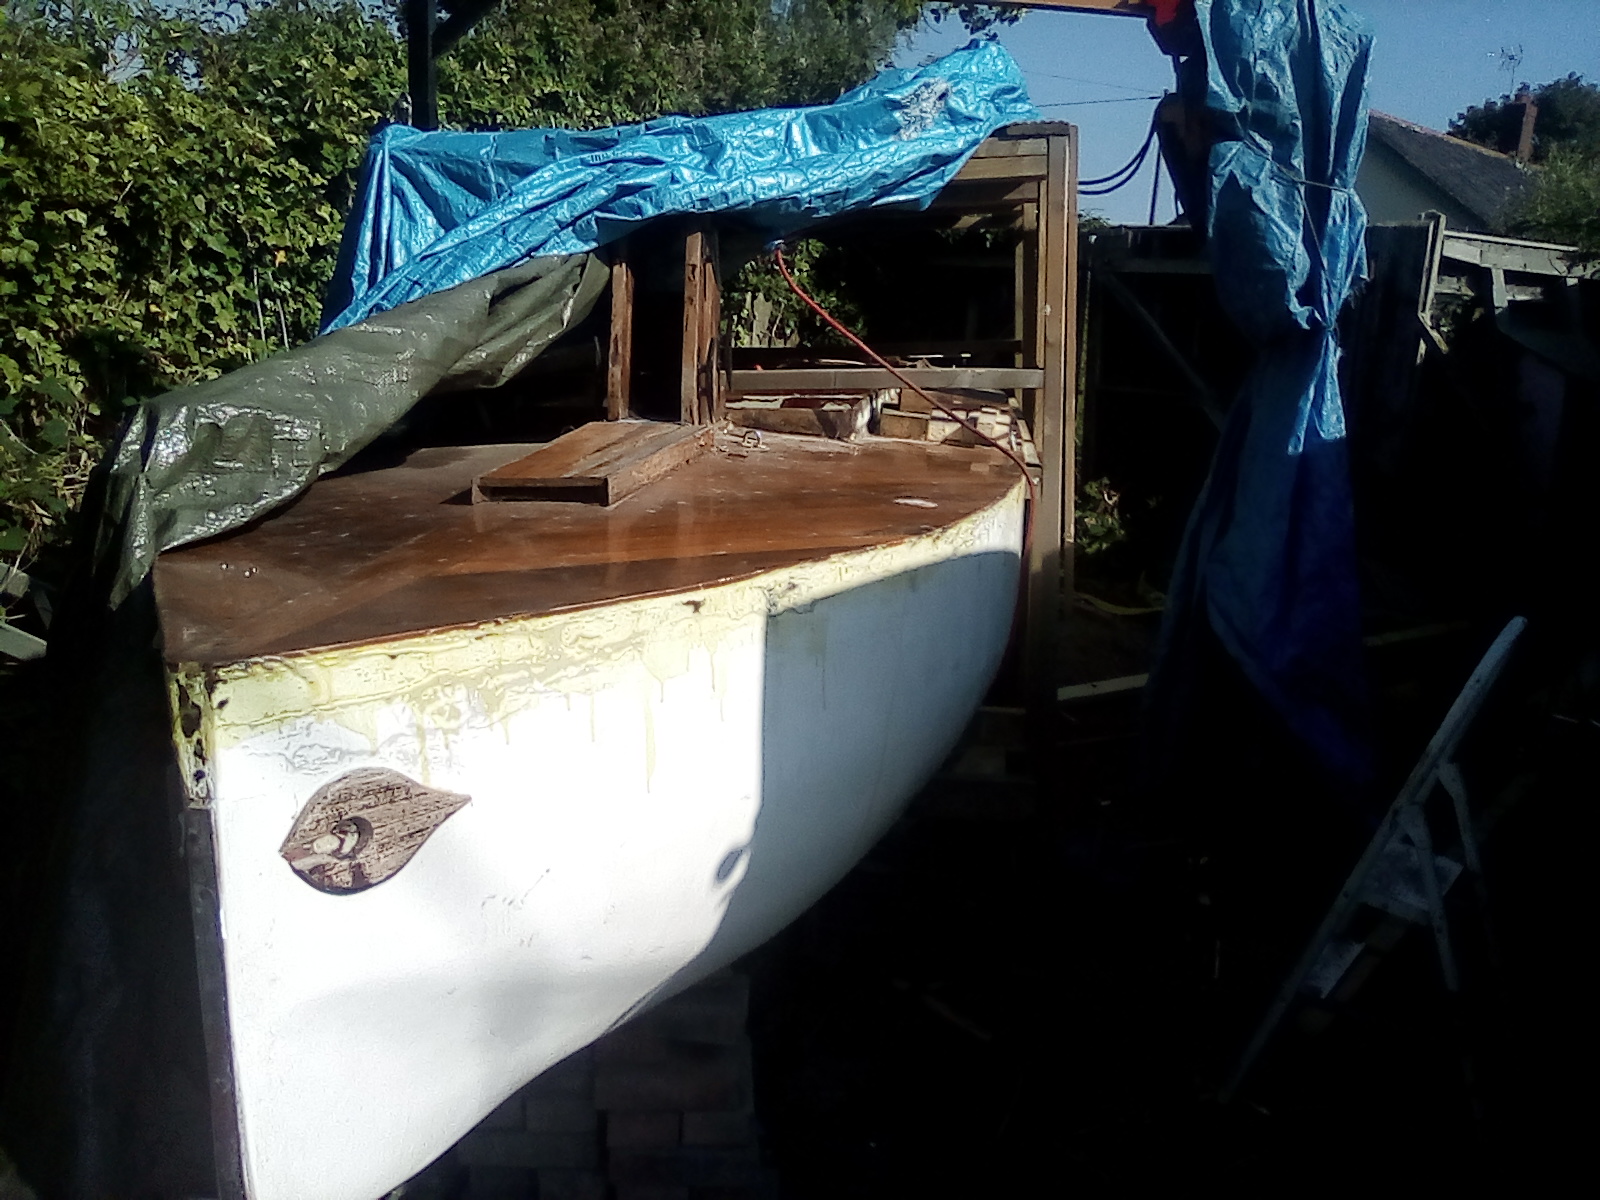
|
|
|
In reply to this post by The Q
Between the nearest and next vertical beams you can see the dark line of the deck to hull cut, and in the shadow of the second vertical beam you can see the dark line of the hull halves meeting. you can see the box structure above to allow me to work inside in bad weather, that worked but it was a pig to get in and out..
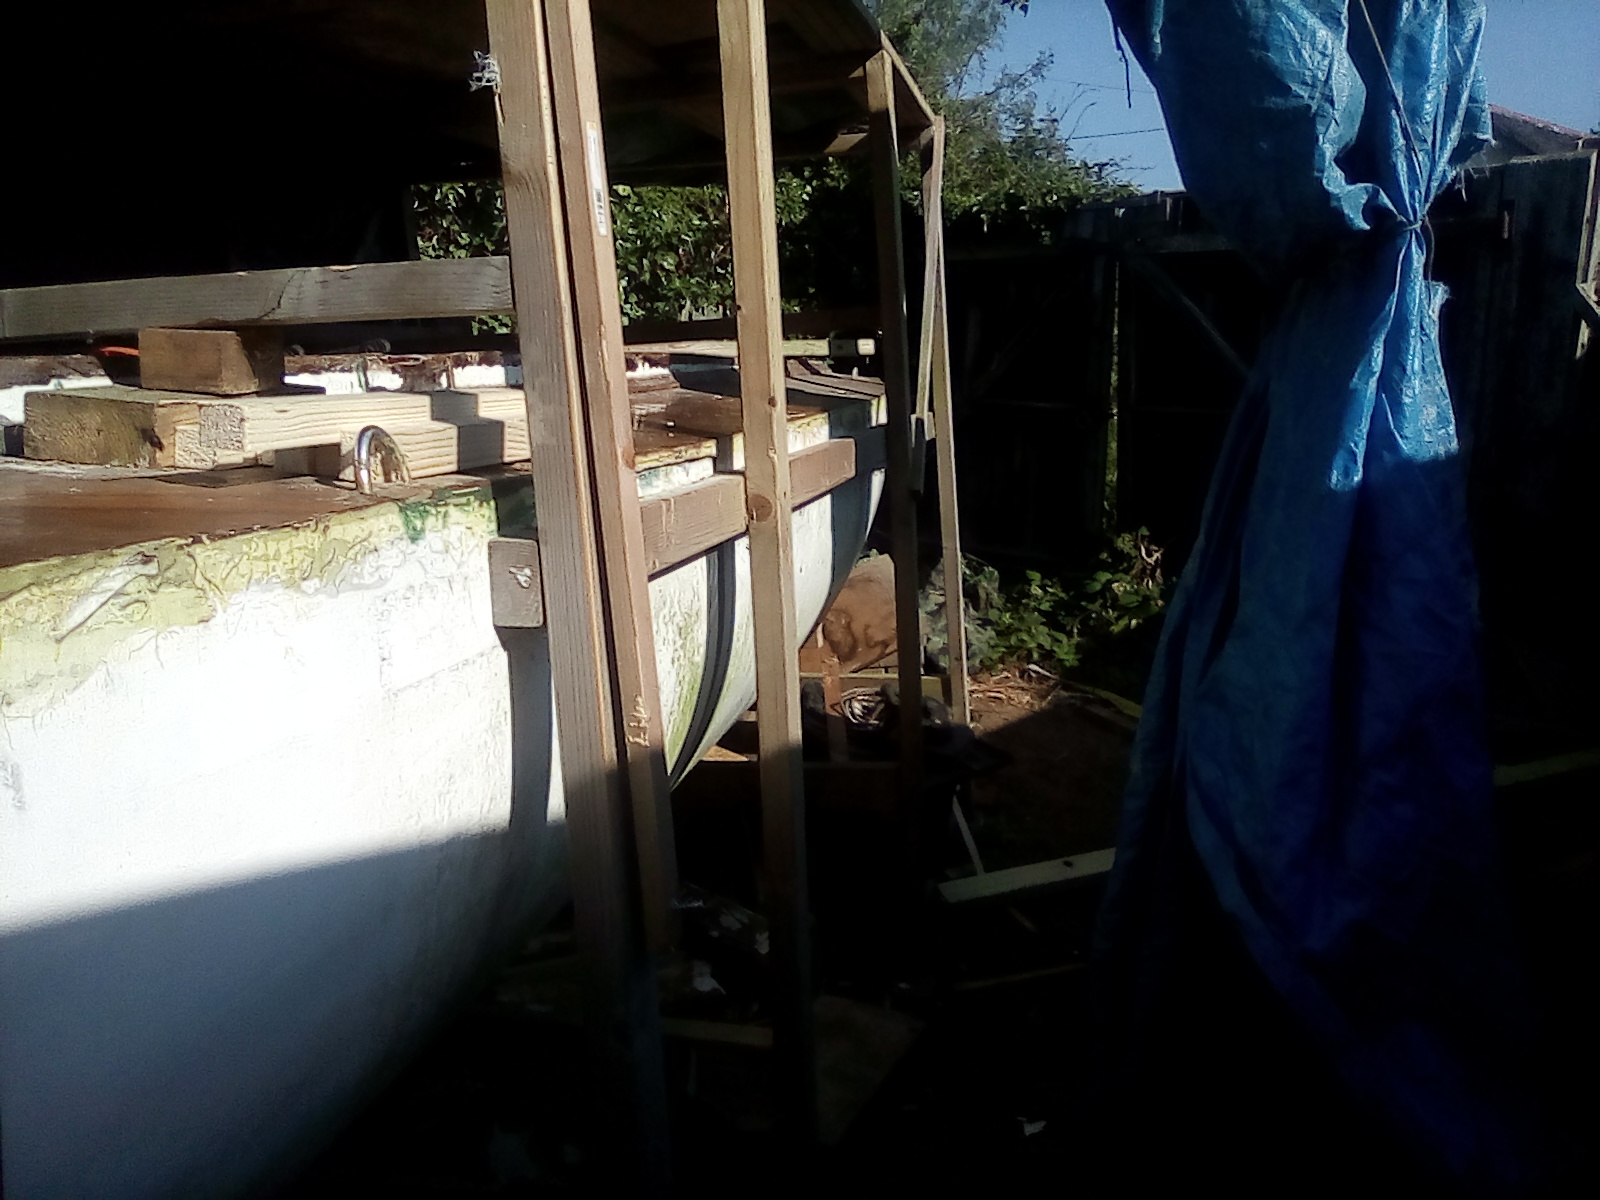
|
|
|
In reply to this post by The Q
Now on the tablet computer, as the PC thinks it's a CD player and they are not talking to each other properly..
The stern.. 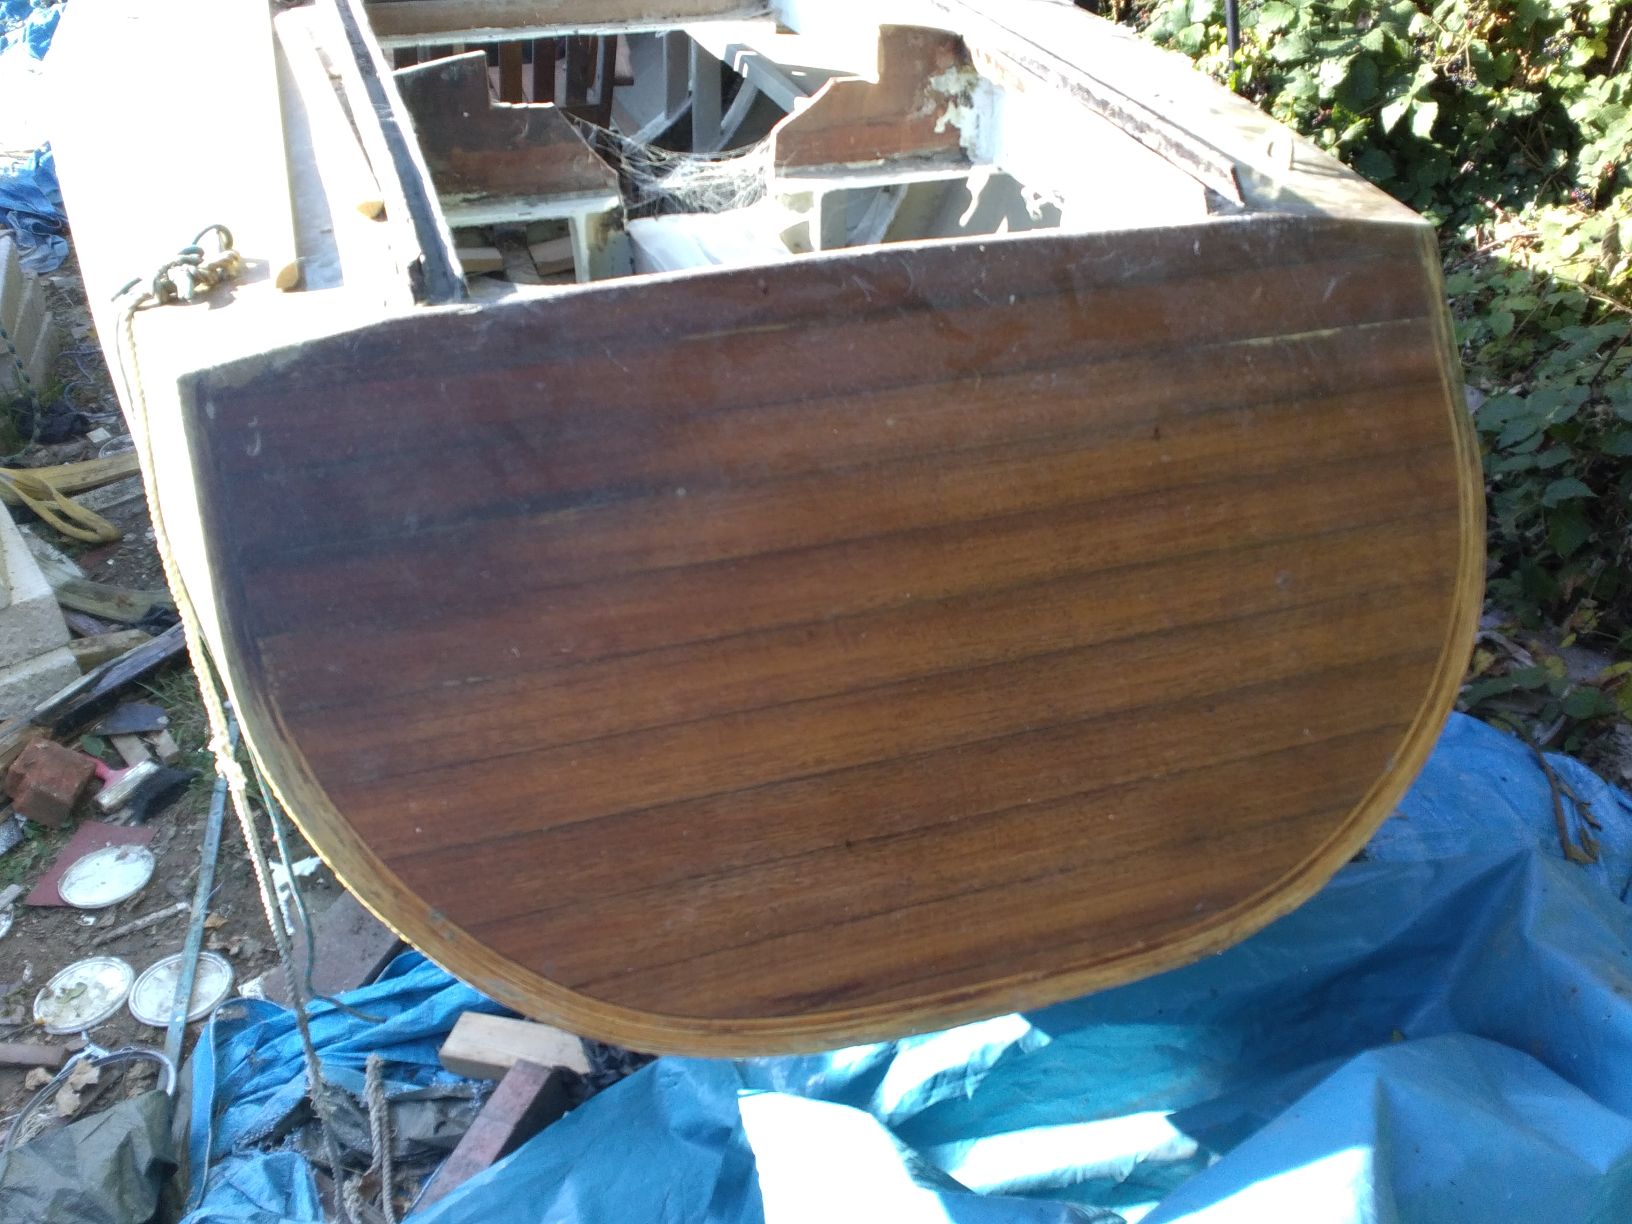 And a bit of the bow recently as you can see all the varnish work needs repair doing... 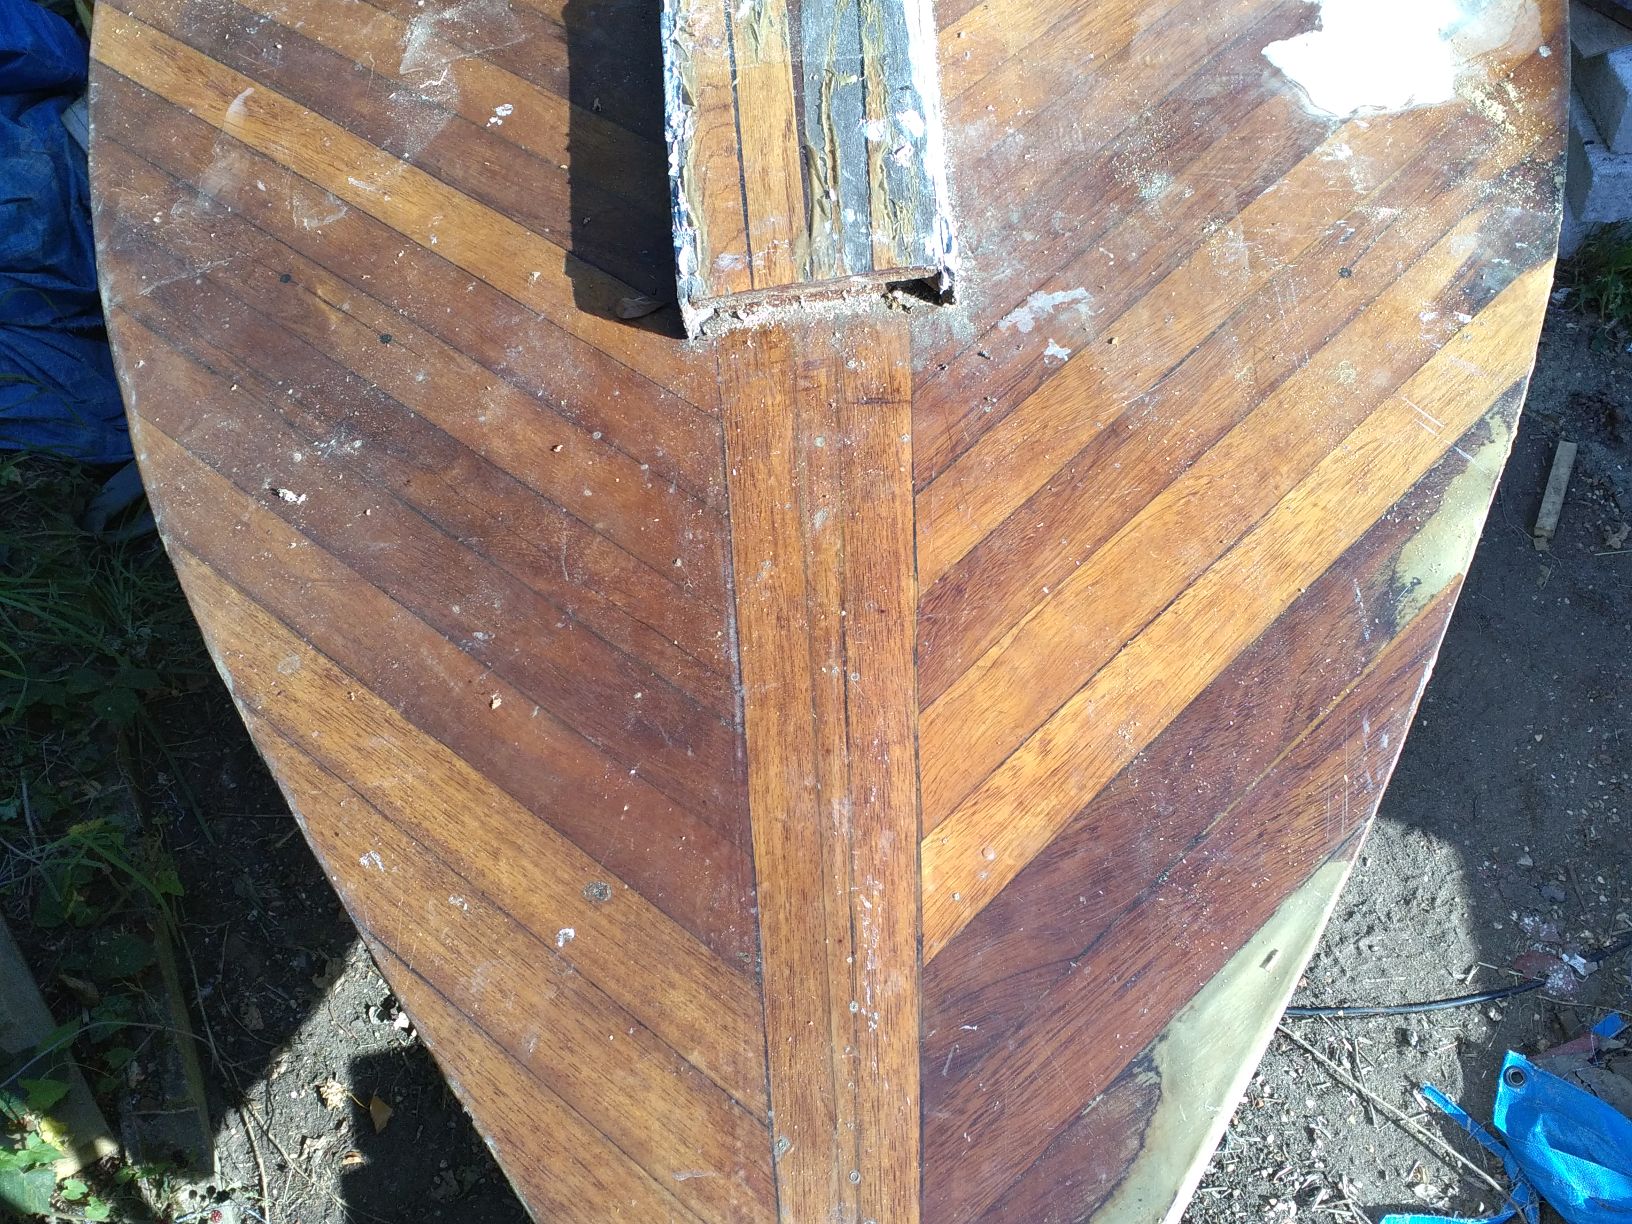
|
|
|
In reply to this post by The Q
Now on the tablet computer, as the PC thinks it's a CD player and they are not talking to each other properly..
The stern..  And a bit of the bow recently as you can see all the varnish work needs re doing...  More to Follow when I've had another battle between computer and tablet.. |
|
|
Mast, boom, and Jib Vang..
About a year ago My injured sailing compatriot, gave me an Old Kestrel Mast and boom, his parents were wanting it out of their garden, He hadn't sailed a kestrel in over 20 years.... This being about the right size for the boat and vastly lighter, It was welcomed as an improvement to the boat.. Shortly after I bought an old set of sails for a kestrel from the bay of E..very cheaply.. These are to use for the trials before commissioning a full new set.. So I removed the old sloping foot from inside the tabernacle, screwed on a dinghy mast holder to the hog and placed the mast in the tabernacle losely tieing the stays to the stay plates. The boom hung on the main halyard. I stood back and.. it looked right.. So... The new mast is only about 2.5 inches wide, whereas the old tabernacle hole was 4 inches square, so an adaptor was made to fit. The height of the old tabernacle was cut off and then the adaptor bonded into place. The side stays were 6 inches too long, so I cut them shorter, rescued the old Eyes, put a new crimp in place and used my electrical crimp tool (capable of up to 16mm crimps and several tons pressure) to fix it all.. The Boom was strange, which was why he had replaced it ( and by necessity the mast ) someone had years ago screwed a X shaped 4ft length of keelboat traveller track to the under side in the middle . Onto that someone had screwed a length of dinghy track. I believe the above was an attempt to convert the old end sheeted boom, to a centre sheeted boom. The Dinghy track I removed, after much measurement and sitting inside with ropes tied on to try various positions. I then drilled a couple of holes into the X track acrossways. Each about 3 inches in from the opposite ends. The rear one will hold the mainsheet block above it's attachment in the boat. The front one will, hold the kicking trap and be where the block for the mainsheet will attach to bring the main sheet to me.. All sorts of arrangements were looked at for the kicking strap, gnavs, levers etc in order to clear me and get the tension right, but eventually the old fashioned block and tackle worked out best. Then came working out the jib arrangements, I knew I needed a self tacking jib so much research was carried out on the net looking at various systems. The solution is.. A jib club that extends forward of the bow by about a foot, where the forestay will be mounted as normal at the bow. , but on top of the jib club. A line from the front edge of the jib club will go to the old spinnaker attachment point of the mast and via various blocks back to me.. By pulling on the line the amount of tension on the leach can be varied, thus keeping tension correct. Using a track or rope horse across the deck would have been ineffectual due to the narrowness of the boat. The windward sheet will be used to control jib position, not the usual leeward sheet. This means I can pull it across to goosewing when necessary. Also mounted on the jib club, a swivel to the bow plate, a furler, two cheek blocks to feed the furler strings back to the cockpit, an attachment one side of the aft end of the club with another cheek block the other to attach the outhaul.. This weekend we laid out the jib on the grass and measured up to shorten the foot. A full size Kestrel jib is about 8 foot on the foot and 50 Sqft sail area. It turned out this one was 5 ft on the foot and about 35ft sqft sail area. Luckily the club is only 50 inches from forestay to aft end, so the foot was marked at 48 inches and the aft end of the sail cut off to nothing at the head. While doing this I noticed the leech was only folded over and sown from the head down to the first seam and from the bottom up to the first seam. Never seen that before, but there was no fraying so I'm keeping that idea it will save me sewing.. The sail was pinned up for the seams, As it is sewing all this up, is a winter it's raining task . A side effect of it being a shorter foot jib, is that it will be a better shape than had I shortened an 8ft footed jib.. The main will be used as is, but it's correctly made for the class at the time, which means it's about a foot short of the end of the boom. When a new sail is made some of that foot will be used and a will have reefing points added. The computer connections were sorted last night so hopefully more pictures later.. Right that enough rambling on for this posting.. any questions? |
|
|
Time for some more pictures
one from the front, note the new mast adaptor in place 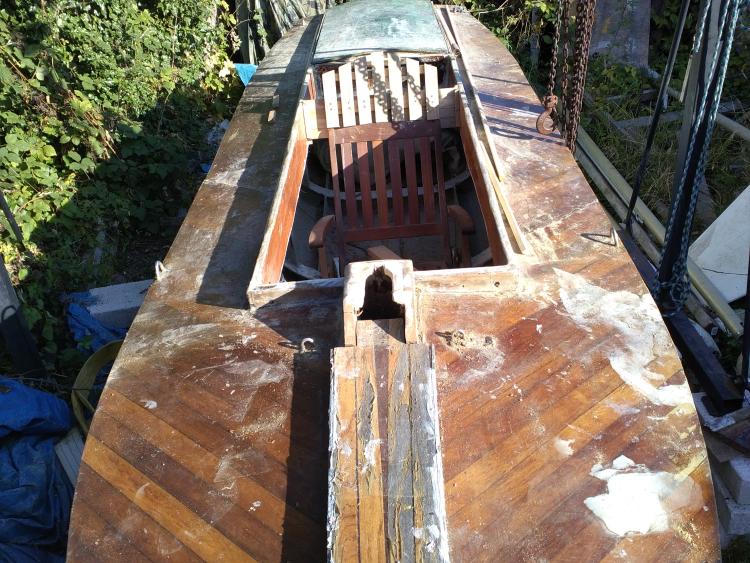 one from the back. 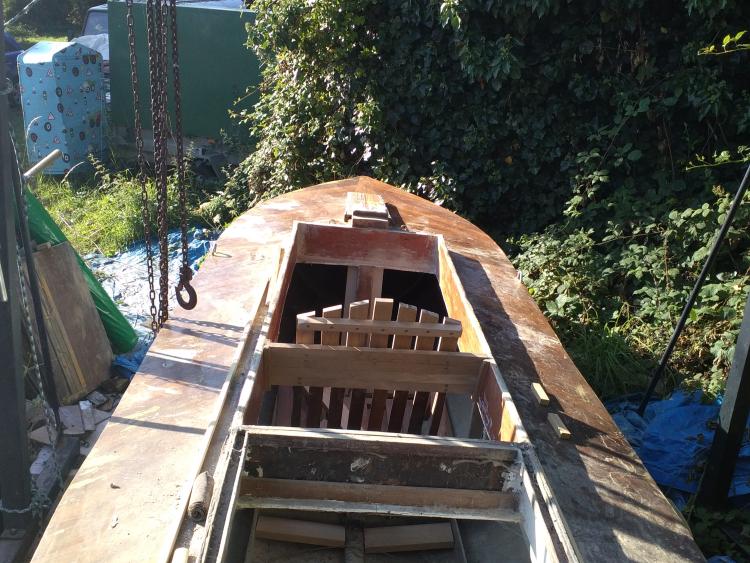
|
|
|
This post was updated on .
Well today's work was originally going to be cutting the keel to shape. But then I realized that can be done anytime, while hull work requires good weather..
While uncovering the boat I managed to cut open my thumb on a old rivet on the boom not a good start.. The first thing was to lower the mast which had been left up since last week., I then measured up for the main halyard sheave and pin with some calipers. It's remarkably small.. 19mm with a 3mm pin. I'm going internet searching to look for a replacement shortly. It took nearly an hour and a half before I got going.. So the grinder ( and drill With flap wheel ) was employed cutting and grinding the rudder case and the aft compartment and generally smoothing things. . After three or so hours the grinder slipped from my grasp and eat it's own cable. The RCD and fuse did their stuff, I spent the next hour stripping the grinder and replacing the cable.. Once tested it was back to work, after a while I needed to change the disk.. It was jammed, I bent the special spanner, so was the end of that for the day. A new spanner stronger has been ordered. A final Bit of work was filing the old rivets on the boom... The picture of the day, the jib club Vang propped up by a brick as it in its raw state today.. 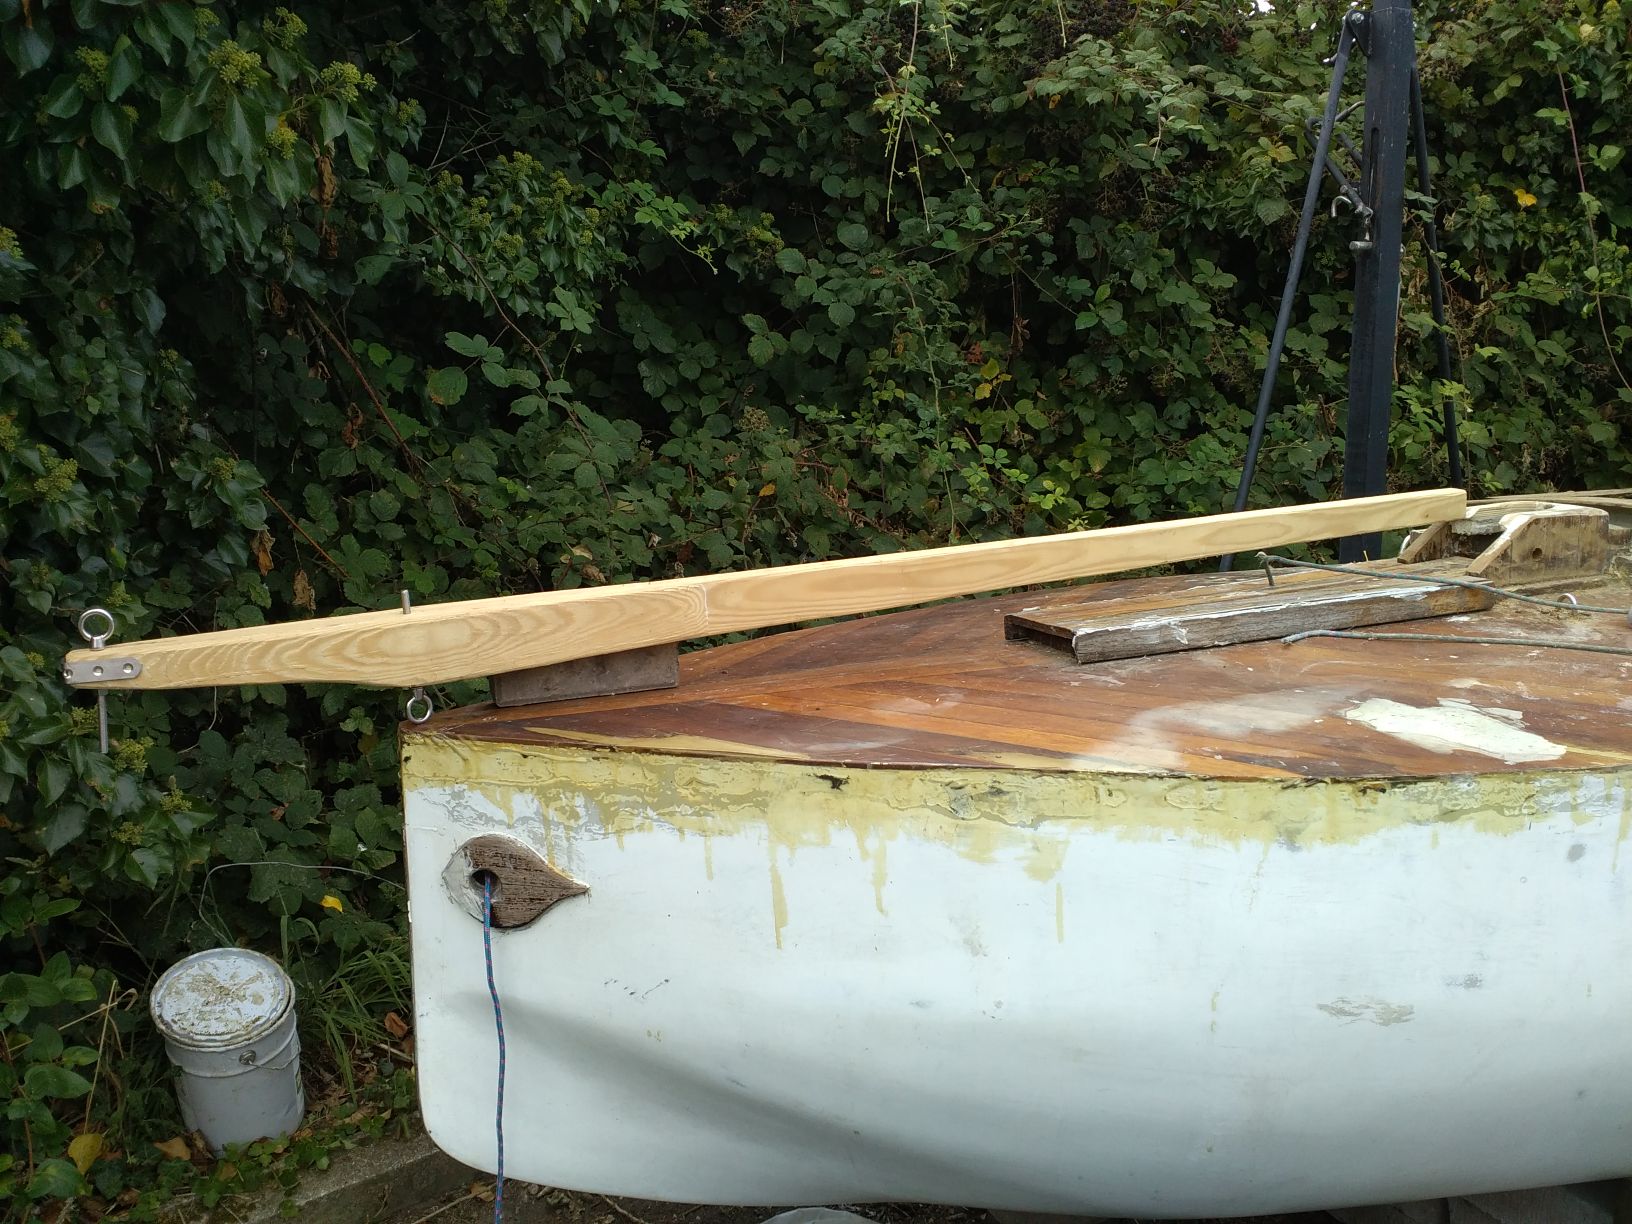
|
|
|
And just for something completely different ..my other hobby..
The big Day approaches our own Broadland Model Railway Club show.. 2019 Exhibition Aylsham Model Railway Exhibition 2019 The 2019 Model Railway Exhibition, sponsored by the Bure Valley Railway, will be held again in The Jubilee Centre, Aylsham, NR11 6JG Saturday 5th October between 10.00 and 16.00 (10am and 4pm). Main parking at the Bure Valley Railway, disabled parking at the Jubilee centre. The following layouts and traders are confirmed for 2019: All Cars Stop Here OO Hong Kong influenced tram stop Arlingham 4mm EM 50s/60s ex-GE branch Barrow Fells 2mm N West Coast mainline modern Bedford Road 7mm O Diesel Depot Blacklade 4mm OO 85-90 or 2000-2007 North Midlands Broad Oak 4mm OO Eastern Region ex Great Central BVR in minature 7mm O 9Aylsham Station 2010-15 Cobbold’s Wharf 7mm S7 East Anglia based on Ipswich docks Coltishall 4mm OO 60s/70s Coltishall, Norfolk Gillsbrook 4mm OO ex-GE 50s/60s Essex/Hertfordshire Hartenberg N Bavarian Era2 Tramway Iceni Cement 4mm OO East Anglia 60s/70s Jusabit MPD 7mm O Early BR motive power depot Operation Abyss 4mm OO Wartime dockside Ringsford 4mm OO East Anglia 50s/60s Thomas and Friends Child friendly hands on Traders: Bob Pearman Books Bure Valley Railway Coast2Coaster Dave Rowlands Joe Lock JustinCase Train Tech Demonstrations Advent Modellers Loco Doctor Nigel Fisher DCC Societies B17 Steam Loco Trust Class 47 Preservation Project Friends of the BVR North Norfolk Model Engineers We look forward to seeing you all there in October! Broadland Model Railway Club show.. |
«
Return to General Discussion
|
1 view|%1 views
| Free forum by Nabble | Edit this page |

