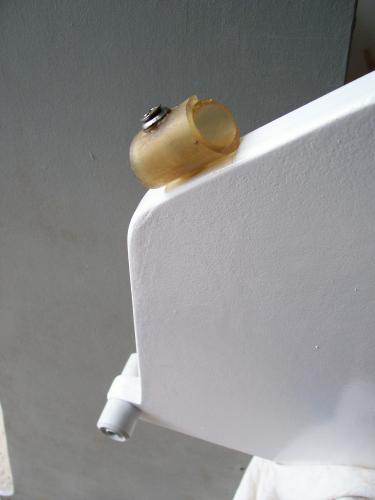
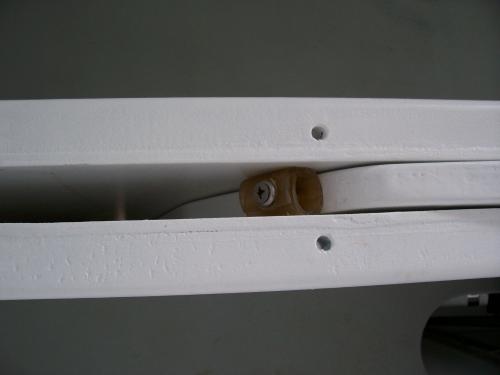
![]() |
I hope it's not against the rules of this forum to post on the subject of restoration of a GRP boat, rather than a new build
My project this winter is to get a 51 year old 16ft Tricorn dinghy back into sailing condition. This involves repairs and refit of both the hull and rig. Currently I'm working on - or thinking about, anyway - the centreplate, which was originally aluminium, weighing, according to a 1961 review, around 30lb. I could make the plate from 18mm marine grade aluminium. That would come to approximately the right weight, but cost a lot. Alternatively, I could have the shape cut from 6 mm steel - cheaper, same weight, but too skinny. Which brings me to the point. Can anyone advise me how to laminate plywood onto both sides of a steel plate, to create an 18mm thick sandwich? I think this solution, if practical, could enable me to shape the sides into a better foil profile, too. Any suggestions? |
![]() ![]() |
Paul H (admin) |
![]() |
Pat,
MilliBee's bilge plates were laminated from 9mm ply and 6mm steel. I carefully drilled and tapped many holes in the steel to accept countersunk set screws (bolts) with a 5mm thread. Then both plates were epoxied together and secured with set screws through the ply into the threaded holes in the steel. So you can probably do the same with set screws from both sides of the ply, to bind all three laminations together. Then seal the edges with epoxy, drive the set screws 1mm to 2mm below the ply and seal every screw head with epoxy. As for the pivot, perhaps drill a large hole in the steel to fill with a wooden plug, so that none of the steel is in direct contact with water. However, Al will probably tell you the steel will very slowly rust because oxygen and moisture cannot be excluded 100% by the epoxy coated wood. He is the expert in that area. I can upload a picture of a bilge plate if that helps. cheers Paul |
![]() |
Hmmm,
In my simple way, I would have assumed that the epoxy would be strong enough to stick the ply to the outside of the steel and seal it from the water without all the messing about with taps and screws. However, if Paul is right and the moisture will get through and start the evil rust, this would make the steel explode the centre board (slowly). I once hacked off about 12mm of black rust from a steel plate bilge keel, and discovered it had slimmed the plate not at all (or at least not noticeably). Since anti-rust paint applied to steel ships these days are epoxy based, couldn't this be used to treat the steel first, and then simply stick the ply on with epoxy resin over the paint? With a fillet of thickened epoxy round the edge, and the ply then fully sealed with epoxy, I'd expect that to outlast me. Just the way I'd tackle it, right or wrong? Ian |
![]() ![]() |
Paul H (admin) |
![]() |
Ian,
Alastair knows the full details - I left steel screws in MilliBee that held joints together and sealed them. Like you I expected zero problems, but Al said the screws needed to be bronze to be safe. I'm sure Alastair will comment soon. -Paul |
![]() |
If it were me, then I'd just drill fairly large (say, 10 to 15mm diameter) holes in a few locations where the ply cheeks are going to be over the 6mm steel core, then send it off to be hot dip galvanised. The cheap way to do that for small items here is to find your nearest steel farm gate/hurdle maker and ask them to add your plate to their next batch of stuff they send to be galvanised - usually cheaper than you going directly to the galvanisers with a one off.
To secure the ply cheeks, I'd coat them and the galvanised steel with epoxy on the inside faces and fill the holes in the steel with glass filled epoxy (just cut up some glass cloth and stir it in to some resin thickened with a bit of colloidal silica). These will form glass/epoxy "rivets" that will securely hold the ply cheeks to the steel core. If you finish off the outside of the centre plate with a layer of epoxy glass then I reckon it'd last for decades. |
![]() |
In reply to this post by Paul H (admin)
On 6 Nov 2012 at 17:00, adminHBBR [via UK HBBR Forum] wrote:
> > > Ian, > > Alastair knows the full details - I left steel screws in /MilliBee > /that held joints together and sealed them. Like you I expected zero > problems, but Al said the screws needed to be bronze to be safe. > > I'm sure Alastair will comment soon. > My understanding is that stainless steel is 'stainless' because of the presence of chromium in the mix. Chromium exposed to oxygen very quickly becomes chromium oxide, which is very hard and inert. Stainless steel is covered with a layer of chromium oxide a few molecules thick. If this layer becomes damaged it quickly repairs itself, but not if oxygen is excluded. Thus stainless screws in an oxygen-free environment behave much like mild steel. -- Hoping for calm nights Alastair Law, Yeovil, England. <http://www.little.jim.freeuk.com> |
![]() |
Thanks to all for the good advice and suggestions. I have to admit I had considered many a similar plan to those above - and worried over all of them - before posting my request for your wisdom.
The part of Paul's plan that puts me off is drilling and threading all the holes, then all the filling on the surface of the wood afterwards. (I forgot to mention that I am always discouraged by the thought of any actual work, so I usually choose to do as little as possible). I, too, like Ian, thought that maybe a good slathering of epoxy on all surfaces would hold the sandwich together nicely, but I worried about water ingress and consequent "explosion" due to rust on affected parts of the plate. I had no idea how stainless steel worked - thanks for the explanation, Alastair. If that's the case, there would be no advantage to using s/s because it might be no better protected in the sandwich than galvanised mild steel plate would be. I have to admit that of the solutions suggested so far, I like Jeremy's best. It seems to offer a good chance of success, reasonable longevity of the finished product, and a minimum of actual work. I was thinking of having some rather larger holes cut in the plate, anyway, with the aims of ensuring the correct overall weight, lightening the plate a little in areas (at the top) where weight would be less needed, and lowering slightly its centre of gravity. I'm about to cut a template from scrap ply to see if I have the shape right, and I may experiment with some cutouts to see what seems practical without too much weakening of the structure. I welcome any more suggestions and advice, though, and I'm sure I'll be asking for more help before the job is finished. Target date for relaunch is April, just in time to shake down before taking part in the Semaine du Golfe du Morbihan, for which I have already optimistically entered the boat. You can find details of the Tricorn, by the way, on the Bursledon Blog site |
![]() |
In reply to this post by alopenboat
I wonder how the Great Sod organized that corrosive water can get to all this carefully protected stainless steel, yet reparative oxygen somehow isn't as invasive.
Go on, tell me stories of dihydrogen oxide molecules being very small and neat, and on the other hand bloated oxygen molecules being fat and blase and unable to get into all those important little places? Between them they're some of the most ubiquitously corrosive substances on the planet. Ask Paulie, he's been telling me about water getting in between the Angstroms of epoxy coating on electronics and threatening to ruin cyberspace and such. It's all very unnerving when all you want to do is go sailing CW |
![]() |
On 8 Nov 2012 at 10:00, Chris Waite [via UK HBBR Forum] wrote:
> I wonder how the Great Sod organized that corrosive water can get to > all this carefully protected stainless steel, yet reparative oxygen > somehow isn't as invasive. > Well, one way of isolating it from the majority of the oxygen is to immerse it in water. Even less oxygen if the water can't circulate. However that may be, a stainless bolt epoxy sealed in a keel can disappear within 2 seasons. Go on, guess how I know. :-) -- Hoping for calm nights Alastair Law, Yeovil, England. <http://www.little.jim.freeuk.com> |
![]() |
And just to throw even more speculation into the discussion let's not forget that prop shafts are generally made of stainless.......
BTW, I like Jeremy's idea best too. I'd make sure I went over the surface of the steel first with a grinder or softpad (abrasive disc) or wire brush in a grinder to expose fresh metal, and then de-grease it with a solvent before epoxying. There might also be some mileage in using epoxy primer paint for an initial coat, but to be honest, I think it's going to take years for corrosion to be a problem. Whether a ballasted centreboard is a good idea is another thing worth thinking about. Does the slight increase in stability (compared to putting the same weight in the bilge) compensate for the greater difficulty in raising and lowering the board? That depends on how heavy the board will be, and what mechanism there is for raising it. John |
![]() |
On 11 Nov 2012 at 14:26, hespj [via UK HBBR Forum] wrote:
> > And just to throw even more speculation into the discussion let's not > forget that prop shafts are generally made of stainless....... > And just see how long it lasts if the sacrificial anode becomes disconnected. :) I suppose you could link all the stainless screws to the anode, or galvanize them ....... -- Hoping for calm nights Alastair Law, Yeovil, England. <http://www.little.jim.freeuk.com> |
![]() |
In reply to this post by hespj
I used to sail a small boat with a non-ballasted centreboard and the thing was constantly trying to float up. I had a Heath Robinson arrangement of rubber sash window wedges on bits of string to keep it wedged down. Several times I wished it had a bit more weight in it, just so that it stayed where I wanted it to. |
![]() |
Another plagiarised solution, that I cannot claim as my own -
This works for hinged boards, but not so well for dagger boards of course as there will be times when for most dinghy designs, all parts of the board are necessarily out of the case, top or bottom. Find a board edge that stays permanently within the case, but is visible from the top when the plate is down.... so that you can adjust it. Cut off a corner, or out a notch and screw into a well epoxy lined hole, (untreated ply loves a good bath and delaminates at the touch of a screw thread anyway), a piece of oversize hose in the chosen recess. My only available hose was just too large, so I split it lengthways and if you look closely, you can see it is doubled up under the screw head: ![]() This is the one for 'Polly Wee' and it is fixed onto an off-cut corner, so that it is apparent when the board is lowered: ![]() Put a washer inbetween the screw head and the hose and screw it down until the squashed hose starts to impinge on the sides of the case. The amount of squash controls the degree of friction till the board stays where you put it. This does rely on the sides of the case being parallel and not warped, or there will be tighter and looser spots.... Won't there 'Rosie Mae'? Christo the W |
![]() |
In reply to this post by alopenboat
"And just see how long it lasts if the sacrificial anode becomes disconnected. :) " ..... Alastair Well that's a different problem to lack of oxygen. The last boat I had with a SS propshaft had no anode and the propshaft lasted just fine. But I was careful to make sure the only other metal near it was either SS or bronze. "I used to sail a small boat with a non-ballasted centreboard and the thing was constantly trying to float up." ..... Jeremy Good point Jeremy. I nearly altered my post but couldn't think of the right words. I think enough ballast to sink a board is good, and I think that a serious amount of ballast that dramatically improves the stability can be good on the right boat, but there's an "in-between land" where you get the worst of both worlds - a marginal increase in stability at the cost of complicated raising/lowering mechanism. I see Frogsider expects the ballast to weigh 30lbs which when offset against the buoyancy of the total board shouldn't be difficult to raise. John |
![]() |
When I said the weight would be 30lb, I should have said around 30kg! Apparently the Tricorn originally had a 40lb plate, but this was increased to 60lb, probably from hull no. 2 onwards. I believe mine is hull no. 4.
The boat was designed and built with a ratchet winch concealed in the top of the case to raise the plate. The winch is missing on my boat, as is the original plate, but I intend to install a simple 4:1 concentric windlass so that a tug on a line will wind it up. I have cut an experimental centreboard template, which looks more or less correct, out of scrap ply, but there may be more space in the case than I thought, so some bits might have to be stuck on to the template before I'm sure it's right. Chris, thanks for the plastic hose friction device idea. I won't need it for keeping the plate down, but I might want some sort of brake to deter the plate from crashing back into the case in the unlikely event of capsize or inversion. Patrick |
![]() ![]() |
Paul H (admin) |
![]() |
In reply to this post by hespj
MilliBee's new centre plate will be ballasted, as per Paul Fisher's plans:
Cut out a rectangle and chamfer the edges, lay on scrap chipboard and weigh down, melt some lead, ladle off the waste then pour in carefully, plane to size when cool. The lead flows around the chamfered edges which holds it in place. Casting the lead will be great fun ....as long John "don't let me see you flaunting H&S rules" is not looking. ![]() -Paul |
![]() |
On 12 Nov 2012 at 7:16, adminHBBR [via UK HBBR Forum] wrote:
> > > MilliBee's new centre plate will be ballasted, as per Paul Fisher's > plans: > > Cut out a rectangle and chamfer the edges, lay on scrap chipboard and > weigh down, melt some lead, ladle off the waste then pour in > carefully, plane to size when cool. > > The lead flows around the chamfered edges which holds it in place. > Casting the lead will be great fun ....as long John "don't let me see > you flaunting H&S rules" is not looking. > > -Paul My Paradox rudder uses a similar process but had a couple of bronze nails tapped in around the cavity so the lead was cast round their heads. Then glassed over. 10 years and no sign of a problem. -- Hoping for calm nights Alastair Law, Yeovil, England. <http://www.little.jim.freeuk.com> |
![]() ![]() |
Paul H (admin) |
![]() |
Al,
Could I use brass screws instead of bronze nails? -Paul |
![]() |
On 12 Nov 2012 at 8:17, adminHBBR [via UK HBBR Forum] wrote:
> > > Al, > > Could I use brass screws instead of bronze nails? > Probably, though I expect you could get away with steel nails or carpet tacks. I used bronze because I had lots, the boat is held together with them. -- Hoping for calm nights Alastair Law, Yeovil, England. <http://www.little.jim.freeuk.com> |
![]() |
Be aware that the zinc in brass gets gradually leached out in salt water, leaving behind a kind of copper paste with little to no strength. Bronze doesn't seem to suffer this problem.
I was thinking galvanised steel nails might work OK? Or, stainless screws are easy to obtain these days. Ian |
Free forum by Nabble | Edit this page |