Heron number 2104

123
123

|
|
Timmo has kindly offered me his old Heron dinghy (no 2104) that he sailed as a teenager. The approximate build date is 1962, based upon numbers in the Australian Heron Dinghy Association website. So it is a mark 1.
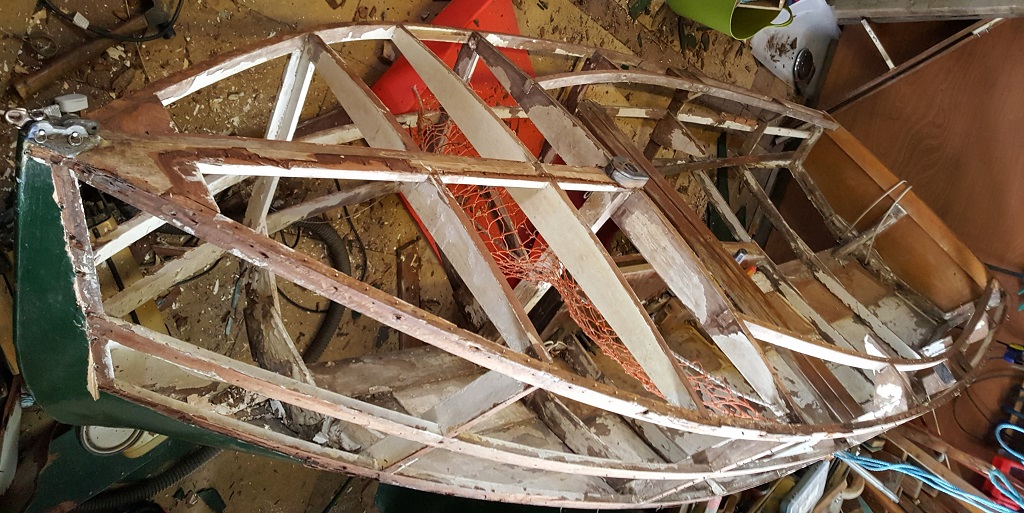
I had already researched the Heron last year, joined the UK association and looked at Paul Fisher modern stitch and tape redesign. So I was pleased to accept Tim's offer, although I knew she was in need of some restoration. This photo shows a nicely varnished version of the early builds, notice the framing. She was built upside down on a frame, which was then planked. 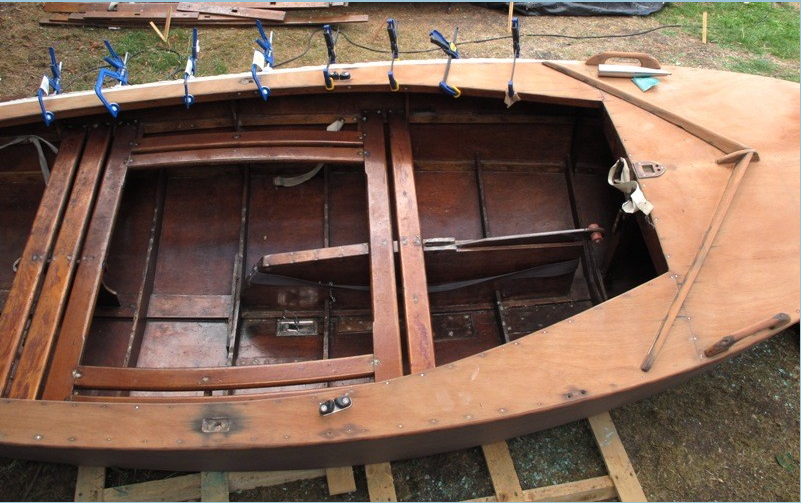 Here is number 2014. Not my favourite colour! 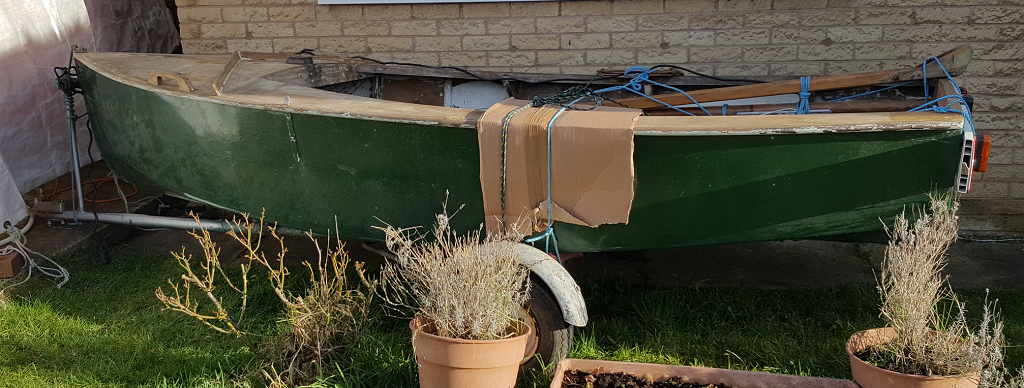 After attacking one of the old repairs on the starboard foredeck I found this: 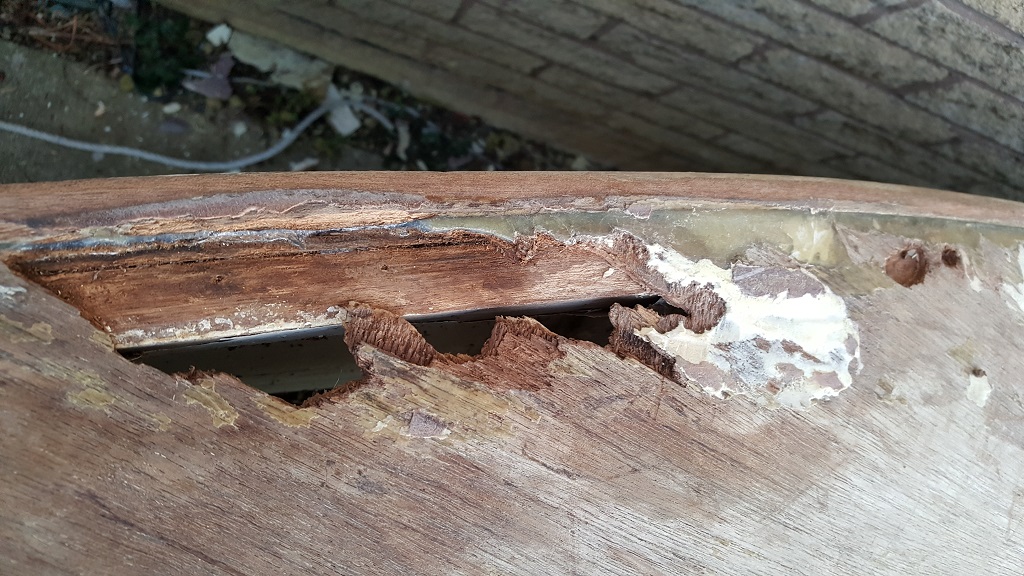 To be fair I had chipped away 3 layers: epoxy, colloidal epoxy and original Cascamite* glue, and then attacked the wood with a wire brush. It's quite fixable though by gluing a 2x1 block to the frame and patching in some ply (ditto on the port side). In the past I found that after drying the wood, a wire brush was an excellent way to remove the rotten wood fibres but leave healthy fibres. That created a very rough surface, but it was a good key for thickened epoxy to build up the original shape. * assuming that Cascamite is the clear-ish substance at the top of the picture. I saw some bubbled paint on the hull, then scraped away a tad too much. Oops: 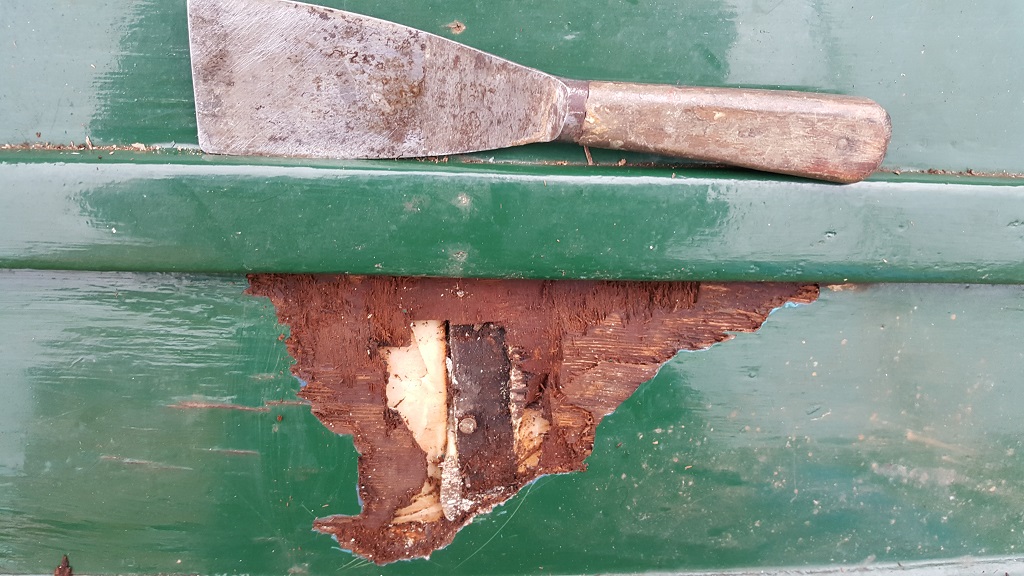 Luckily Tim had already double planked either side of the hog from foredeck to transom - you can see the interior plank through the hole. So it's also quite fixable - let the wood dry, wirebrush and epoxy in some ply. Possibly 9mm for extra strength, as there is a slight gap to the interior plank. Moving the hull around my hand slipped on a piece of the chine rail that snapped off. Oops, lots more broke away. That revealed an obvious design flaw; the side panel end grain is only sealed by the chine rail: 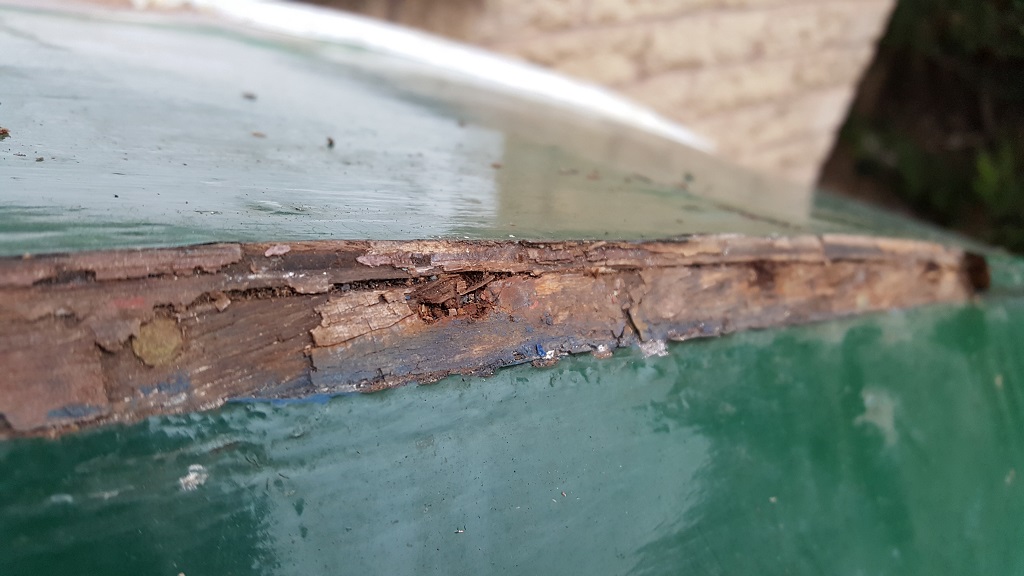 The end grain was damp, but despite that looked sound. So it if drys out ok, I'll rip off the entire chine rail, dry it with a hot air gun and seal the end grain with epoxy. Then glue on a new rail. One final problem. The trailer journey nudged a panel out of place, because the Cascamite glue holding the internal frame cracked I think. Fixable, provided trailer improvements are made to support the keel better. Despite all these niggles it's a lovely design, what the Mirror should have been I think. The rig is Gunter, or to be precise a 10 degree high peaked gaff like I already have and like on MilliBee. I had hoped to varnish the top side, but the foredeck will best be painted with Jotun Penguard undercoat then topcoat; which can stand up to the anchor, chain, seaweed, mud and sand. There is some nice mahogany, oak and possibly teak that will varnish really well. But sailing is the first priority, after she keeps the water out! -Paul |
|
|
Hi Paul,
Looks like a good one with a little work, I have some Heron bits in my shed if you need any spares. Curiously my Mermaid as seen on several Thames raids is very Heron inspired with an identical hull shape but built in buoyancy instead of the bags. Rows well and carries all the camping gear etc, plus very stable with the nearly flat bottom. Enjoy Steve 
|
|
|
Steve,
Thanks - the obvious need is chine runners  . .
I do have some oak, but no bandsaw unlike Tim who has no less than 3 bandsaws in his capacious workshop (bigger then the first home I bought). I heard that Ronseal Wood Hardener works well in these situations. Let the (soft) wood dry, paint the hardener, then finish with epoxy+paint. Has anyone else used Ronseal Wood Hardener? Does it really, really, really do what the tin says? Spruce to Mahagony is the woodworking equivalent of Alchemy.  The hull floor paint is cracked in 1 or 2 other places. I'll scrape them open back to dry-ish wood. It looks like the original undercoat did not stick well OR the ply has rotted from the inside. Its all fixable because Tim recently doubled up the floor about 200m either side of the hog. So there is a sound inner shell to stick repairs to, plus the floor bulkheads. Being an early model I think she is worth saving. There is a lot of good Mahogany, Oak and maybe Teak in her that is 100% sound and which will varnish nicely. The side decks when sanded have a nice grain; varnished they could look good. But pragmatically painting the large areas and varnishing the highlights is the easier solution. It's a wooden boat, things evolve slowly. -Paul |
|
|
Hi Paul,
If you need to process some oak I have a band saw, bench saw and planer in my small workshop not far up the M5. You are very welcome to come and play. Chris A. |
|
|
Thank you Chris,
That sounds like a great idea. I'm also thinking of planking over the 2in deep floor frames to get a smooth floor and extra bouyancy - resawing scrap wood will create lightweight cleats. I will glass the floor like MilliBee; after 10 years the floor has worn well and is in good condition. Paul |
|
|
There are a lot more areas of water damage and cracked joints
This picture is a good example, see how the joints have cracked open and the ply panels have a weak seam: 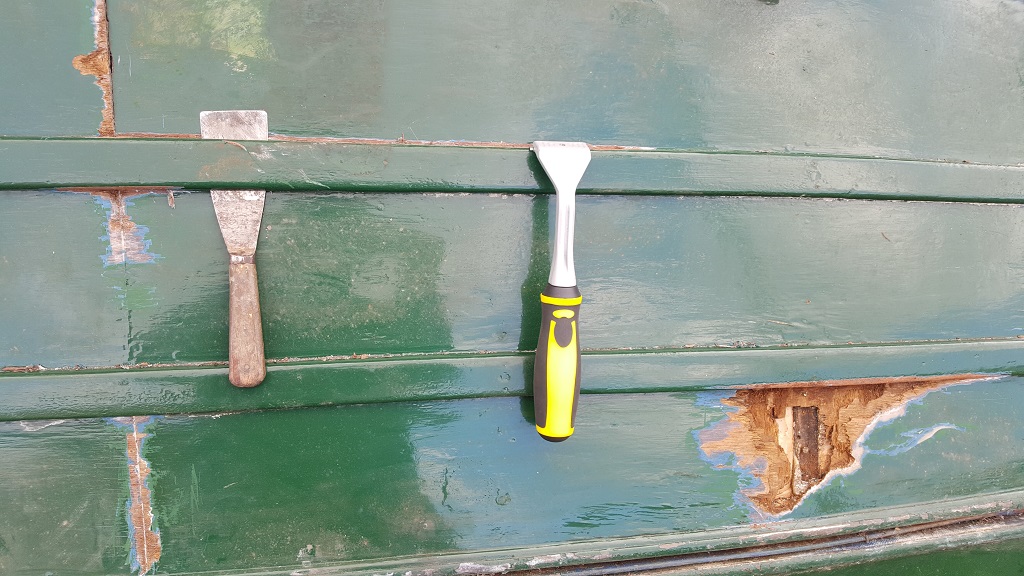 Here is the inner seam. No butt strapping which I think is the strongest and most robust join. The glue has cracked and let water under the Red Cedar floor joists. I use my Bosch multi-saw to cut under the joist with a thin blade, the copper tacks where cut and I could pull the floor joist away. 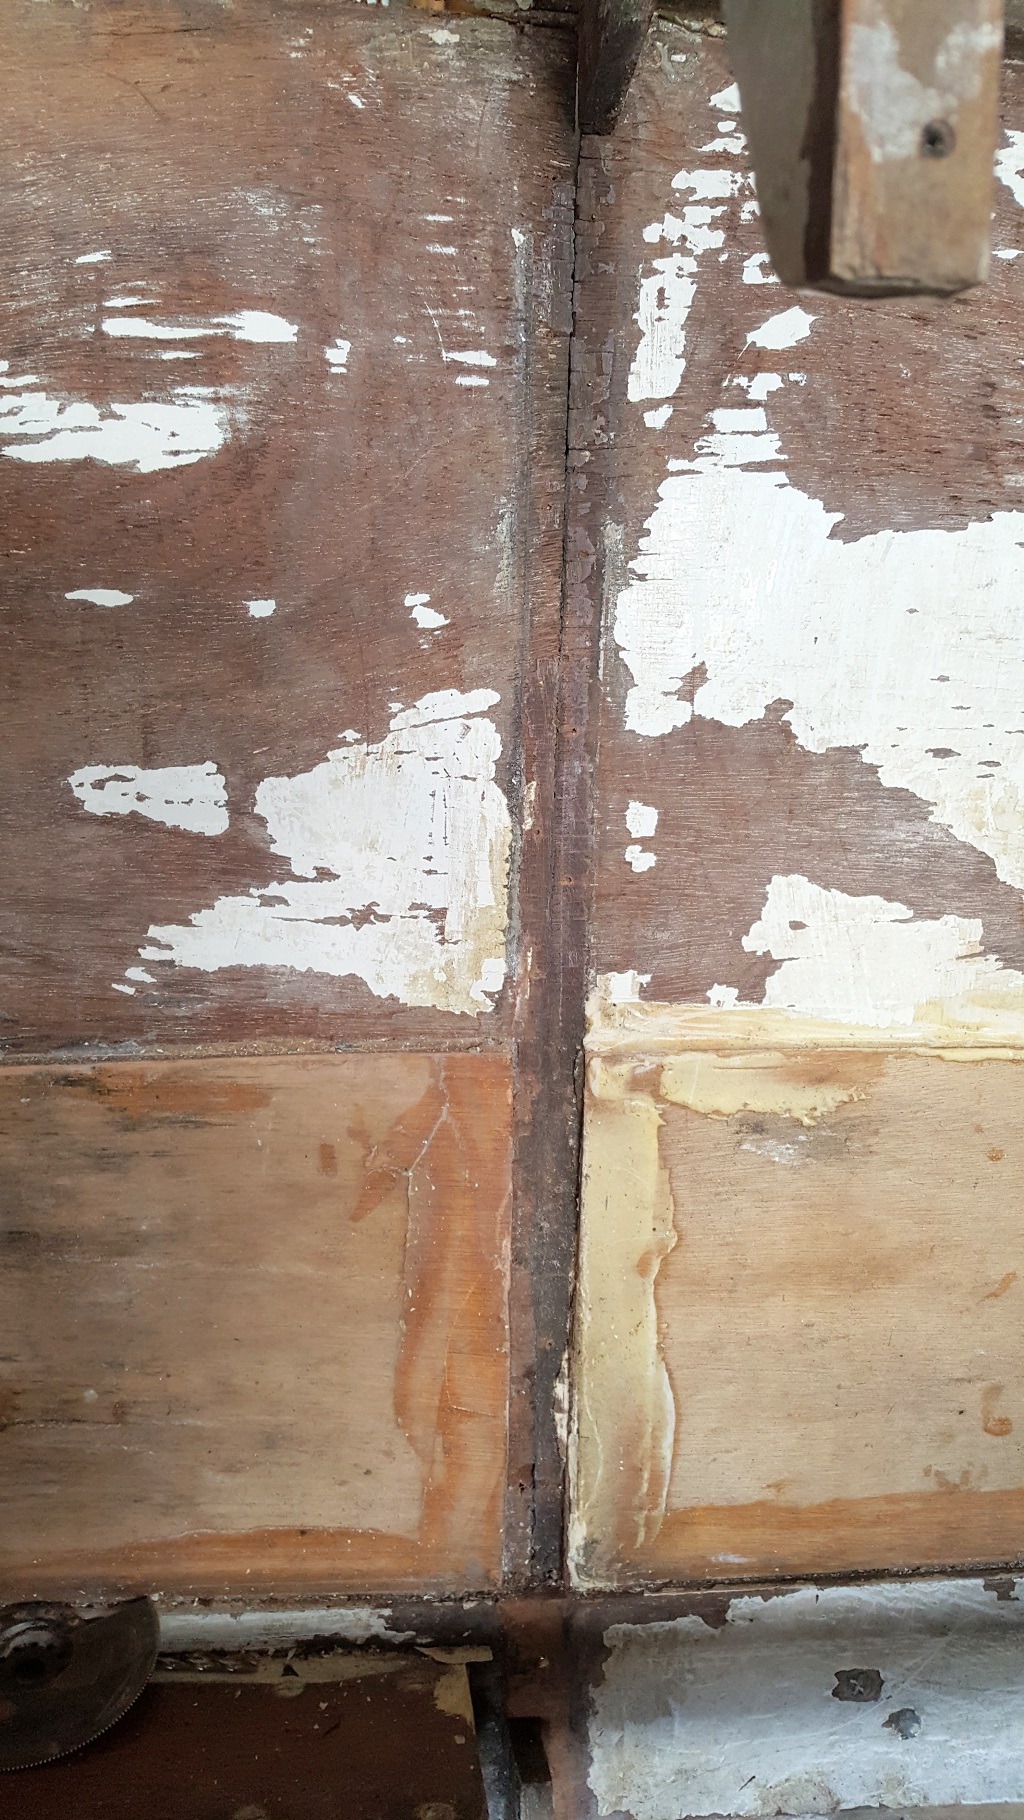 Whilst cleaning up the internal seam of old glue and newer epoxy fixes I had an oops moment 
The scraper went through the floor: 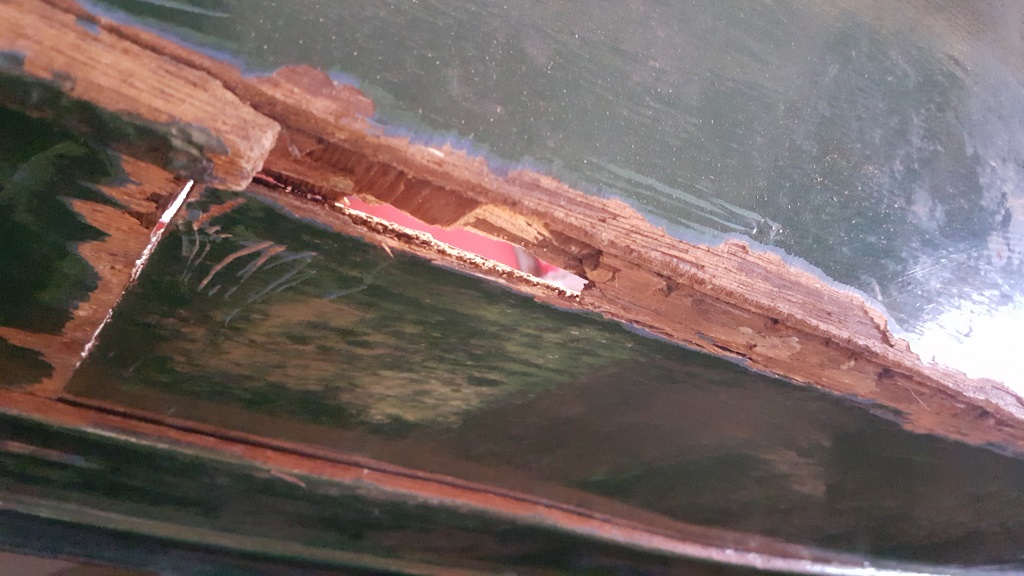 More light at the end of the tunnel: Paul Fisher kindly sold one sheet of his modern S&T Heron plans. I marked the buoyancy which needs to be added in red, side and rear seats plus half way up the foredeck (flush with CB): 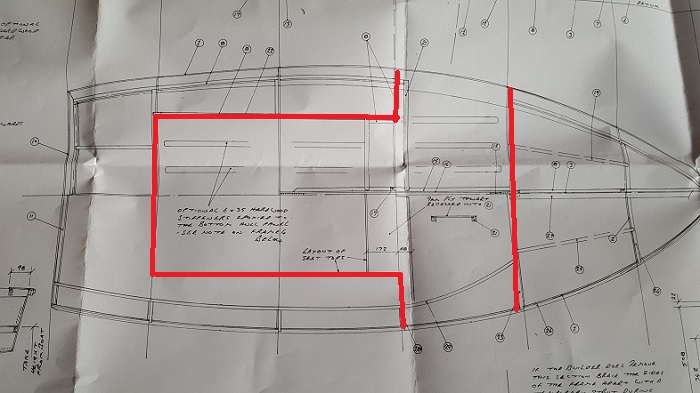 His plan says 18in deep rear seat and 32in between side seats exactly like MilliBee, built to his Lynx14 plans. Perhaps he uses those dimensions on lots of dinghies! The jury is out regarding 32in between seats, the original curved seats are 30ins apart. -Paul |
|
|
Musing about all the work needed, especially joints that have partially cracked. I have to:
Fix all the rotten hull patches Fix the rotten fore and gunnel decks. Build seating and buoyancy tanks. Ideally remove the rubbing strakes, fix and sand then glue back on with epoxy. The glue has cracked and let water in. Even if patched another area will suffer in the future. They are held on with copper nails so removal should be easy. I came to a conclusion over coffee - would it be easier to start again?  Paul Fisher has dimensions for the hull panels. I'd have to make 4 hull panels, 5 bulkheads are needed anyway for seat/buoyancy tanks, I'd have to make good many of the (new) joints anyway. New foredeck and side deck panels are almost needed anyway. (Timmo suggested I might want to replace them). What concerns me is how easily joints have cracked; I could be on permanent joint fixing duty. Then I could reuse: Rig+sail Rudder Centreboard 3 curved foredeck beams, front is hardwood. Side deck coming and supports (hardwood) Hardwood mast post Transom with hardwood beam. plus lots of hardwood, Red Cedar and Oak strips. The long centreboard case sides look like 3/4in thick mahogany - and probably very heavy! Better to make a nice coffee table. Then build a lighter case from 9mm ply. I can use Jotun 2-pack on the case, reuse the hardwood ends and know that everything is strong and water tight with epoxy and 2-pack paint. The old centreboard is in good shape and can be reused. BTW The Oak/Mahogany seats and floor boards weigh a whopping 19.5kg. That's almost one third of the official weight.  How about a simple in/out poll of rebuild or bodge forever?  -Paul |
|
|
Rebuild. No contest. 😎
|
|
|
Hi Paul,
I had a Heron a few years ago that needed new decks though the floor was in quite good condition. I never liked the bag lay out so I started down the same route of building in buoyancy tanks and learnt quite a lot in the process  . .
However! In the end I realised that what I was doing was converting a Heron into a Mermaid i.e. a boat that I already owned  At that point I stopped and passed my ex bonfire project on to somebody else. At that point I stopped and passed my ex bonfire project on to somebody else.
If you want to own a Heron then build a new one, you could also use the brand newish Bermudan rig for one that I have in my garage/loft etc  . .
Or you could just make me an offer for the Mermaid which has not been in the water for a few years. Steve |
|
|
In reply to this post by Paul H (admin)
On Tue, Feb 27, 2018 at 12:39 PM, Paul (admin) [via UK HBBR Forum] <[hidden email]> wrote:
I've just checked. It's exactly 250 days until 5th November. Put it in the pile with the rest of your scrap wood :-) |

|
|
This post was updated on .
Pete,
Yes talking to Tim and others offline the consensus is rebuild. But I had a go at removing all the plywood from the frame. A short day's work revealed the Red Cedar framing - I removed the starboard side panel and 1/3rd of the floor panel: The Framing skeleton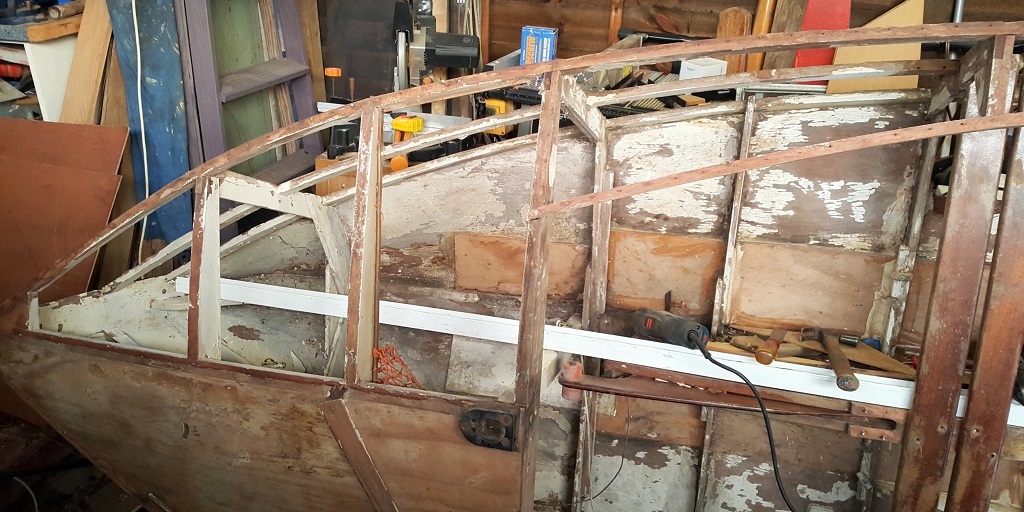 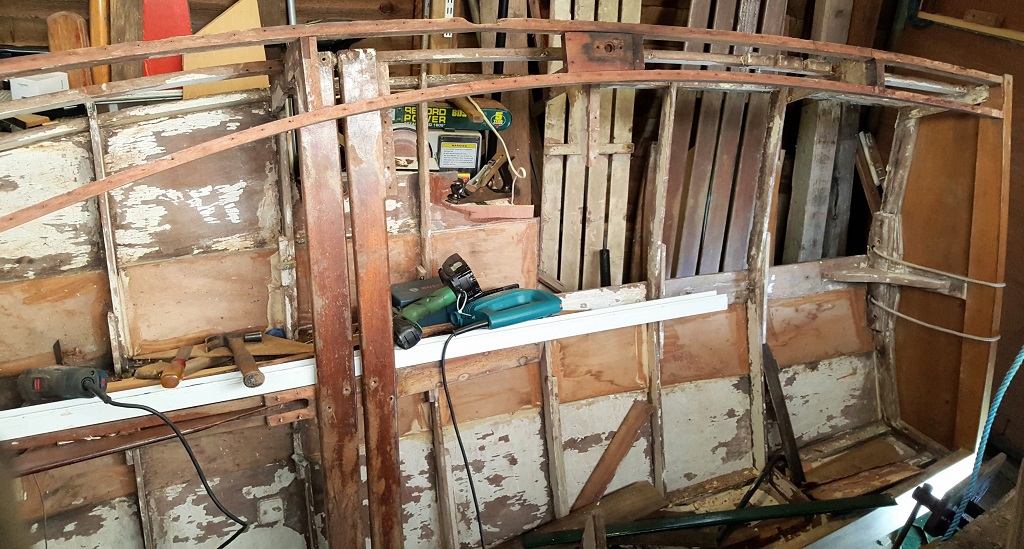 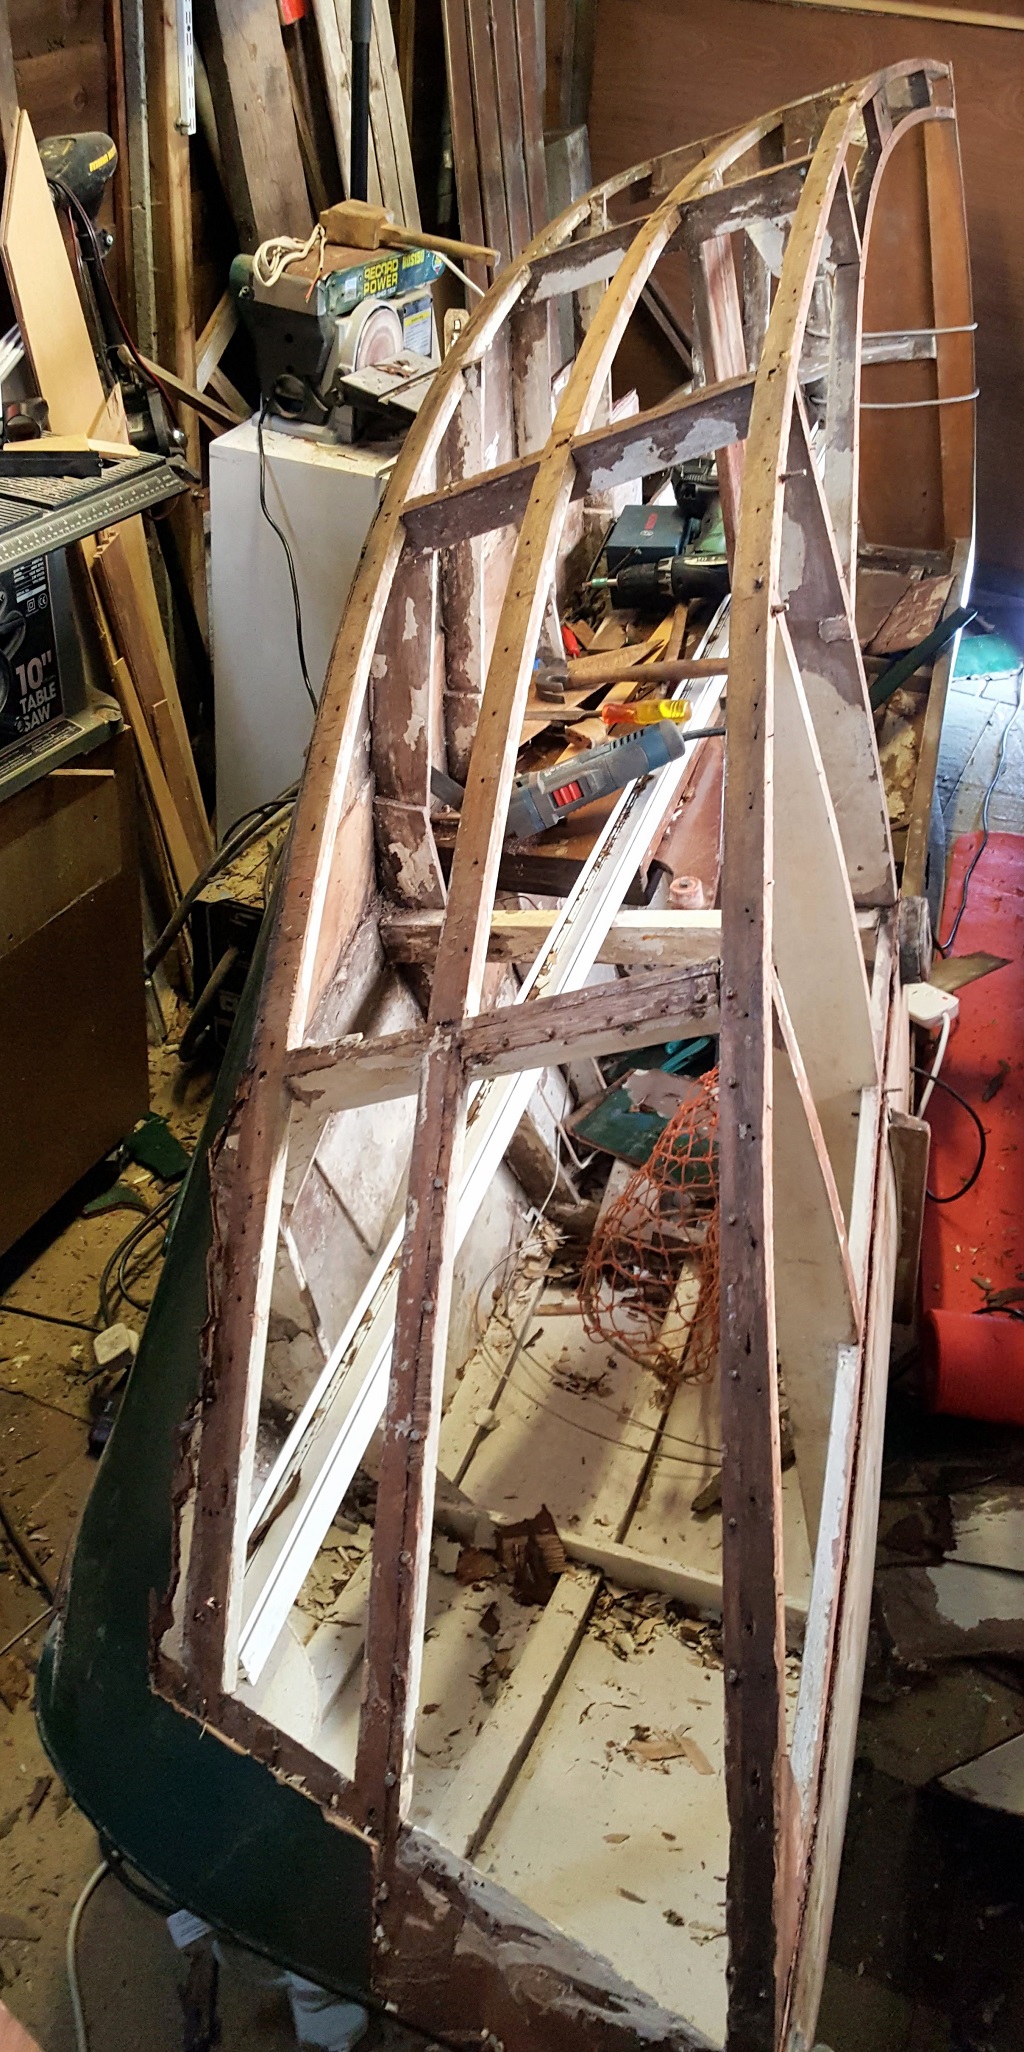 Apart from localised staining due to water (which had rotted the ply) the Red Cedar frame is in good condition. There are two patches slightly rotted, which can be fixed. Re-planking will be easy but the next hurdle is gluing the frame together with epoxy. It was quite easy to lever panels away with a crow bar. The glue seemed to have minimal strength and the nails did a better job of holding most of the ply. Progress slowed right down at the rear quarters, as Tim's Dad had repaired the area with epoxy which was very, very strong compared to the "magic glue". How to re-glue the framingIt's a sequential conundrum to find the order that each piece of wood is removed then epoxied. At the same time the shape must be preserved and twisting avoided. Ideally every joint will be epoxied. Something like this works: 1 Remove centre stringer at each side, sand and clean [removing it allows the new bulkheads to be fitted] 2 Starting at hog, remove pieces of floor support and insert 3 new bulkheads as per Paul Fisher's plans, adjusting the width to match the framing. Epoxy at hog only at this stage. 3 Continue for the two forward frames. 4 Remove stem if possible, epoxy to the hog. 5 Remove Transom knee, epoxy to the hog and transom. 6 Remove inwhale, sand and clean. Repeat for other side. 7 Remove foredeck beams and King Plank, sand and clean then epoxy back in position. 8 Epoxy inwhale into framing. Repeat for other side. 9 Epoxy centre stringer. It has a new location in the new bulkheads. Repeat for other side. 10 Remove chine log. Sand and clean, then epoxy back in place. Repeat for other side. That's the first stab. Another way to think of it is work from the hog upwards. Keeping the Red Wood frame is probably the quickest rebuild, plus it retains the history of the boat. The CentreboardLater the centreboard case must be removed, split open, epoxy coated then sealed with Jotun HB undercoat then Jotun white topcoat - both 2 pack. The case sides are way over the top, 3/4in Mahogony or Red Cedar. 9mm ply is sufficient and much lighter, so a total case rebuild is worth the extra days work. I painted MilliBee's case white inside and it performs very well - stones or mud jamming the board is quickly spotted and fixed. The Jotun paint is rock solid and should last forever. Paul |
|
|
More ply removed, all except the port floor:
 Most of the old glue joints in the framing have a slight movement, so I want to rebuild the joints using epoxy. Most of the joints were screwed. The problem I'm having is removing the screws - most are corroded so that even with very firm pressure a screwdriver will slip. Sometimes the heads snap off and about 20% can be undone. I wonder if sub-zero temperatures cause the Red Wood to shrink tight on the screws? [coefficient of expansion: wood across grain 30, steel 12] Would a hot air gun loosen the screws? Judging by the weight of what remains and the difficulty of opening the joints, I'm leaning more towards a new Stitch & Tape build. The remaining plans should arrive tomorrow. I would then recycle a lot of the framework: inwhales, stem, transom, king post, foredeck frames, mast post, curved decking support, stringer reused as cleat for new seats, centreboard, rudder. The CB case is 20mm Mahogany - too heavy but the fore/aft cleats and cappings can be used on a plywood case. Paul |
|
|
Another option is to fillet the joints rather than disassemble them.
|

|
|
Do the new plans still use the original style framing structure?
Sticking to the more modern building method will give you a much lighter hull to move around, is this a new boat now or a 99% "restoration"  Watching with interest. Steve  |
|
|
I think somewhere back up this thread it says newer hulls can be stitch and tape
If you are going for a new build, rather than loft-up new panels from scratch, why not clear ply from one side (or opposite sides, for stability) floor and side of the current hull, then lay new ply over the frame and cut two each of floor and side panels to stitch and tape; that is assuming the old ply strakes have disintegrated beyond reasonable use as patterns themselves. I suppose it depends on how desperate you are to remain 'in class'. This way, you would at least have a building frame. One more small point - the panels making up the centreboard case really do not have to be anything more than 6 mm. It is the top and bottom slots that take all the lateral pressures and should be adequately reinforced. Having said that, Polly Wee has a 6mm ply case, but it is sheathed inside (and I think out), with epoxied polycotton sheeting as is my wont. Press on! CW |
|
|
In reply to this post by LASER41420
Steve, No, the original framing is overlapping Red-Wood 11mm x 50mm. Up to seven pieces make up each frame. Paul Fisher specifies 6mm plywood frames with a cleat along the top to take the compression load. MilliBee is built the same way. But he uses identical frame positions, spaced apart 2ft or 610mm. That means all of the side deck and foredeck Red-Wood supports can be reused on the new S&T hull; likewise the King post and King plank. I've stripped all the ply panels, 50% had water damage. I removed the centreboard and weighed the skeleton - that included the stem, transom and centreboard case. I read approximately 48Kg or 100lbs which was an OMG moment.  That is a crazy amount of weight, proving the framework is completely over engineered to compensate for the low strength glues available in the early 60s. That confirms that a new S&T hull is the way ahead, reusing as much as possible from Heron 2104. Paul |
|
|
In reply to this post by Chris Waite
Chris - that is quick and easy to do, but lofting can be done inside a warm house! For interest the side panels are 17in deep for the central 50%, tapering to 1ft at the transom and 15in at the bow. I prefer 9mm case sides for robustness. Unlike Polly Wee, I won't have floorboards that support the case. Paul Fisher also specifies 9mm ply. The floor panels will be 9mm more or less flat up to the mast post, then 6mm for the 3ft twist to the stem. I don't trust 6mm with dropped anchors, chain, outboards also heavy footsteps and towing bumps. 9mm panels will add under 5kg to the floor weight, low down of course. [I have already saved 19.5kg in original hardwood floorboards and seating]. -Paul |
|
|
I've started a personal ban on brass screws - they are the devils job to remove.
 For the centreboard case I resorted to alternating with a floor board saw and hack saw; both are thin with fine blades, I use Eclipse bi-metal HSS blades 24tpi. I cut through the screws (about a dozen) and sawed between case and hog. It's a beast of a case, 3/4in Mahogony (I think) or Red Wood, that weighs in at 9.3kg or 20lb. That's way above the weight of a plywood case. 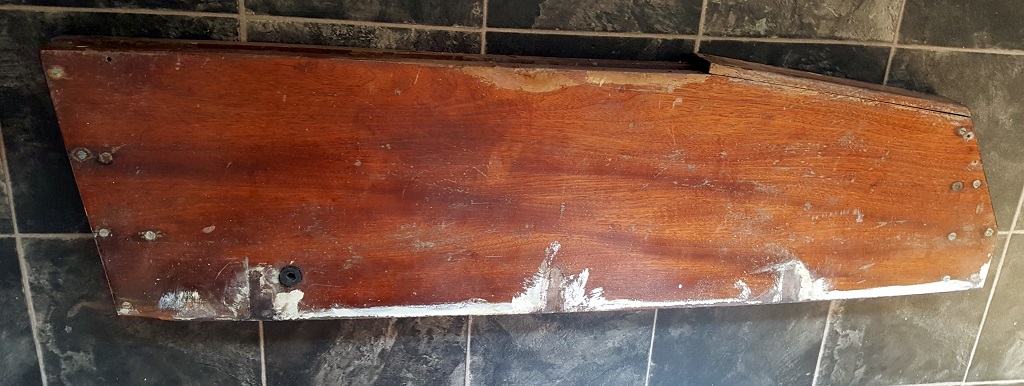 Hopefully I can disassemble it to reuse the hardwood end logs, and I can draw around the shape onto plywood. Unlike the original plans, Paul Fisher extends the CB case side supports to bond to the King post. That significantly strengthens the forward top corner; I expect the glass-fibre Herons do that. The joint between hog and case was poor. The case was butted up to the hog, instead of being fitted into a wider slot which could have been a stronger joint. It cracked open easily and there were multiple repairs with glassfibre tape, I presume to combat leaks. The end grain of the forward case log is damp. There is no damage, when dry and sanded it should be ok. -Paul |
|
|
In reply to this post by Paul H (admin)
Ikea should make boats?
The panels are cut from 5.5mm ply. I might double up the standing areas later to 11mm to improve stiffness - alternatively I could glue the old Redwood planks directly to the floor (sole). 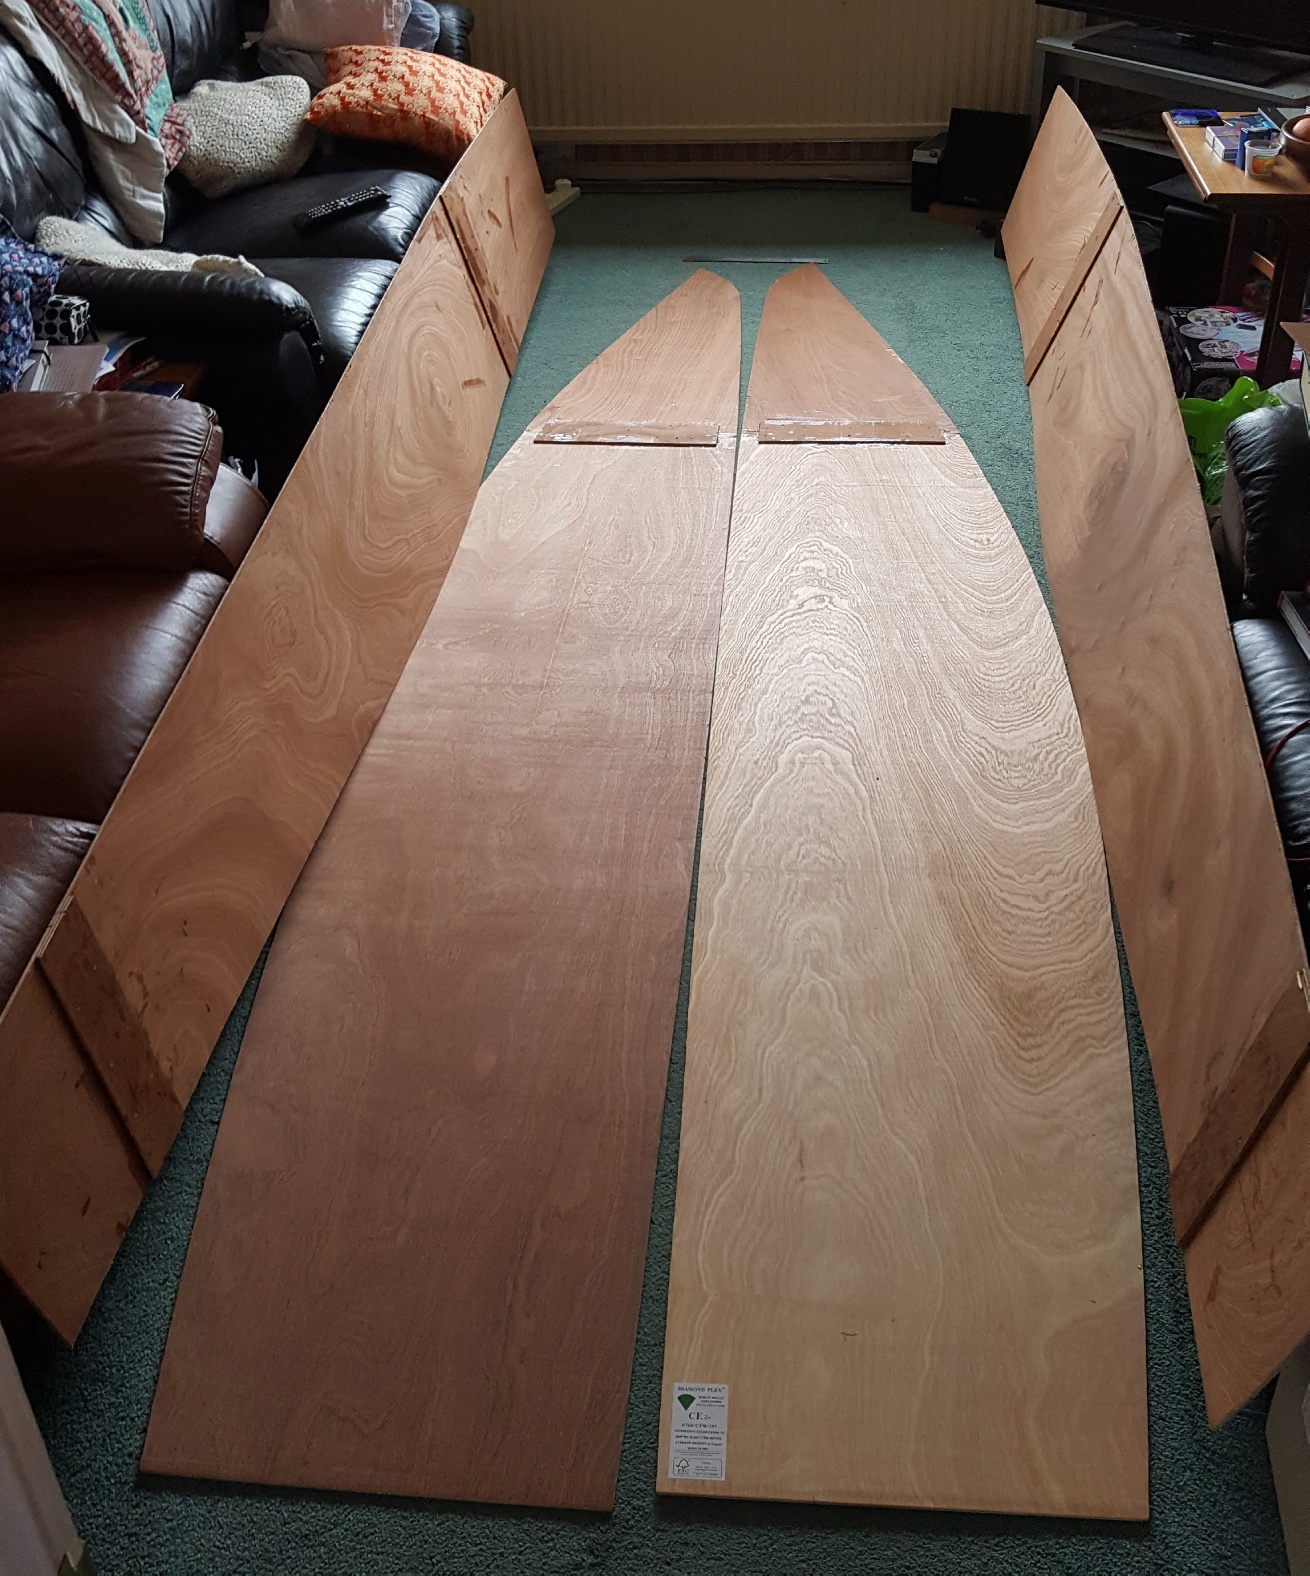 If we could just get some dry weather to sort out the shed and make space.....  Paul |
|
|
I think I'm a bit surprised
That the forward butt joints on the floors and sides are so nearly opposed to each other, rather than as offset as possible, to spread the stresses. Also that it has been necessary to have a second set aft on the sides of an eleven foot boat. Is this to minimize ply use? The the butts on the floor would have been better toward the aft end where the run is relatively flat and therefore more liable to flex, (witness your thoughts on doubling-up) and the forward end where there is considerable twist under the forefoot will not only be easier to form as a single thickness, but that twist will render the hull stiffer at this point anyway. Well monocoque Similarly there is sufficient length in an eight foot sheet to reduce the required butts to one per side for the sides and that could have been close, if not at the chainplates, where there is maximum depth with very little twist; a butt strap giving maximum strength to a vital area. I guess the horse has bolted and the stable door is swinging in the breeze? Was it cut on your super-duper new electronic cutter? The Ancient and Marinated Chris W |
«
Return to Builds in Progress
|
1 view|%1 views
| Free forum by Nabble | Edit this page |