It's got 2 Bee

12
12

|
|
I have started building the Richard Wood's Bee, a 16ft seaworthy row boat that also carries a sail.
Plans overview of Bee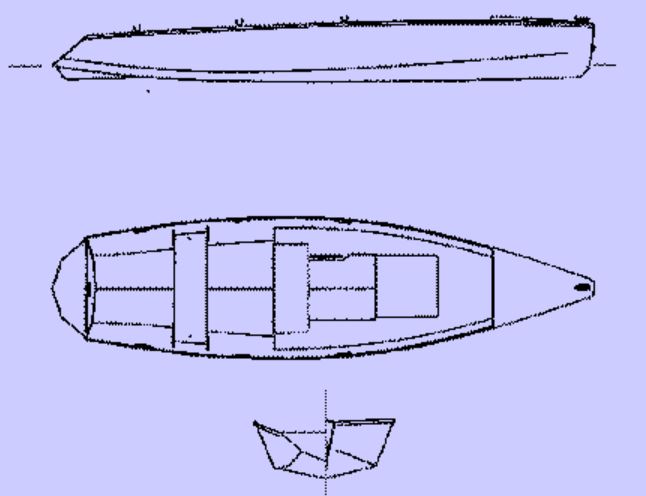 Length: 16’ (4.86m) Beam: 4’ 3” (1.3m) Weight: 108 pounds (49Kgs) Carrying capacity: 4 Adults Optional sail: 38 sq ft (3.5sqm) A stunning build of the Bee is documented on the website of Peter Kovacsy, an Australian boat builder and artist: 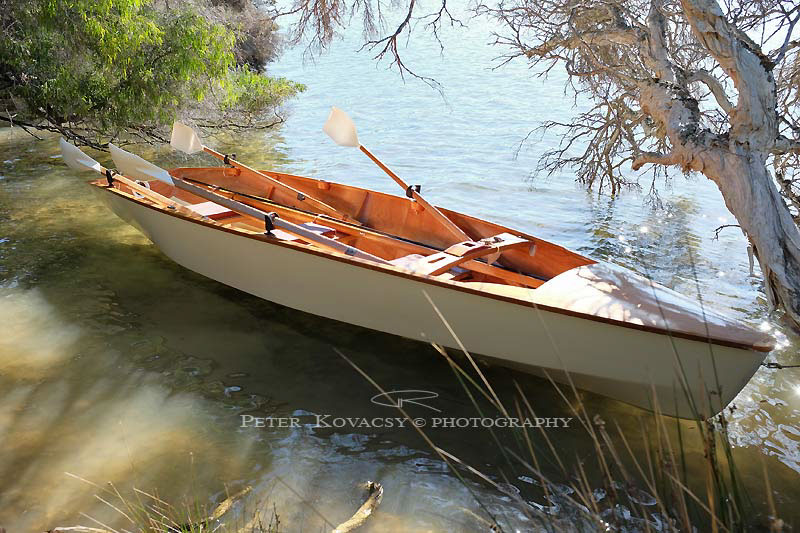 All I have to show at the moment is 4 planks of ply: 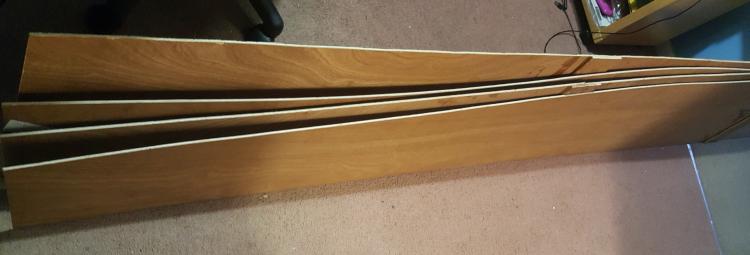 Little acorns.... My interest in the Bee is the slippery hull, ideal for river raids and my special interest in electric propulsion. -Paul |
|
|
When cutting the planks I found a handsaw was ideal. With 2 planks per side, little rocker and 16ft length the curves tend to be gentle, almost a straight line in places.
The saw was quicker than a jigsaw and left a "flatter" edge to plane. A few places need trimming though: 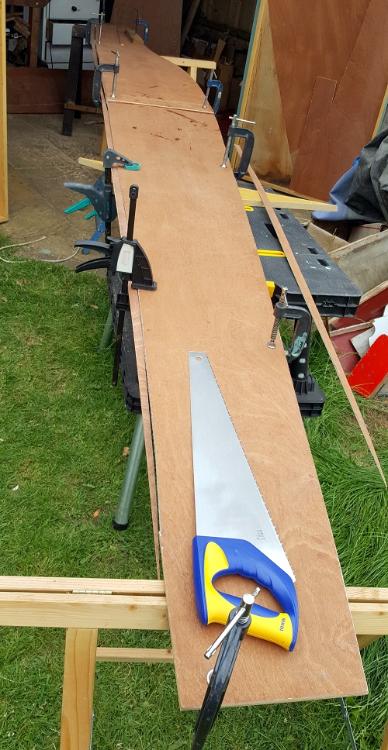 Below the planks are partially stitched to find the high spots that need trimming. The designer specified two frames 1300mm and 3000mm from the stern to support and shape the hull. The panels will be screwed to the frames during stitching and 3 temporary battens will lock the span distances across the gunnels: 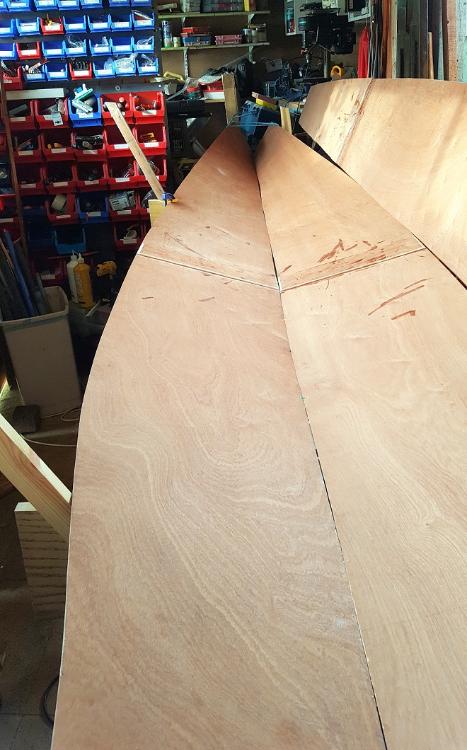 Next job is a cradle on wheels to move her around and gain access. Wheels big enough for grass will be needed, trimming the sheerline can't be done without looking from a distance. Has anybody successfully used a cradle on grass? Polyurethane (PU) wheels seem to be the widest and best. cheers Paul |
|
|
Fattest tyres and biggest wheels you can reasonably source.
Also make sure cradle is completely rigid (triangulated all round) or it will twist on uneven ground and distort the boat. Or check it for level each time you move it. Having made that mistake I painted round the feet of my building frame so it went back in exactly the same place if I moved it. Worth trying a pull saw. A lot of people find them even better for panels like that. Doesn't have to be Japanese, but they are rather good. Tim.
|


|
|
Thanks Tim,
Pneumatic castors are about £30 upwards, but none of them have brakes. This one is 260mm diameter: 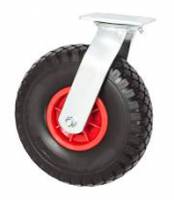 Obviously it will cope with grass very well. 4 castors would support MilliBee also, but she sits on a sloping drive and brakes or chocks are mandatory! There are some end of line castors, 35mm width which I hope is ok on grass, for £7: 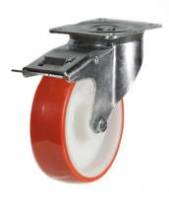 Those are mail order, after a quick search. -Paul |
|
|
Now come along Huccleberry
I promised I'd not turn our forum into a political blog some messages back But if you insist on belittling the beauty of Brexit Then I may have to recant CW |
|
|
Glad to hear you are building Bee. I have just returned from rowing on the river in my Linnet which is a close cousin of the Bee. Both were designed in 1994 by Lilian Woods who used to be Richard Woods wife as recreational rowing skiffs able to be used on the sea. I believe one rowed round the Lizard point.There is a good article about them in Watercraft No 25 as well as one in Practical boat owner which shows a picture of a Bee with someone camping in it. If you want copies of these articles I can let you have them.I hope you have as much fun with your boat as I have had with mine which I recon is probably the best boat I have had. Chris A.
|
|
|
In reply to this post by Paul H (admin)
Why do you need to move the boat any distance while it is being built? - are you building it in one place and storing it in another? Your boat looks to be similar weight, or only a little heavier, than the one I built this winter, which I think is now named 'ROLO'. Rolo was built without a conventional building jig - the shape of the boat was defined by the shapes of the plywood panels. If you do it that way there is no need for a building jig, or a special cradle. You do just have to check for twist along the length of the hull and if twist does appear remove it with a batten fixed diagonally across the hull at deck level. The construction of Rolo actually started with the hull resting on two transverse supports - effectively the same as if it were resting on two saw horses. The problem with that was that pressure on the seams between adjacent bottom panels where the hull rested on a narrow transverse member did cause some local distortion at the seam. Would have been better just to assemble the hull sitting on a flat table, possibly with some padding (an old matress perhaps) so that you dont get too concentrated pressure on the hull. If you dont have an old table to suit you could just use a sheet of cheap chipboard or suchlike resting on any suitable support - old chairs or whatever. Try to get the hull to a convenient working height, if its too low you will be doing all the work bending down. Once I had the hull seams joined with epoxy fillets and/or glass on the inside the hull was rigid enough for an alternative method of support. What I did, which worked well, was to sling a piece of rope so that it hung in a loop between roof joists, the loop transverse to the length of the hull. The hull rested in the loop somewhere towards the stern and the bow sat on a saw horse, but it might be even better to have rope loops supporting it near each end. That way I could turn the hull about its long axis to any angle and also raise and lower it by lengthening or slackening the rope loop. Very simple and made it easy to bring any part of the hull to a convenient work position. Probably only suitable for a fairly light boat though, unless you have a strong roof above! Once the boat has been built then it is very useful to have some wheels for moving it arround, eg to take it from a car in a car park to the waterside or to move it around in the garden at home. You probably saw at Beale Park that we have wheels that we can fit onto the topsides of ROLO. These are really useful because the are very quick to put on and take off the boat - easier than getting the boat on and off a conventional launching trolley. These wheels also enable the boat to be towed along behind a bycycle but I am not sure how practical that is in reality - so far we have usually been carying the ROLO on the car roofrack and have rigged up a gadget to get it easily on and off the roofrack. For soft or very uneven ground, eg a muddy or stone covered fore-shore, the tyres on the wheels that fix directly to the sides of the boat are too thin and the ground clearance is too low, so I have also made a more conventional launch trolley with fat pneumatic tyres to use on such terrain. Both sets of wheel can be carried on board the boat if necessary. Incidentally, I found that pieces cut from plastic turf and fixed to the support surface on the launch trolley are good to provide padding between a lightweight hull and a launch trolley or road trailer. Some people use old carpet for this but I think it tends to become 'manky'. You can buy a smallish piece of plastic turf as a door mat, I got such a doormat from B&Q - John |
|
|
In reply to this post by Chris Adeney
Thanks Chris, maybe we can take both out on the Avon near your sailing club (whichever direction the pub is). And of course everyone else is welcome. regards Paul |
|
|
In reply to this post by John P
John, I'm a bit limited of space in the shed extension, so I'll have to juggle things around when building. My wooden workbench and chopsaw table are also on wheels. So I'll play a favourite track on You Tube and see where the equipment ends up when the the music stops. I've extended a small trolley I made for MilliBee with reclaimed fence posts, to hold the 2 external frames 1700mm -ish apart. The external frames feature in the build steps, one must lightly screw the panels to the frames to hold the shape prior to epoxying all the seams and internal bulkheads. The bottom panel twists through about 60 degrees relative to the forward external frame, so it needs to be screwed to the frame to hold the designed shape. 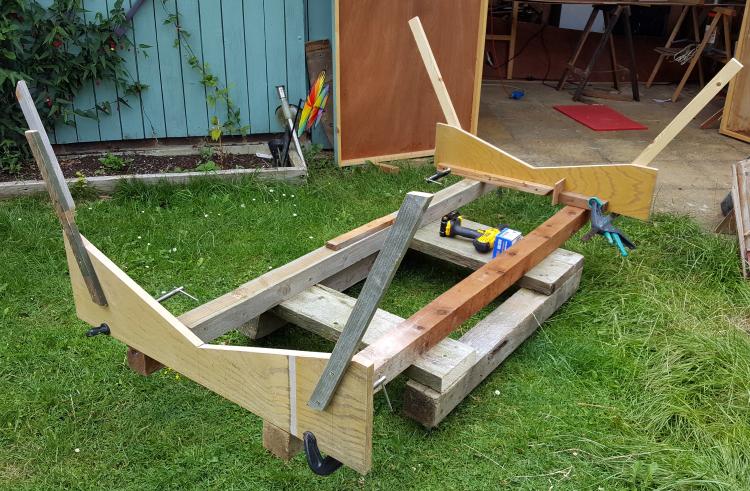 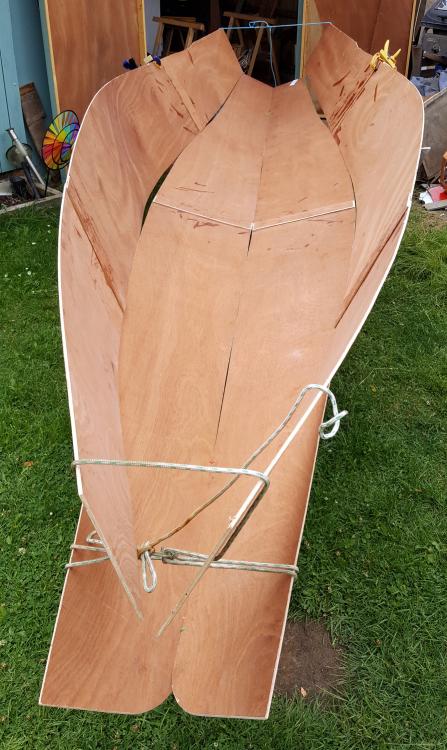 Ignore the sheerline, I added material to be trimmed later when the gunnels are fitted: 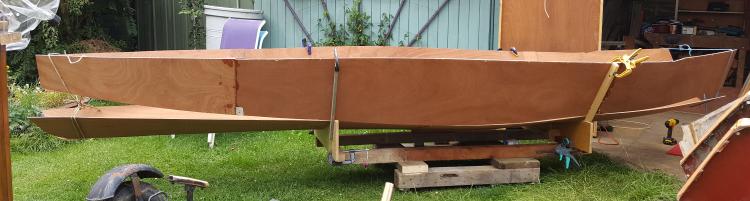 This was a quick mock up to get a feel for the hull shape. I've since disassembled it to drill the keel stitching holes with the bottom panels clamped together. I used 50mm wheels that were surplus, but they dug into the wet grass. They roll ok on the patio slabs, but something much bigger is needed on grass. The plastic turf sounds like a good idea on a trailer; to eliminate pressure points and it washes clean. regards Paul |
|
|
A bit of shed re-engineering was needed - removing some of the left side of the old door opening to gain width. Ideally I would remove another 6in, but quite a few timbers needed cutting and moving.
Roughly 6 stitches each side get the planks approximately in alignment fore and aft, which forms the shape well. I did make sure a chine stitch right by bow aligned the panels accurately, then I can start stitching from the bow backwards, as per the instructions: 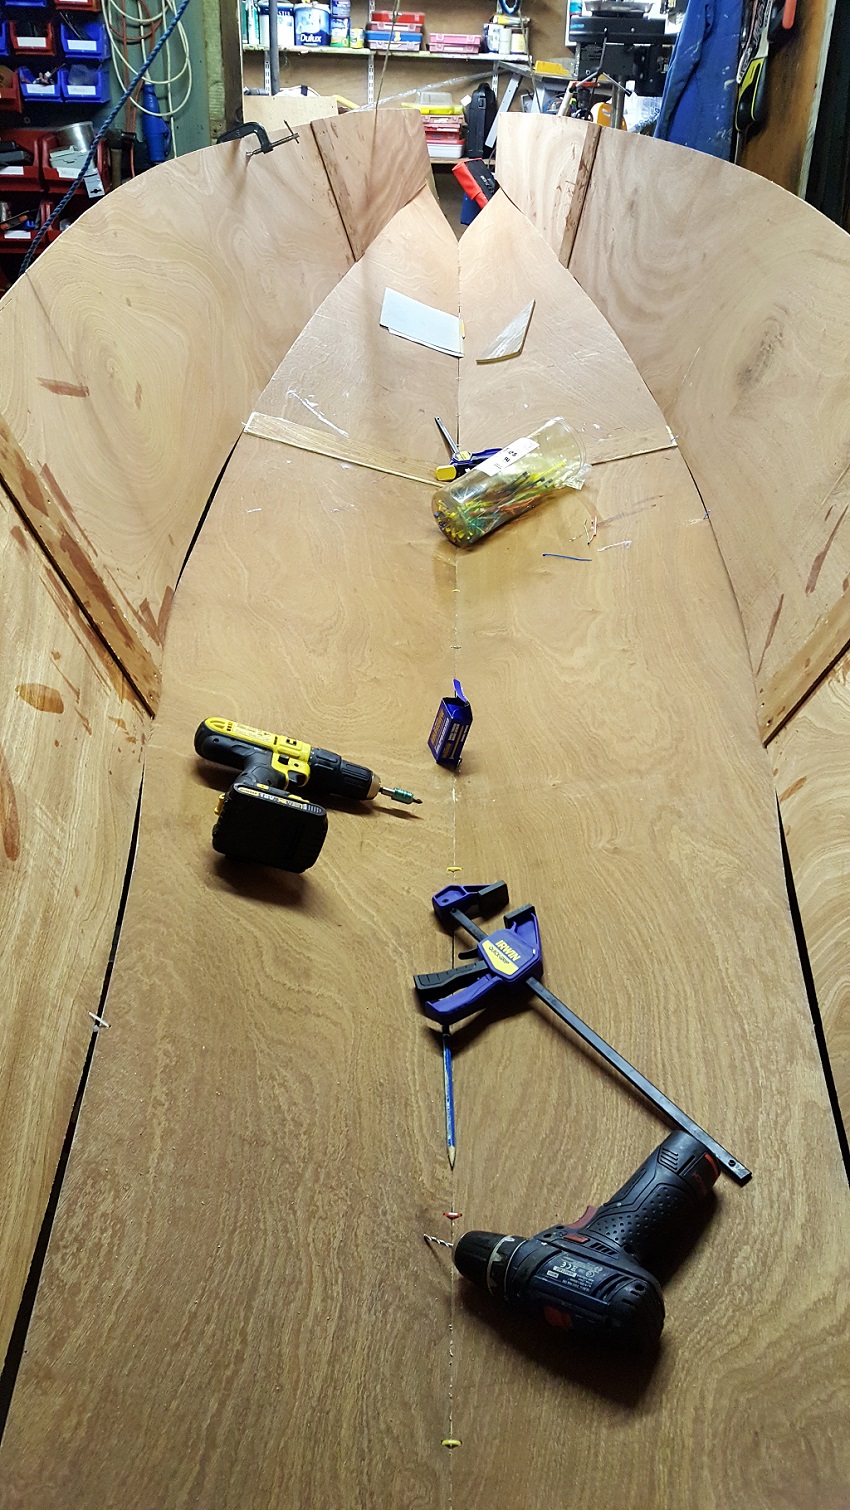 The eagle eyed will notice the unusual butt joints - its a long story..... -Paul |
|
|
A stitch in time....
I finally managed to get the stem stitched without the sound of cracking plywood. Those with experience will know the trick is to stitch the upper panels to the lower panels before attempting to close up the stem - that spreads the loads evenly along the edge of the distorted lower panels. Otherwise there is a tendency to apply a point load at the pointy bit and - bang! Every few days I tightened the large cable ties that spread load in the strong centre of the panels, adding more side stitches. Then the last 10mm was straightforward, although the large ties still take a fair amount of tension: 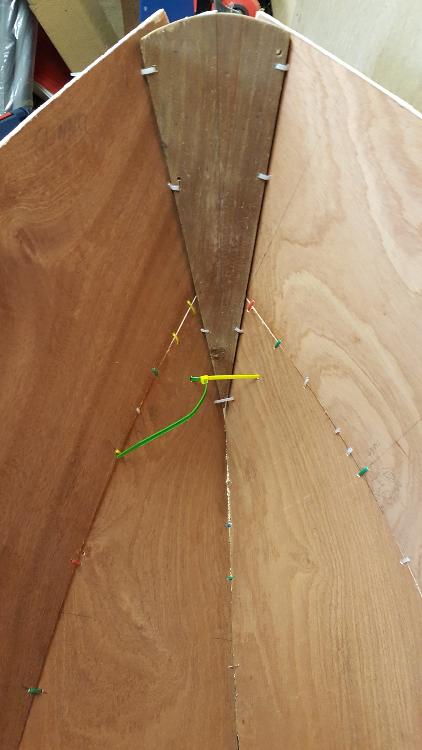 It's a simple stem design. A triangular 9mm piece at the rear and solid wood is glued to the front and shaped. Obviously the gunnels will bond nicely to the solid wood with a screw and glue joint - to spread the force of head-on bumps down the entire boat. As the Ozzy dealer at Beale said, they don't make boats with brakes. Everything is stitched, cable ties save a huge amount of time stripping wires. A few more ties are needed to align the panels accurately, it might be worth the trouble of copper ties in the difficult areas. Note the chine sweeps inwards towards the rear; simulations show a fine entry and fine exit of the waterline as you would expect. Something went 150mm wrong with my side length calculations! I have dumped the double inner and outer transoms that made a rudder and outboard impossible. I'll have to add a seat at the rear for buoyancy - and then way up the hassle of adding 150mm at the sides verses losing a little in sleeping length, depending on the location of the ever so important centreboard. 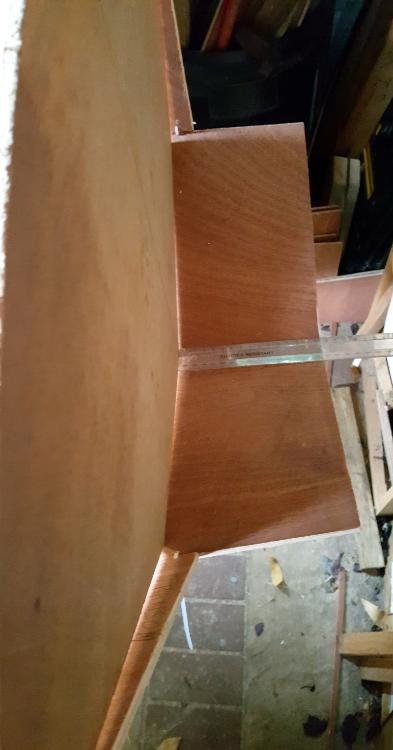 One thing I will do when fitting out the hull, is buy 2 semi-flexible solar panels and build the decks big enough for the panels. Modern semi-flexible panels are thin, lightweight and perfect for following a slightly curved deck - forget the clunky old panels with rigid aluminium frames. This picture is a bit extreme, a 30 degree arc is recommended, but you can see they are more flexible than plywood along the long axis. 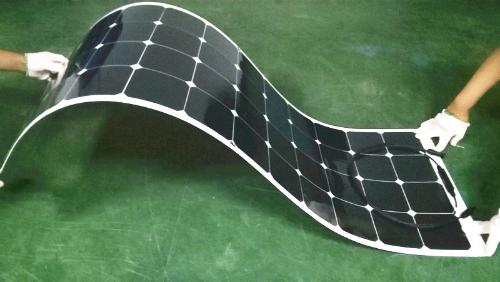 -Paul |
|
|
Interesting to note
That in the picture of the interior of the hull looking aft, the chines appear to curve inboard toward the quarters before tending to straighten up again as they reach the transom. I noted this problem early on with the Premise design, due to drawing up the full side strakes first, with a fair curve throughout the length of their chine edge. What actually happens is that as the side strakes are flared out, they develop a contra-rotated, pinched-in effect at this point. I found the way to solve this was to develop the chine forward with a fair curve, using a batten - the above effect does not occur as the (Premise) sides are more nearly vertical here, then continue the batten produced curve on the floor panels aft of the maximum beam. In each case, these (that is the floors forward but sides aft) are matched to the fair curves already cut into the strakes they will be joined to. Here are two photographs of Polly Wee - 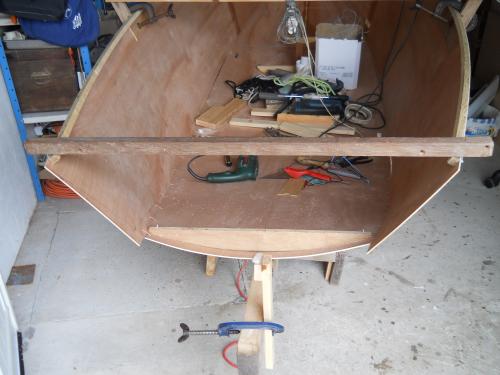  Not the most explicit of this anomaly, but the best I can find after the event. The other point that Paulie makes is to always start stitching from one end. If there are any errors they can be corrected at the other end rather than having to dismantle, or try and cut both while in situ. I also chose the bow - as can be seen in my case by a protrusion of the side strakes aft, though this vanished anyway when I installed the transom raked at about 20 degrees and then trimmed away the excess. A stitch in chine Sort of thing CW |
|
|
Chris, I noted the chine curve inboard when drawing the offsets. That is a deliberate part of the offsets for both panels. I wasn't sure why, but assumed it must be a design decision; to make the hull a bit slippery? As you said I balanced each side every 3-4 stitches and the bow was a good place to start, after loosely tying the panels every few feet to avoid twisting at the stern affecting the bow. The bow is the difficult area because of the massive twist of the bottom panels, so it has to be even and balanced right from the start. I like the crescent shaped frame to hold the bottom panels in a curve, before adding the side panels. I'll have a go and see if I can replicate a gentle curve. To rake the transom I'll need the first gunnels in place, because the side panels are a tad short - oops. Door stop is 10 x 36 which is close to the design spec for the gunnels of two layers of 10 x 30. It's fairly cheap and I sorted out some knot free lengths at the wood yard this morning. When its painted I'll reuse the Mirror hardwood rubbing strakes that I kept from Tigger, RIP. -Paul |
|
|
I look forward to hearing about the performance of the flexible panel solar. After our holiday in Cornwall I had the idea of a solar canopy with flexible panels. If a 300Wp array produces say 200W then I would only need 3 hours of sunshine to give me an hour of cruising at 600W - nearly full power. With your long, light boat on a speed limited waterway you might get away with 400W, so 2 hours of sun for each hour of playtime.
|
|
|
I have four flexible panels fitted to a slightly curved canopy, wired to an MPPT module so that I can get as much as possible out of the panels. Some quick and dirty testing showed that I could get around 100W or so out of the panels on a bright, but slightly overcast, day.
I worked out that, allowing for stops for tea, locks, lunch, etc, that should be enough to charge the battery pack for a typical day of river cruising. I worked on the basis of needing around 200 W or so to maintain 4 kts (yet to be tested). My modified Winsome hull is pretty similar to the Bee, and when tested needed around 80W of actual propulsive power to cruise at 4kts in still water, with no wind: 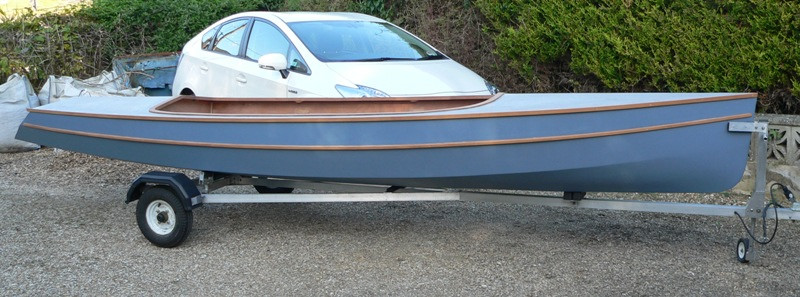 |
|
|
Jeremy,
80 Watts seems about right for a slippery hull. MilliBee (14ft x 6ft, 250kg) could do about 2kts down the Thames with that power, with no wind. It's interesting you chose a curvy canopy to mount the panels. I had that idea for a 100W panel at the rear on the Bee - across the hull because at least 1 metre is needed. Then I thought it could be removable and bolted onto MilliBee. For sailing a canopy might get in the way, so one would want to un-plug it. The other 100W panel could fit on the foredeck; I need 2 panels to charge the 24V battery pack - made from 2 leisure batteries in series. Do you have any pictures of the canopy? cheers Paul |
|
|
Jeremy, what was the peak rated watts of your solar canopy which produced about 100W?
Paul, and anyone who is tinkering with electric propulsion, here are some notes copied from my post on another forum: Here is an update: I've used the brushless outboard and controller with my newly built 14ft skiff/rowboat and have a few more numbers for you. I have previously measured the motor/controller/outboard drawing about 135W at full speed with no load, but this seems to be proportional to speed because I found that in use, the motor will still move the boat and have steerage way at just 40W! The lowest number I saw on the wattmeter was 18W with the motor still turning reliably - it's generally considered that sensorless brushless motors won't run at very low speeds. Not much steerage and boat barely moving at that level though. Max power for this boat/prop/24v was 650W. If you use a bigger prop/more volts/fatter boat, the power goes up. I fitted a thermocouple deep in the motor, ran for 15 minutes or so and did not see temperature above 40 C at 650W. Unfortunately I have not been looking after my batteries properly and the voltage started sagging rapidly after that but I don't think there will be any problems with heat dissipation. Finally, the boat is so stable (with those heavy batteries) and power required so low that I will probably make a solar canopy using flexible panels, for complete autonomy. I anticipate that four hours of sunshine will give me one hour of playtime! |
|
|
I'll try and dig the canopy out from the garage and take a photo - it's been sat in there for four years whilst we've been building the house, just getting dusty.
The canopy is just a whole sheet of 3mm ply, glued to some curved, laminated, beams, reinforced around the edge with some steam-bent strip. It looks very like the sort of canopies that are often fitted to small steam boats. There are four, 100 W rated, semi-flexible solar panels, the ones with the aluminium sheet backing plate, bonded to the ply. All four are connected in parallel, via Schottky isolating diodes, to an MPPT charge controller. I found that adding Hall sensors to a standard BLDC motor significantly reduced the no-load power, so improving efficiency, and also gave a big increase in low speed torque. I also re-wound my motors with much heavier gauge wire, to reduce the copper losses, and that made a big improvement in efficiency, too. The hull propulsive power requirement was measured on Chichester canal some years ago. I made up a tow test rig, loaded the boat to its normal displacement, then towed it at a constant speed and measured the force in the tow. From that I worked back to get the propulsive power needed. Everything is optimised for 4kts, the prop, motor etc are all operating at peak efficiency at that speed. Anything over about 4.5 kts is much less efficient, but at around 3kts the efficiency is only around 10% lower. Using a large, slow RPM prop, with a motor re-wound to have a low Kv, plus a reduction drive of 2:1 between the motor and the prop, helps keep the overall efficiency up. The nominal battery voltage is 14.8V, increasing to 16.8V at full charge. The solar panels peak point is around 17V to 18V, leaving a bit of headroom for the battery management system to work OK. |
|
|
Where can I find these brushless motors and controllers?
Also is there a simple way to add a prop? Cheers Paul |
|
|
In post no. 85 of this thread there is a great description of a set up for a kayak using a "long tail" propulsion (like the cordless canoes). Most parts come from Hobbyking:
https://www.boatdesign.net/threads/efficient-solar-powered-electric-kayak.52833/page-6#post-745467 That would be the easy way; an excellent way might be to copy Jeremy's UJ outboard arrangement and fit it to your sloping transom. I can send you an APC Sport 11.5" x 4" propeller f.o.c. if you want it; just fix it to a bit of 8mm threaded rod between two nuts and try it out in water with your cordless drill, you'll be amazed! I'm a bit disappointed that Jeremy only averaged 100W from a 400W array, I will have to revise my expectations. |
«
Return to Builds in Progress
|
1 view|%1 views
| Free forum by Nabble | Edit this page |