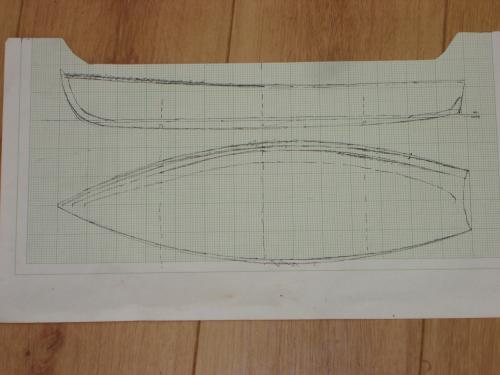
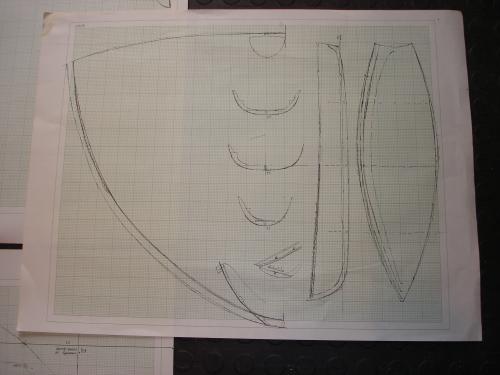
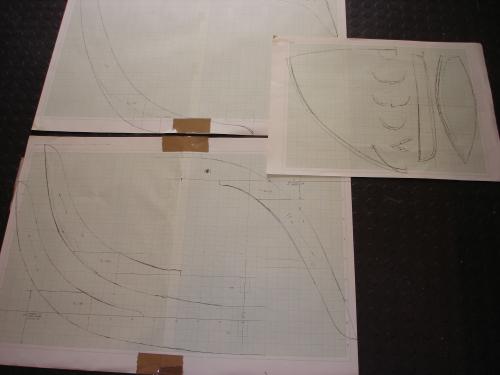
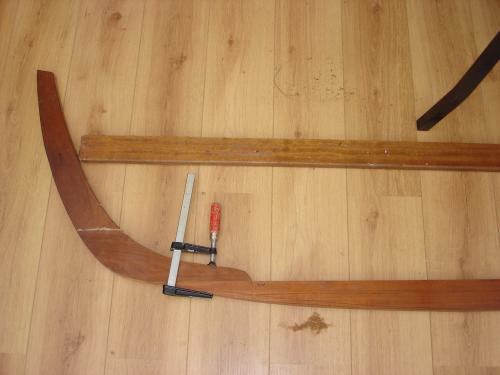
![]() |
I've started a boat build and as there is a slight possibility of finishing it I thought I would share, but don't hold your breath until the launch.
It will be a 14ft long pvc/nylon skin on teak frame. All the wood is from old university furniture which was being thrown away. I chose to skin it instead of strip planking or similar as I hope it will be easier than other methods. Even the graph paper (12 squares per inch - very handy) is recycled from the same source! This is the drawing I'm working from: ![]() Another with frames and full size transom: ![]() And full size frames ready to transfer to wood: ![]() I have started cutting wood and I'll put pictures in another post, but I have to say that summoning the mental energy to get started and keep going is by far the hardest part. If I was a "normal" get-up-and-go type this would have been finished in time for the summer holiday a month back; so encouragement is warmly welcomed. |
![]() |
Hi Alan,
I hope you haven't been overwhelmed by the avalanche of support and encouragement you've been getting. ![]() This is exactly the kind of design/build we like to see. Is the design your own or did you just make it up? Send more photos soon. Graham |
![]() |
Sorry, as one of the SOF proponents here I should, perhaps, have spotted this earlier.
I apologize if this is teaching granny to suck eggs, but there are a few points with SOF construction that are important. The frames must be set back from the stringers so that the skin can't contact them, and with wooden frames it's often easier/neater to scallop the space between the rebates that will hold the stringers to ensure this is the case. Fitting the stringers to the outside face of the frames means probably having a screw head on the outside, which will need to be well embedded in the stringer so that you can fill and sand the stringer to reduce the effect of a hard point on the fabric. Avoid very shallow angles in the fabric from one stringer to the next if possible, as when shrinking the fabric tight it helps if it pulls tighter to the stringer at the same time. Use as many stringers as you can. I got away with a keel, two gunwales and four stringers with Aero, but if doing it again would have used 6 or 8 stringers to reduce the fabric spans. A look at the thread here from when I built Aero may help a bit, but Aero is a bit extreme, perhaps (see http://uk-hbbr-forum.967333.n3.nabble.com/The-quot-Aerowherry-quot-a-lightweight-rowing-boat-was-going-to-be-a-canoe-td2424625.html ) |
![]() |
Sorry, but the post message page isn't working again, the post message button has disappeared after I add pictures, so no pictures.
It's great to get two replies, good encouragement. All my own design but based on all the plans I keep looking at, and construction to fit my own woodworking skills. The stringers will be proud of the frames by enough to avoid the "hungry horse" effect, and I'll be covering with pvc coated nylon, like lorry curtains, applied as warm as possible and stapled; one piece each side. |
![]() |
Hi Alan,
The post message with photos is working fine at this end. I've just tested it. Must be something going on your end. Bloody Computers. |
![]() |
Hi,
I emailed Alan as soon as I saw his post. The reply he sent me has been forwarded to Nabble Support. They cannot reproduce the issue are keen to get reports whenever this happens.
Greg Chapman
GregAfloat - My Boating Biography |
![]() |
I've just received Gregs email about Nabble help so I'll try to post some pictures as a test:
![]() All still working so here is another: ![]() Strange, all working today so I'll post now. |
![]() |
Not much of interest to show people yet but I've glued together all the frame half lap joints and I'm now struggling with the transom. It is from a table top about 19mm 3/4" thick with grain horizontal, plus another smaller piece, grain vertical, to reinforce it. The table top was warped into a curve so I've been planing the faying surfaces (where you put the glue) to make them flat enough to glue together. Planing these big surfaces is pushing my skill level somewhat, but the hardest part is finding somewhere to rigidly hold them. Anyway, I'm getting there.
Edit: I'll just add that a proper bloke would have knocked this out in a morning. |
![]() |
All major sub assemblies now glued up, transom problems overcome and frames planed to remove 50 year old varnish. Getting plenty of practise at sharpening planes.
![]() |
![]() |
This post was updated on .
Finally cobbled the bits together for a picture:
![]() The frames and keel are half-jointed together, which takes the strength out of both components. To put the strength back in a keelson (is that right? a flat plank under the keel) will be added to strengthen the keel and tie bars will be added to the frames above the keel. |
![]() |
The stringers for this hull are unlikely to bend around it's curves if I make them in one piece so I am making them in two layers 25 x 8mm (25 x 16mm total). That's the trouble with recycled wood; if I bought it I would choose something bendier. Also there is nothing much over seven feet long so each stringer layer will have to be scarfed. Five stringers each side, each in two layers and each with two scarf joints means about 80 tapers to be cut, so I made a jig-
![]() The straight side (top of pic) goes against the fence of the table saw. The narrow end of the jig goes to the outfeed end of the table and the saw blade enters the strip to be tapered just next to the clamp (bottom right of pic) so that blade friction keeps the strip pushed against the jig, not away from it as would happen if you put the whole jig the other way round, which seems the "obvious" way. I have cut all the stringer parts to size but haven't used this scarf taper jig yet. And here is another jig, used to cut the half lap frames. If you stare at it long enough you may be able to work it out... ![]() |
![]() |
Nearly forgot these two aids to ripping strip planks:
![]() Featherboards - vertical to control workpiece, on home-made brackets on fence; horizontal one is not pressing on strip, just controlling vibration. ![]() Outfeed roller made from a piece of pvc downpipe. |
![]() |
Looks like your well set up Alan. I particulary like the roller. But shouldn't the feather boards be in front of the blade? The vertical one to hold it down and the horizontal to hold it against the fence with the riving knife behind the blade to stop it grabbing. Just a thought Ray.
|
![]() |
The vertical featherboard is holding the stock down and leaves room in front of the blade to use a push stick. The horizontal one is barely touching the strip being cut, (it's not pressing the two pieces back together) but without it the strip was vibrating and moving about in quite a scary way - it resonates as it reaches certain cut lengths without the featherboard. Anyway Ray, advice and comments warmly welcome, a table saw is not a machine to take liberties with. I probably should have asked here about my various setups; I looked online but didn't find much of direct use so had to resort to thinking. Just waiting for a spare dry afternoon to cut the scarfs now.
|
![]() |
Good luck with your build Alan. Sorry but having run my own joiners shop making windows and doors for the trade for 25years l just can't heip the odd comment. Your doing a fine job.
|
![]() |
I worked with mainly metal and plastics but we had a Rojek table saw so I had some experience but am wary of them as if you make a mistake the wood/plastic crosses the workshop like a bullet. I didn't know what resawing meant (even though I had done it) before someone here explained to me.
Oh, nearly forgot; there is a "finger" in front of the blade holding the work against the fence, this must help a bit. |
![]() |
After ripping and scarf cutting comes the gluing so time for yet another jig
![]() Six glued joints at a time, 18 done so far, 20 needed plus spares plus some will have to be lengthened so all ends have been tapered to allow for further jointing. |
![]() |
That's the way to do it! Neat and efficient. Like it.
|
![]() |
I did a trial assembly of the boat and attached the stringers to the frames; I had to move them about a little to get some nice curves - here are some pictures:
![]() ![]() ![]() At this stage I know now that the forward frame is about 2" too narrow and that the tuck just before the transom will not be fair. This is what comes of scaling up from a piece of graph paper. Some ribs will be fitted eventually to fair these curves and stiffen the structure, but I now know that the boat will never be "perfect"; I'll just have to accept that. And here is a nice picture of the frame to keel halving joint, you can see how the keel is reinforced by the keelson(?) and the frame is reinforced with a strip over the halving joint cut-out. ![]() |
![]() |
I now have two problems:
One scarf joint fell apart when bent around the top of the frames. It could be due to not cleaning the wood with cellulose thinners, or improper curing. Any ideas? There is epoxy visible equally attached to both halves and it came apart with stringy bits, and failed slowly. Also, how do I laminate my stringers in situ? If I do it off the boat they will be under much greater stress when attached to the frames and this is what I am trying to avoid by making them in two layers. But if I laminate in situ (which I must) I won't be able to remove the screws which fasten the first layer! I did think of taping the stringer with masking tape and just gluing the second layer over, leaving a small piece of tape embedded at both sides of each frame position. But tape would not provide enough tension to hold the twist at the stem. Other people laminate stringers so there must be a way but I'm all out of imagination - suggestions wanted! |
Free forum by Nabble | Edit this page |