![]() |
I was idly leafing through eBay a month before our summer holiday and accidently bought an amateur built Welsford "Joansa", so the grp dinghy has now gone, by the same route.
Unfortunately, while lifting the boat from the car roof with a helper, I dropped it and damaged one panel on a sharp object. This happened while on holiday and the son-in-law of the cottage owner gave me some polyester resin and I bodged a repair. Pictures of boat and repair below: ![]() ![]() ![]() I now have to repair it properly and need some advice. I'm planning a rectangular "graving piece" with tapered -like a scarf- edges. The damage is fortunately limited to the middle of one panel. I'll use a piece of the same 4mm marine ply that the boat is made from. Does this sound like the correct approach? Also, I want to buy an epoxy starter kit with all the fillers etc. so that I can practice fillets and so on. I am planning to buy a UK Epoxy kit. Are there any other complete kits that I should consider? |
![]() |
I understand the desire to do things right, but it's worth considering alternatives before chopping bigger holes and filling them in again.
The wooden repair sounds like a very professional approach and will work well. Would look good too if the boat was finished bright. Does need some fairly precision carpentry. There was a good article in Watercraft on the very subject some time ago. I'm sure someone will remember the issue! However, there are less purist but probably just as effective approaches. Given the boat is painted inside and out simply filling, sanding and painting the polyester resin repair may result in a perfectly adequate, invisible and long lasting repair. If in doubt then sanding out a shallow hollow inside and out over the damaged area and filling that with some glass fibre and epoxy, then sanding smooth (with the help of some filler) will definitely be as strong as a wooden patch and the repair process will require less further destruction of the hull. My son used the epoxy glass approach following a very similar sounding incident involving a ring bolt and his 4mm ply Kayak. Repair's held for years and we can't actually see or remember where the damage was. But, there is an elegance to the wooden patch that does appeal. Tim. On 8 Oct 2012, at 13:52, Alan [via UK HBBR Forum] wrote: > Unfortunately, while lifting the boat from the car roof with a helper, I dropped it and damaged one panel on a sharp object. I'm planning a rectangular "graving piece" with tapered -like a scarf- edges. The damage is fortunately limited to the middle of one panel. I'll use a piece of the same 4mm marine ply that the boat is made from. Does this sound like the correct approach? |
![]() |
I agree with timmo…. Tony |
![]() |
Another vote for the "fill it, fair it paint it and leave it" fix!
If it were me I'd be inclined to try and remove the polyester (if you can) and then just fill with thickened epoxy if you wanted a really long lasting repair. I doubt there's any merit in cutting bits of wood to fit, other than the faintly therapeutic one of fiddling with bits of wood for a few hours. |
![]() |
I agree with all of the above.
I can recommend UK Epoxy's products, they work well and the service is excellent. Sand off and dig out as much of the polyester as you can, fill with epoxy thickened with filleting blend, leave a shallow depression. Then once its gone off a bit but still tacky over-fill with epoxy mixed with fairing blend. If you try to sand filleting blend you'll be there till Christmas. Wait until it has gone off completely, probably a couple of days. Use some spare 4mm ply to make yourself a long board, say 18" by 2-3" with a couple of wooden blocks 2" in from each end for handles. Stick your sandpaper to the face of the ply ( double sided tape is good) and use with long strokes parallel to the plank. The board will curve to the contours of the plank and remove all high spots. If you want to get really picky and technical use the car repairer's technique of spraying over the area lightly with a contrasting colour, then sand it off, this will show any depressions until they are sanded away. Fill any big holes again and repeat as necessary. Don't ask how I know all this. |
![]() |
In reply to this post by Alan
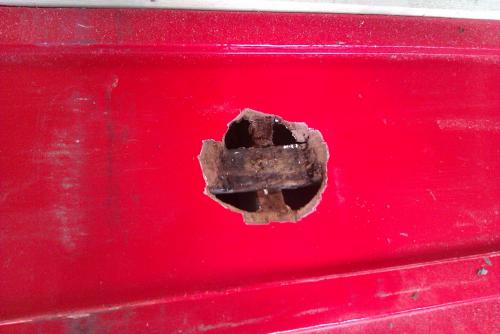
Hi, just in case you do want to repair by replacement, be warned it is a lot of work but depending on the size of damage it may be worth it. Have a look at some of these pictures I've just taken while repairing a GP14 damaged by rot on the trailer, I had to replace a section because after removing the damaged wood it was a big hole to just fill it.
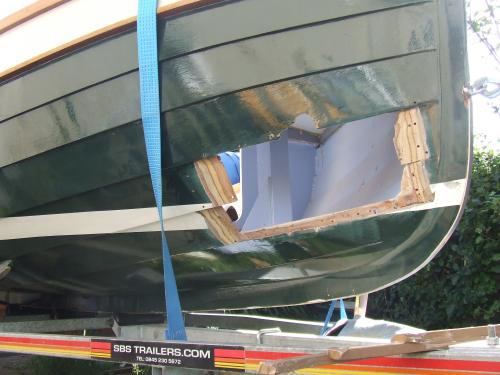
![]() The floor had gone like a sponge in the area of the frame and stringer, the water seemed to have got in through an exposed screw head or a reaction of the wood and copper screw. (Strange that it should be the same point on both sides of the hull). ![]() ![]() 
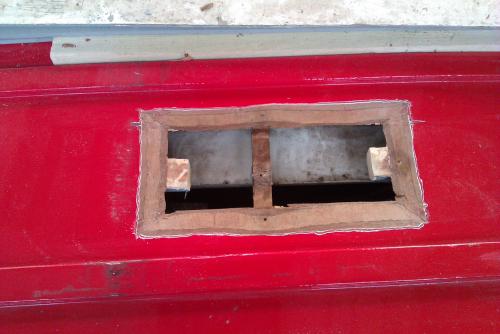
I had to cut back quite a way to find some solid dry wood, which I then squared off to a uniform shape ![]() The ply is 6mm thick so I put a scarf bevel of 5:1 ratio, which I cut wiht a sharp chisel, block plane and belt sander. ![]() The replacement stringer was a piece of Douglas Fir ![]() 
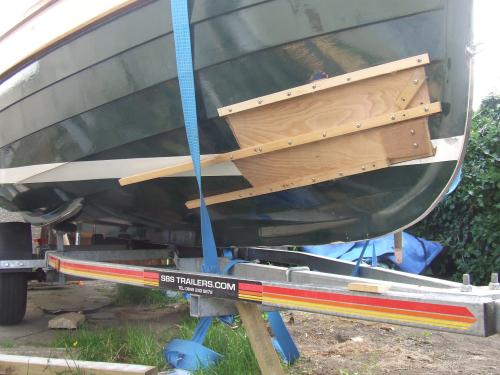
I drew through the hole onto some stiff card to use as a template, this was due to the twist in the hull and it was easier than taking sizes. As usual I couldn't find a piece of marine ply the correct length so I had to scarf two shorter pieces to make a patch the correct length. The scarf bevel was cut at the bench using a jack plane. ![]() The patch was then clamped down to the shape of the hull with supports above and below screwed together to ensure a tight joint. Plenty of parcel tape was used to prevent unwanted sticking ![]() And 'Voila' supports removed and a patch as strong as the hull, Finish off sanding smooth and a coat of epoxy (this was because although I used marine ply, the bonding was C### and it splintered badly) ![]() A view inside showing some temporary supports. The gaps in the centre by the frame were filled with epoxy & microfibres using a temp block underneath to hold the wet filler in place. ![]() 
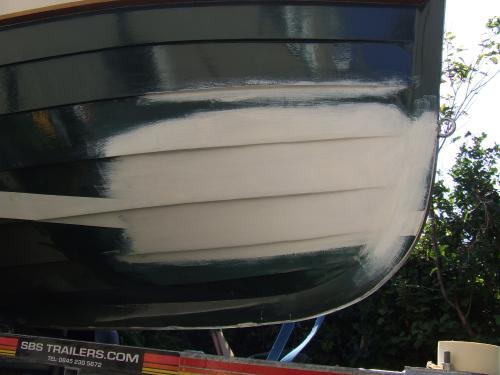
The same process was used for the smaller hole on the other side ![]() ![]() ![]() ![]() ![]() 
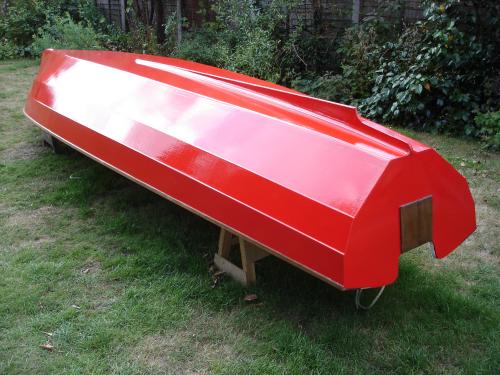
This is as far as I've got, I need to blend in the patched, add lots of undercoat & paint. Then turn the boat over, blend the inside of the patch and replace the damaged areas of the frames. I'll show the final shots when finished |
![]() |
Here are some pictures of the repair on my Abel, after a RTA last year, just after the article in 'Water Craft' was published.
The porcedure is similar process to that of the GP 14 in my previous post ![]() ![]() ![]() ![]() ![]() ![]() ![]() ![]() On the inside I added an extra layer of Glass Fibre cloth (Belt & Braces) plus no one sees this bit. ![]() |
![]() |
Fantastic response, thanks people. While walneyjohn's repairs look extremely professional I am now convinced that I can make a perfectly adequate repair with filled epoxy, possibly with glass fibre added depending on how it "feels". I'll look up the Watercraft article before I start, and I'll order a UK Epoxy kit.
I'll have a few questions about rowing ergonomics too, but I'll leave that until after the repair. |
![]() |
Just a quick note to say that the outside was repaired soon after the previous post using UK Epoxy and an angle grinder and was quite easy thanks to advice above.
|
![]() |
......and then the inside was repaired, using the same method, and the boat repainted and sold on ebay for half of what I paid for it,and looking twice as nice.
![]() |
![]() |
Alan, You seem to have done a great job.
Personally I think E-Bay is great for buying things but not so clever if you are selling. I stand to be corrected by those who know better................................. |
Free forum by Nabble | Edit this page |