Evolving 'Polly Wee'

1 ...
3456789
... 11
1 ...
3456789
... 11

|
|
Plumbers use a PTFE tape on the threads when screwing metal fittings together to ensure a seal. Do you use something similar with plastic threaded fittings?
Brian |
|
|
Thanks for that Jeremy
As Brian has mentioned, what about PTFE tape, which I have not more than a few feet from my right ear? Sikaflex; I would probably have to buy a 500 gram tube to use a couple of dabs and the rest will go off sitting on a shelf with all the other hardened products I thought I was going to use one day. I have a superb collection of solid paints and glues, all tin, jar, or tube shaped. Paulie – I originally put ‘two-way’ for the valves; then it didn’t seem quite enough, so I added another to match the outlets. But thank you anyway; these things can get out of hand for an old goat. Talking of valves, a great deal of this system was designed around what I could find on-line; if you can find a three-way valve to accept 1.5 inch hose, then it would turn my diamond into a cross and possibly leave the boat upside down after a capsize, as my amazing self-righting system probably wouldn’t work. I even had to go to America for an in-line valve of the right bore. Next, I appreciate your and Al’s abhorrence of underwater hull holes, but worse things have happened at sea. Haven’t they? I do not want to be pumping in as well as out – it sounds like making simple things complicated to me and like a load of hard work too. It’s mostly that I want to be able to ‘flood and blow’, well ‘fill and empty’ the tanks at sea, that has made me go for a closed system at all. In fact, it’s interesting that the only boats I have often seen sunk in decades of watery little excursions are small, neglected, motor boats at their moorings. This is usually where rainwater has swamped the boat to the point where an above water fitting has allowed water into the hull, or there has been some failing of an underwater fitting through lack of maintenance. There, now when I am seen slopping around in the bilges of a semi-submerged hulk, you will be able to cheer as loudly as everyone should have when I carelessly allowed Ms. ‘Rosie Mae’ to slip me into Sutton Broad last summer. Who actually knows of a failed underwater fitting? Chris |
|
|
I'm aware of two boats that have suffered failure of underwater fittings but both have been GRP boats that live (9+ months of the year) in the water. Fortunately only one of these failed when the boat was in the water. On both cases is was the result of low quality skin fittings that suffered from electrolysis. My cruiser (now 34 years old) still has its original Blakes seacocks that are inspected annually and good for another 34 years I expect. I would think that for boats that spend most of their life on a trailer Plastic or DZR fittings will last very well indeed. |
|
|
>
> Chris Waite wrote > > > > Who actually knows of a failed underwater fitting? > > Chris > > What is worse than a boat sinking on it's mooring due to a failed underwater fitting or pipework? A boat sinking on it's mooring while you are asleep on it perhaps? -- Hoping for calm nights Alastair Law, Yeovil, England. <http://www.little.jim.freeuk.com> |
|
|
In reply to this post by Chris Waite
Personally I'd avoid using PTFE tape, primarily because it will make the threads bind tighter and cause a force that will tend to stress the female thread outwards. The only failures I've seen on plastic threaded fittings have been where the "nut" has split, as a consequence of being exposed to too high a hoop stress. As I mentioned before, most plastics have a pretty high thermal expansion coefficient, so if it's done up tight on a bit of PTFE, then the thing cools down, the outer female bit may shrink down to tightly on the male bit, increasing the stress in the plastic. Using something gooey would tend to reduce the problem, because it would have a bit of give in it. One thing you could use, and which doesn't seem to go off in the tube, is Screwfix Liquid PTFE (http://www.screwfix.com/p/no-nonsense-ptfe-liquid/40302). I've used it a fair bit when fitting a new bathroom a year or so ago and found it to do a good job. The fittings on the cistern were all plastic, and it seemed to work a treat on them, even though it mentions metal fittings on the bottle. Jeremy |
|
|
Outboard vibration has cracked plastic fittings - something to bear in mind
Sent from my HTC |
|
|
Marelon seems to be popular for through-hull fittings. Marelon is one trade name for glass re-inforced DuPont Zytel (a variation of nylon)
http://www2.dupont.com/Plastics/en_US/Products/Zytel/index.html Forespar use the tradename Marelon for hull fittings - it out performs conventional nylon: http://www.forespar.com/what-is-marelon.shtml cheers Paul |
|
|
So outboard engine vibrations can crack plastic eh, Eco-Ninja-Administrator? In that case, it’s just as well that some of us
Some of us purists are building boats with stern decks and no brackets in fact nowhere for an outboard to perch at all. What is more, we are intending to meander down the bosom of Old Father Thames, using nothing more than muscle power, with perhaps the odd whisper from the delicate daughters of the Jet Stream. Next another question for the HBBR resident engineer, Jeremy ‘Cogs’ Harris: Hitherto, I have used silicone sealant, (of which I still have a reasonably fluid sample on a shelf in the garage here), for bedding in underwater fittings and I suppose my original question was more to do with getting a seal between the Nylon and UPVC threads on the skin fitting and the valve respectively. So is there that much advantage to Sikaflex 291i over my trusty silicone sealant? Two Saturdays ago now, I accidentally fitted the centreboard case. I’d made it up, sheathed inside and out with the bed-sheet; then Anders, I brushed the inside with two part polyurethane – not enough area to make it worth while soaking up paint with a roller and two coats did not seem quite enough, so I gave it a third, producing a pleasantly adequate white. 100 mls. covered some ten square feet – a square metre, with three coats. If the paint had been a darker colour and I had used a roller for a more even finish, two could well have done the trick. Anyway, I screwed the two sides together and offered them up to the hull and it was all going so well, I mixed up some epoxy and masking up the paint edges inside, I glued and screwed then slipped the whole gooey thing into position and slithered underneath to insert some more screws. Jolly good and just in time to go out to dinner with friends: 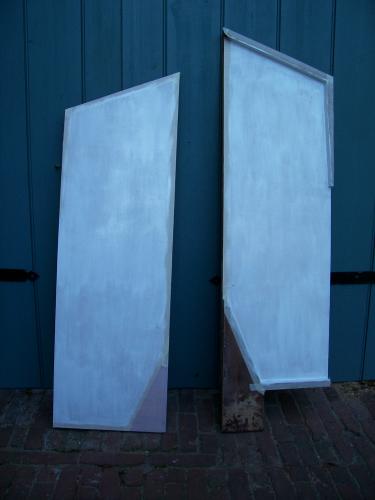 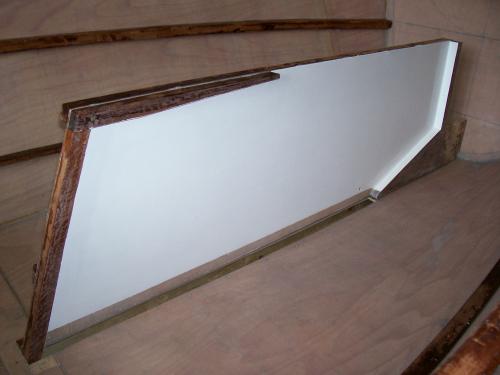 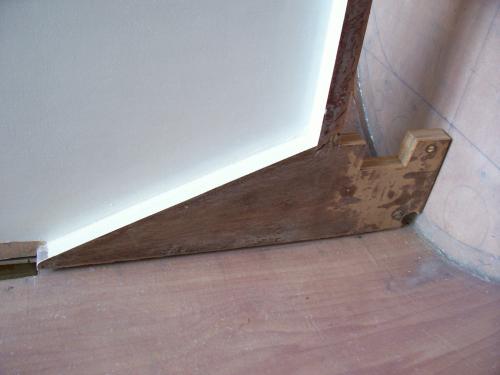 Well it should have been jolly good, but I had also left the masking tape in situ and allowed it to sit overnight smudged in hardening dribbles of epoxy. A week later and most of it is still in there. I’ve tried white spirit and shoving it around with a screw driver blade without much success, so I wonder if I send in a duct-tape chaser? Either that, or I’ll just have to let it live out its natural life inside the case. The only thing to do at the time was to get right up and ignore it, so I turned her over and found out the real reason there was such a tremendous crack when the frame flew apart during the forefoot episode; ‘Polly Wee’ had taken it upon herself to extend the central seam running aft from the forefoot by about fifteen inches. Not quite ruler straight, but not bad for a first attempt: 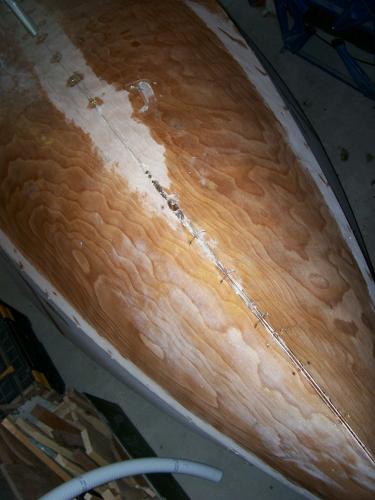 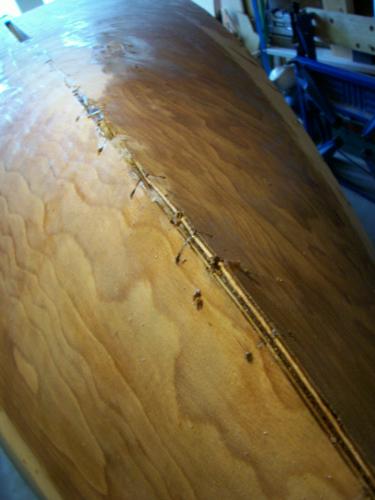 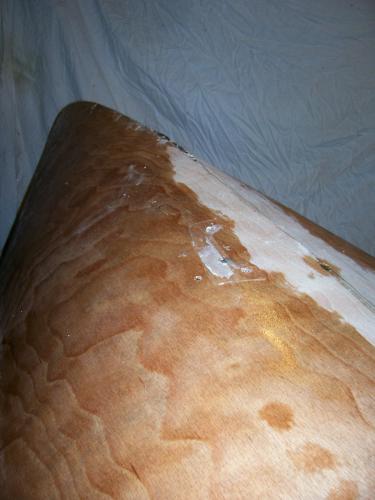 In fact with the other known cracks and the strained stitches, there was quite an interesting situation under there – bit like ChristoPart and his Bee, but the basic shape was within a hair, well three or four then and it was all intact inside and stuck hard to the glass-taped internal former supporting the bow, so I decided to press on. Nothing a lick of epoxy wouldn’t cure So it’s been shaping, filling and epoxying all week and on with the sheathing. She now has two layers of GRP to support her bitty flat bottom: 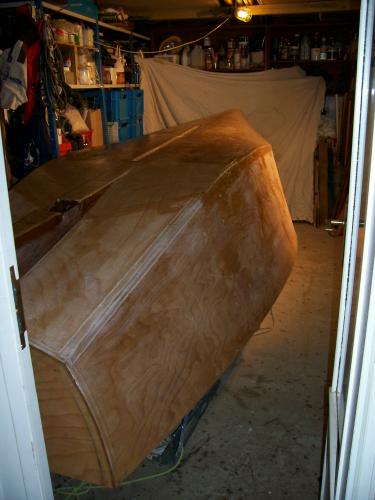 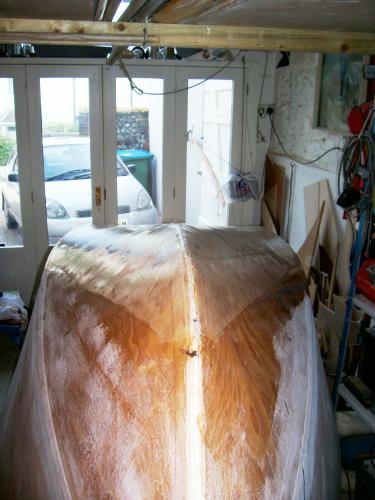 And is awaiting her all enveloping bed linen; is this a fitted sheet? 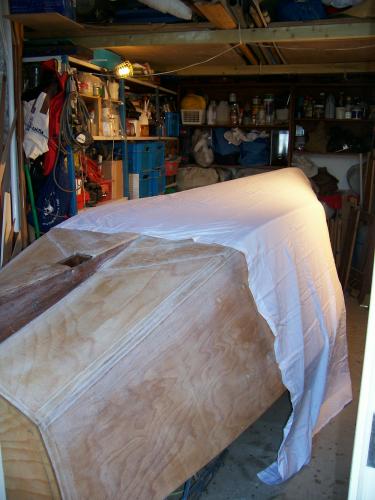 Oh, and I’ve finished the skeg and fitted her a nose ring; I’m not much into them for people, as it looks too much like scaffolding to me, but I reckon they suit a dinghy all right, (bit fuzzy): 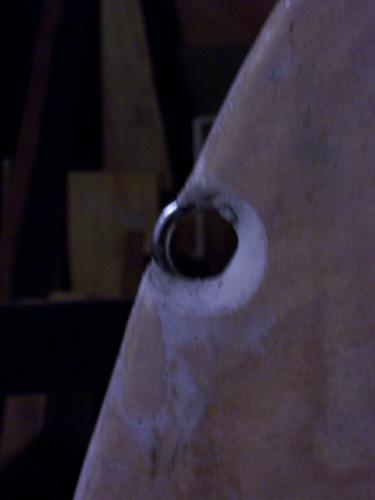 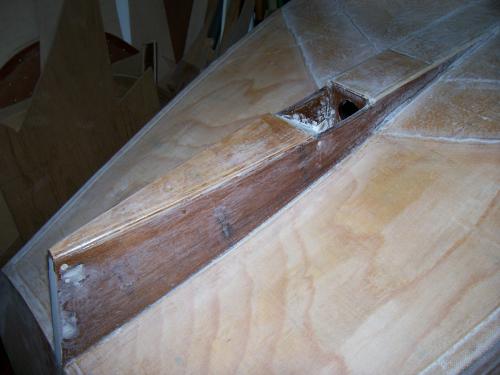 So there goes my few days off – the Minister of the Interior has been very good about it and progress has been made CW |
|
|
I suppose I could point out that the above is a bit like calling a doctor a vet.................. I'm a retired scientist, rather than engineer - a not-so-subtle difference , especially when it came to pay. (engineers tend to earn a fair bit more than scientists, for some completely unfathomable reason) Silicone is OK if all you want is something that can make a sort of made-to-measure gasket. The problem is that it's very fussy about what it will and won't stick to. It tends not to stick to many plastics, especially nylon and polyethylene plastics and their ilk. It also doesn't like sticking to wood, unless it's well-sealed with something like epoxy. Polyurethane sealants, like Sikaflex, are much more forgiving, in that they stick to pretty much anything fairly well. The problem is that they are expensive, and because they cure by using water vapour in the air as a catalyst, they tend to go off in the tube once it's been opened. There is a thrid kind of sealant I've used, that sticks as well as polyurethane but that doesn't go off too quickly if not used, two pack polysulphides. They are typically used to seal up the joints on aircraft fuel tanks and are pretty much impervious to anything. They do tend to smell quite appalling, though, a sort of cross between dog fox and the smallest room after a night on beer and curry.......... The good news is that you don't have to shell out a small fortune for Sikaflex, as there are equivalent sealants at around half the price. For example, this stuff : http://www.ebay.co.uk/itm/High-Strenght-Black-Polyurethane-Sealant-Koi-Fish-Pond-house-Car-/280818951438?pt=UK_HomeGarden_Garden_PondsWaterFeatures_UK&hash=item41621d250e is a fair bit cheaper than Sikaflex. 3M also do their 5200 sealant (which is near-identical to Sikaflex) in smaller tubes, like toothpaste tubes. I've had a quick look and can't find a UK supplier at a good price, which is a pity. I bought some small tubes of this in the US a few years ago and it seemed to last reasonably well once opened. I don't think it was mega-expensive, either. Another PU sealant that I've used and is pretty good is Tiger Seal, originally marketed as a seam sealant for use in car repairs, I believe. Unfortunately this stuff now seems to be as expensive as Sikaflex, although it was much cheaper when it first came out. |
|
|
Ah Jeremy
I think the vets would be the more offended, after all they apparently are allowed to treat us people and doctors are not allowed to treat their patients. Anyway, I'm just an old quack me and I'd have given my eye-teeth to have been an engineer*; though actually I think a dentist got them. Anyway, no insult intended, someone who can make a gear box is in such giddy realms by comparison with anything I could muster. All that and notice that the lines of the Duck Punt are 0.2 mm out - is that what I understood you to have discovered? That makes the cracks in the bottom of 'Polly Wee' look like the Grand Canyon and I'm soldiering on anyway. You give the best scientifically engineered answers I've ever seen, so you get my vote Chris (*Long story) |
|
|
Its comming out very nicely. I´m looking forward to the day when you can take some pictures a bit further away. Its diificult to see the lines with the camera so close up.
¿Where do you plan to sail her? |
|
|
Where do I plan to sail her?
Everywhere, Anders, everywhere Seriously, I would have stayed with little 'Rosie Mae', but I reckon she's just too heavy for an old fart like me to comfortably push the half mile back and forth to the river and not quite seaworthy enough to be happy traversing directly across from my home turf (?surf) of Chichester Harbour to the Isle of Wight without going down into the Solent and being sure of reasonable weather. I think my insurance covers me for 'Inland and Coastal Waterways' - so that's where we're a gonna go. I hope Sorry about the lack of overview and I agree absolutely. Even though she is designed to between the local bollards and into my garage, there is so little room in there at the moment, it took me ten minutes to get to the shelves on the back wall to try and find my bicycle tyre repair outfit, then back to fetch the "Lamp on a string" because I couldn't see a damn thing, then back for a third time because I'd forgotten the tyre levers. All incurred by running the puncture-proof front tyre over a scrap of prickly Pyracantha lurking in the courtyard. Once the bike is in the garage it will only fit alongside the boat, entirely obstructing the final pathway. I'd love to see more of her too, but I have no way to move her about while she is upside down, without wrecking the top of the forward bulkhead. Even turning her over is a nightmare which I am saving at this stage, until I have finished the outside of the hull. So a Tesco's sheet and a half to stipple on, sand down and recoat with epoxy and sand down, then two or three coats of white two-pot poly and adjacently some more of the same in a fetching shade of grey, then up she'll rise and we'll all get a better idea as to whether I'm building a boat, or what. Do you think I'll be finished for say October or so? Bear in mind that I'm signed up for the Thames Raid and Watercraft's ABBA at the beginning of June? I'd better get off this laptop CW |
|
|
Please dont go desperate and push her out for a longer distance photografic view. There´s something about having to wait for the final pictures. Its like christmas. Imagination builds up and wee Polly wally doodle all the day changes all the time.
|
|
|
It gets better Anders
Today I had my second puncture in the other Kevlar-armoured tyre on the way home from work. Oh, Jolly Dee! So I up-ended the bike and checked round the outside 'cover' to see if I could find a cause. I'm getting quite good at spotting the 'other ends' of thorns and there was one, so I marked the location with a clothes-peg on an adjacent spoke, used my trusty levers, then having removed the offending prick from the tyre, exposed the wounded inner tube and started to search for the hole - nothing. The Great Sod obviously wants me to remove the rear wheel, or he's not going to be satisfied. I stick my tongue out in your general direction G S. So I pumped up the tube as it hung off the wheel and out from under the cover and it hissed like anything - but not from anywhere near the marker, despite using spit, then water, then soap to try and locate it; plenty of hiss, but no hole. With half a bowl full on the floor and Ruthie balancing the remains under the flailing tube it was eventually discovered some eighteen inches - nearly half a metre futher round the rim. No thorn; just a ruddy great hole So do you think I am suffering from 'Tyre Creep' - this is a small but incredibly magnetic gremlin that holds the rim in a vicelike grip and on the half mile trundle home, grabs the deflated outer tyre and shifts it a millimetre or so at each rotation of the wheel? I cannot think of any other explanation CW |
|
|
Sounds odd, but tyre creep sounds like the only real explanation.
FWIW I keep my bike tyres filled with Slime (http://www.ebay.co.uk/itm/SLIME-8oz-237ml-TYRE-INNER-TUBE-SELF-REPAIR-PUNTURE-SEALANT-/260917699469?pt=UK_sportsleisure_cycling_bikeparts_SR&hash=item3cbfe8238d). The nice thing about Slime is that you often have no idea that you've had a puncture, as it seals up around things like thorns. It even seals up after you've pulled a thorn out. BTW, the best "puncture resistant" tyres I've used are Schwalbe Marathons. They really do seem to be resistant to pretty much anything. |
|
|
In reply to this post by Chris Waite
CW wrote;
"Do you think I'll be finished for say October or so? Bear in mind that I'm signed up for the Thames Raid and Watercraft's ABBA at the beginning of June? " Given the number of boats currently being built in time for the Thames Raid maybe this year HBBR stands for Half Built Boat Rally. |
|
|
In reply to this post by Chris Waite
Chris,
I cycled to school for many years and my experience is that the tyres pick up all sorts of thorns and minor fragments of sharp material.....but they don't cause an immediate puncture and they often are not visible. Somehow something pushes a sharp object a little deeper into the tube, perhaps running over a bump, high/low tyre pressure, the tyre may have worn thinner or the Great Sod is having a laugh just when you are showing off your cycling skills to your mates. New tryes can help because the rubber is thick enough to absorb the sharp fragments flush with the tyre surface, but without them touching the tube. In the good old days tyres where wooden.......  -Paul |
|
|
In reply to this post by Chris Waite
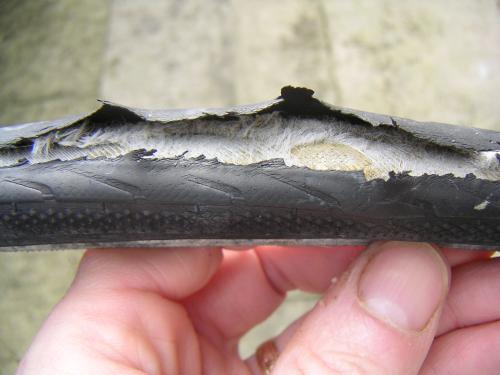
My £0.2 worth. I'll start at the beginning. 1. When installing a tube always line up the valve next to the logo on the tyre. That means that once you find a foreign object in a tyre, the hole in the tube can only be in 2 possible places (one, if you note the direction when you remove the tube). No need for clothes pegs. 2. Tyre levers? These were invented for bodgers and folks without fingers. A tyre that cannot be removed and installed by hand is a tyre that should be in the skip! Technique is the name of the game. The inner well of a rim is a much smaller diameter than the bead of the tyre. The trick is to force the bead into the well whilst taking up the slack at one point on the rim. The tyre will then roll off, tube in place. Installation is the reverse! Check out the wire puzzles you get in Xmas crackers. 3. the easiest way to find even the smallest of leaks is use your nose. Hold the tyre under your nostrils. They are extremely sensitive to the small difference in air flow and you also invariably get a whiff of rubbery air into the bargain. If still no luck and the air is still (indoors perhaps) try the same against an open eye! 4. Tyre creep? I think not. Three things I'd check. a. The rim tape is secure and no spoke holes are exposed. b. The sidewall is not split allowing the tube to push through (more about that in a minute). c. The tube had not been pinched under the tyre bead on installation. d. God forbid, someone used bodgers levers to put the tyre on! 5. Trundling half a mile home, is half a mile too far, which neatly leads me on to my p*******e yesterday. (The word p******e is never mentioned by any self respecting cyclist) I set out from home at 1900 last night. Just over half a mile from home my rear tyre rapidly deflated. I whipped the rear wheel out and within 45 secs had the tube in my hand. A quick inflation and some nose work, rapidly finds a rather large hole in the tube. I felt around the tyre and, by the light from my headlight, visually inspected the tyre. I could find nothing. So I shoved a new tube in, inflated with the best pump available (Zefal HPX) and was on my way within about 5 minutes of the original deflation. About 4 miles from home there was a loud bang and my rear tyre instantly deflated. I didn't need any further hints that this was almost certainly a side wall failure. Out with the wheel again, tyre off, large hole in the same area. This time shining a torch inside the tyre I could see the short split just above the tyre bead (probably helped that the nearest street lighting was about 3 miles away). So, into my bag, retrieve my folding tyre, install with a new tube and back on the road within about 10 minutes this time. Lots of rapid pedalling to get to the pub by 2100. Only 38 miles on the folding tyre when I arrived home, and it's now back off the wheel and in the saddle bag where it's done most of it's 60k miles! The tyre that failed has a kevlar laminate (there, that sounds boaty). and it was it's first and last p******e. It was fitted in July 2009 and had only done 12.5k miles. Further inspection of that bike and my winter hack bike, means that I've had to order 4 new tyres today and am now feeling suitably skint! For info, being tight, most of my tyres end up the same way. There first and last p******e usually occurs around the 10 - 12k mile mark like the one below  . .
   We now return you to the scheduled service.  |
|
|
Whilst I generally agree about tyre levers being unnecessary on most large diameter bike tyres on road bike type rims, I defy anyone to get a Marathon off a deep 20" double wall rim without them! (and I've been a bike user for 50 odd years).
I can just about get a decent tyre back on the rim of my folder OK just using my fingers, but there is no way on earth I can get it off without them. My two other bikes have shallower profile 27"/700C rims and are fine with no levers, but my old recumbent had some very deep rims that were a struggle, just like the small rims on the folder. There seems to be a tendency nowadays for narrower rims that are intended for heavy duty use (ATB/hybrids) to have deeper sections and a very narrow well, making it tougher to get a large section tyre off as there isn't enough room for the wider beads of the heavier duty tyres to sit down in the well. I have a set of plastic levers that minimise the risk of a pinch, but they are a bit too slippery at times and won't stay put without being hooked around a spoke. Perhaps we need to call....................... Bicycle Repair Man! http://www.youtube.com/watch?v=rxfzm9dfqBw |
|
|
Great video
I have worked in a bicycle shop as a repairman. So here´s my few cents on levers. If you can do without, GOOD. And thats possible on most rims. but some, like Jeremy says are just to deep. It can be small diameter high quality rims and it can 700C high quality racing rims. The very narrow (20 - 22mm) racing tyres (With a seperate inner tube) can also be VERY inflexible. So sometimes reality call for levers. But thats not a problem if you know how and where to use them: Deflate the tube, push the tyre into the center, drag the hands around the tyre, both at the same time, different direction ending up near the valve. Push the valve into the tyre, insert lever 1 some7 - 8cm from valve and push it down and fix it. Do the same with lever 2 on the other side of the valve, drag it around the rim and of she goes. When refitting the tyre, NEVER use levers. All tyres (that I´ve known) can be fitted without. Its just a matter of violent twisting and on some racing tires it means really violent twisting using the palms of your hands and not the thumbs making sure that the tyre stays down in the center of the rim. |
«
Return to Builds in Progress
|
1 view|%1 views
| Free forum by Nabble | Edit this page |