Evolving 'Polly Wee'

12345678
... 11
12345678
... 11

|
|
Curves are starting to look good!
Mind you, makes cutting the wood into strips and wrapping it round moulds lapstrake style look the easier option. Must get on and do some of that. Timmo On 11 Jan 2012, at 18:09, Chris Waite [via UK HBBR Forum] wrote:
|
|
|
In reply to this post by Chris Waite
Or we could take cross sections from the wonderous new creation and bung them into one of the free design progams, like Hulls, which will create planks to approximately match the tortured forefoot. Cutting those planks will may well require an extra sheet of ply, but should be quicker and easier to build. -Paul |
|
|
In reply to this post by Chris Waite
I have noticed that the cheap ply I am using doesn't always want to bend in nice smooth curves. There are sometimes flat spots and kinks. I'm putting that down to inconsistencies in the grain of the inner layers.
I think sometimes there are big knots which won't bend, and shakes or cracks where it most certainly will. I'm trying to make a curved coaming which is proving tricky. Tell me when I can take my fingers out my ears Cee Dubbs. |
|
|
In reply to this post by Timmo
"Mind you, makes cutting the wood into strips and wrapping it round moulds lapstrake style look the easier option."
I agree. All these cracks etc. would make me nervous and I would put at least 2 layers of thick glassfibre on both the inner and the outer side of the hull. Actually, when building a boat with bouyancy tanks, seats, centerboard, water balast tanks etc, the building of the hull itself is a relatively small part of the process. max 25%. And laying up the hull clinker or stiching is for me by far the most funny part of the whole process, so I´ll stick to that way of making a hull. But I find it to be interesting to follow the process of Polly wee. It teaches me about the limits of plywood. |
|
|
Apart from the sudden welcome spark of the Thames Raid, it’s all been a bit quiet, hasn’t it, my little Possums?
I’ve been struggling to get back to where I had reached with the first hull before I gave up on it; I was hoping for the end of the month and I’m about there. There’s been a bit of shoving and gooing to get those suspect ‘shakes’ in the forward starboard bilge flat: 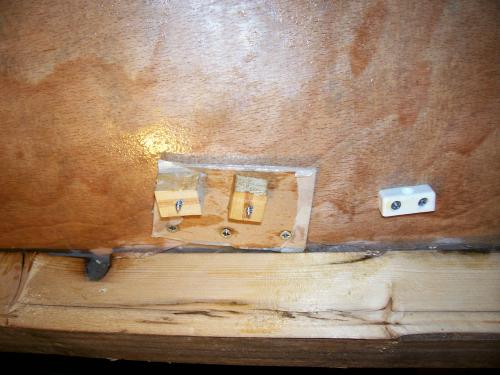 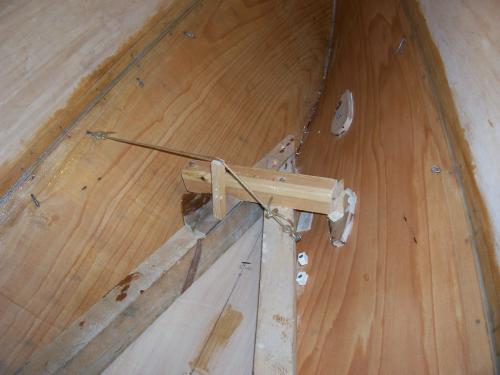 And there is still an angle in the ply; this shot shows the gap under a cardboard pattern: 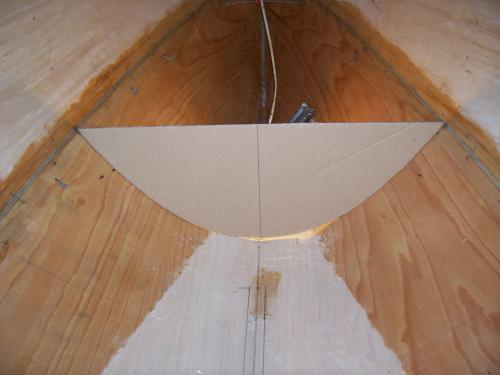 But don’t be mistaken and don’t take a fit This is the place where the bulkhead will sit:  And it has been successfully pulled into shape with a brace of offcuts and a kitchen widget underneath screwed to a suitable tension with a nut and bolt – Simplz? 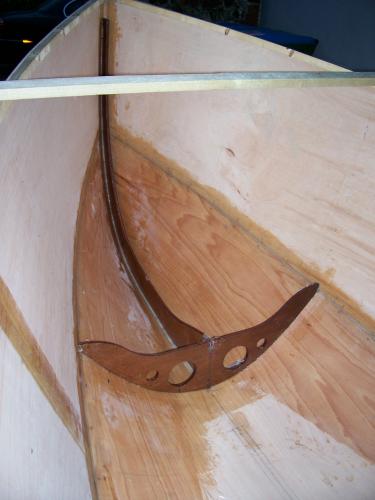 Anders – you suggest I need a couple of layers of glassfibre each side of my crack-astrophe. Well goodness, even Rosie Mae only has that many layers, she is grossly overweight for her size and her hull is GRP in the first place. I hope that the unlikely coincidence of the forward main bulkhead being directly over the offending tectonic disruption will allow me to get away with a much more meagre repair. Anyway, stitch and tape only requires one layer each side of something as substantial as a seam; I plead my case. Christo-Part! Here I have been struggling for months (four of them), to get the same shape in the forefoot you seem to have achieved in a week or so, once you had hit upon which ‘tab’ to stick into which ‘slot’. What thickness and type of ply are you sporting in that elegant bundle pictured on the Thames Raid topic? And why aren’t you telling us more about it? So, on this grizzly end-of-January gloaming, will the real ‘Polly Wee’ please step forward? 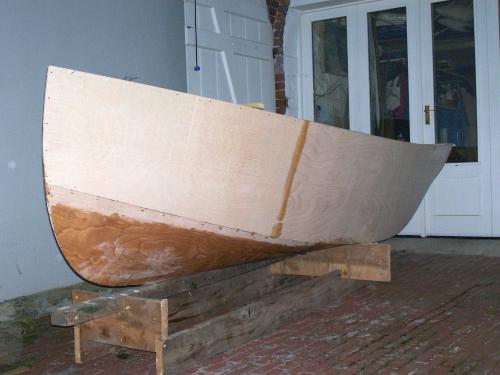 Well I don’t know, but I have much higher hopes this time around. Her important little places offend me much less than the previous example; in fact some of her is quite cute, but I don’t expect the casual glance to identify what is apparent to me If you could see her through my eyes CeeDubs (Und next, bulkheads) |
|
|
I agree. She looks cute and I like that deep forefoot. Looking forward to the next chapters.
The most interesting part of this build is that I dont know what to expect. When you´ve seen a couple of clinker ply builds, then you know the story. This is more of an adventure into the unknown. |
|
|
Cloaca? Well not very often
And yes this is getting personal; at least it is if you’re a bird. Some of you will be aware that us mammals have relatively sophisticated kit; as my old junior-school headmaster started our sex education – “You may have noticed you have something between your legs”. Avians (not aviators), reptiles, amphibians and monotremes (not triremes), are less fortunate in that they only get issued with one orifice a piece and not much external apparatus. That is the end of the zoology lesson, except to say that ‘Polly Wee’ probably comes under this classification. Read on Keep thinking backwards – nothing in, until you have fitted the piece before it. I was just getting my mind around the bulkheads and had fixed the forward one in place: 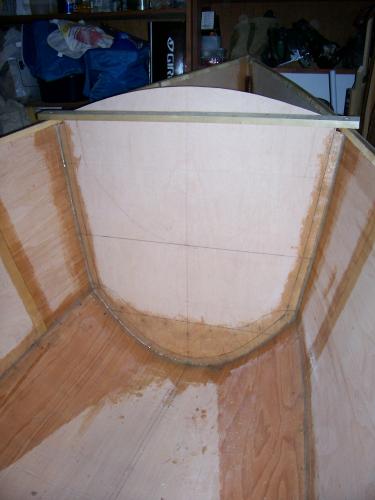 Having previously accepted that I am going to have an underwater hole in the hull and subsequently squared away the layout of the water-ballast in my mind, I determined that the best place for the in-and-out-let would be low down and aft. And what will this boat have down there? A skeg So this fitting would best be mounted within the skeg – about where those lesser creatures have their important little places. So before fitting the aft bulkhead I have had to sort out a cloaca, a hole and this is how it goes: 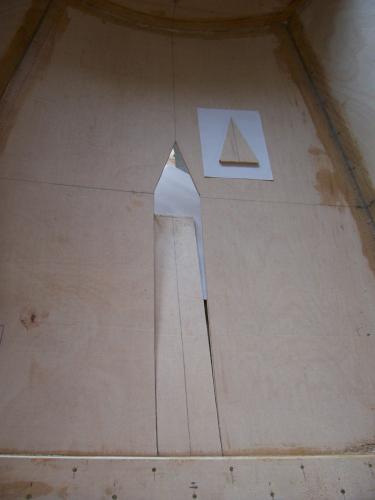 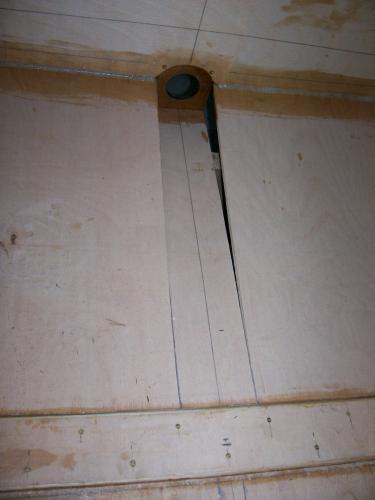 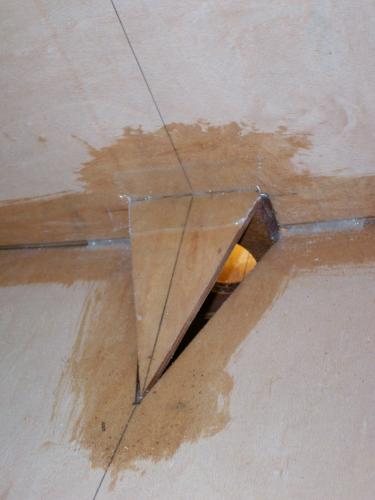 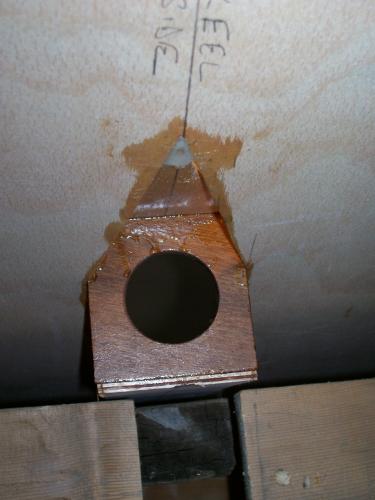 Had I been tempted and fixed the bulkhead in place first, it would have made cutting the slot into the floor much more interesting, but as it is, I've got away with it: 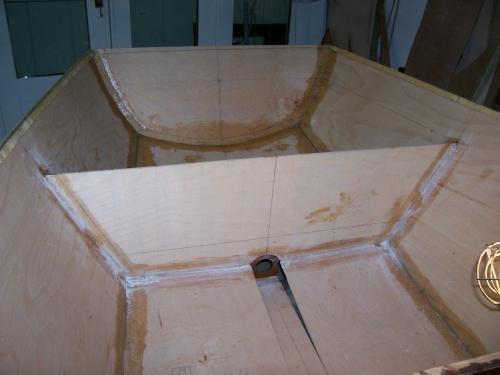 The sides of the skeg are also cut out and the forward ends epoxied in place today, though the goo is still too tacky to take the clamps off to show you. So Anders – again, I agree with you; while I persist in hoping like hell, I’m never really sure what to expect either; so consider this a winter, fireside saga in instalments, for anyone who cares to check in. And talking of checking in, there is another group of amateur builders in France. One of their number, Eric Marechal (Eric17) has been in communication for the past few weeks as he is also keen to improve the unfortunate forefoot of the standard Sharpie. We have been chatting back and forth and he has been transferring my comments from this site and those directly to him, onto his two sites: http://www.nauticaltrek.com/12683-evolving-little-bigornick http://www.nauticaltrek.com/12697-little-bigornick-les-propositions-de-plans How good is your French? I’ve been using ‘Google Translate’ which gives the gist, but keeps tripping over technicalities and unlike Eric, also whatever whimsical little perversions I offer to get a laugh It ain’t got no sense of humour Cee Dubbaya |
|
|
Zut Alors. C'est magnifique!
Chris will she have a wee little cuddy then like Little Bigornick? 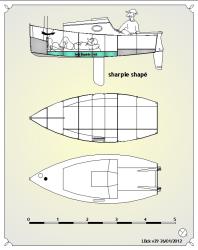 A good 0.5m further forward and shorter so that the crew can get their weight forward.....or will the water ballast mean she is so stable you can lounge on the rear quarter with a gin and tonic in one hand and tiller in the other. You know you want to.... -Paul |
|
|
Flippin' Heck, Cee Dubbs you even manage to make a Bum Hole look elegant!
Graham |
|
|
In reply to this post by Paul H (admin)
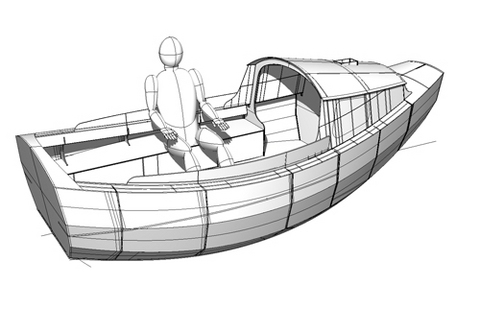
Interesting you should ask Paulie
I was thinking of something rather more extensive than a simple foredeck and had come to a rudimentary version of 'Tit Willow's cuddy: 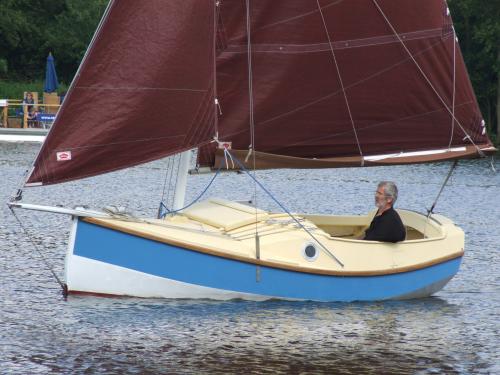 However, if you think long and hard enough, there is a problem; this is what I previously wrote and you have introduced the moment to bring it up: "The HBBR Scot (I am sure there is a whole Clandestine Clan, but Grum stands proud among his fellows, for shear tenacity if nothing else), has explained to me that it is not possible to move far enough forward in the Coot to grapple with the mast, for fear of overwhelming instability." I want to be able to lift out and replace the (unstayed) mast - from the cockpit - while afloat, so I cannot be standing much more than a couple of feet away from it. Hence there cannot be anything very extensive between the two of us; so I have hit upon a half way house; a bit like the old woman who lived in a shoe; with the possibility of a canvas dodger to complete. She is likely to look even more like a clog than the great 'TW' herself. Details when we get to the bit about decks, OK? CW |
|
|
Tenacious eh? I've been called worse! The Tooth Fairy called me Parsimonious the other day. There was a silence for a second then a mad flurry as I shot upstairs to Google a definition and she reached for the I-phone to check that she really had accused me of the right thing.
The very cheek, we Scots are merely cautious and aware that if it isn't raining today it almost certainly will be tomorrow. Having spent a few days last summer drifting down the Thames in the wee Coot I must say I am now much more confident about taking a stroll around her promenade deck and wandering forward to the mast. Providing you have your feet well placed I think she would stand for an un-stepping.  Tabernacles are good but require at least a fore-stay, or you could have a gate on the upper partner/deck so that the mast could be canted backwards without the need to lift it out. This could be incorporated into a canvas/roll back hatch-cover thus enabling star gazing whilst listening the the gentle hum of the generator next door. Half way through February, not long to go now. |
|
|
I thought about tabernacles and gates and canvassey hatches and such, Grum
Then decided it was all getting too technical; put the stick in the hole, then walk away - like the Meerkat says. Sitting beer in hand at the end of a long day distributing epoxy, it came upon me that the hull had suddenly become a boat in the making. Why the change, I don’t know. A fortnight or so ago I was going to spend a weekend sheathing the inside of the hull with my usual choice – Tesco’s Finest Polycotton bed sheets: 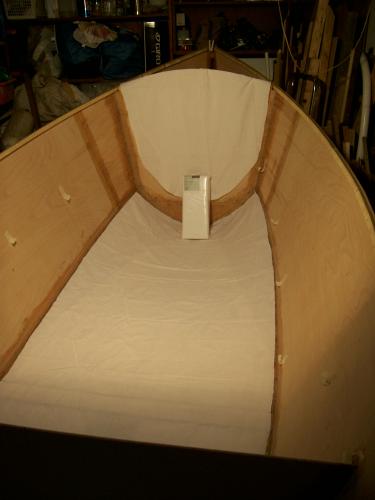 Sheath the inside? Over the years I have noticed that when ply starts to deteriorate, the first thing to become apparent is small splits appearing in the painted epoxy surface. Though the effect is most prominent on convex surfaces, it eventually happens even where the ply is flat or concave. Referring back to my favourite ‘Tit Willow’, the deck was epoxy sheathed in admittedly rather heavier duty polycotton. Over twelve years on and at the last count the very convex decks seem as sound as ever; 4 mm. birch-built 'Octavia' got the bed-sheet treatment and she’s doing fine. (Note they are over-painted with two part polyurethane - http://http://uk-hbbr-forum.967333.n3.nabble.com/Two-pack-painting-td3760627.html ). Anyway, I didn’t do that; there was too much going on and I decided to produce the stringers and such that will fit round the interior of the cockpit at floorboard level, as they also form the top of the water-ballast space and again at thwart level to support that and the bunk. There are not going to be any frames throughout the length of the cockpit; with these substantial stringers, sheathing inside and out and side decks, I reckon she should be strong enough without. I also made the centreboard case; everything offered up, but no epoxy: 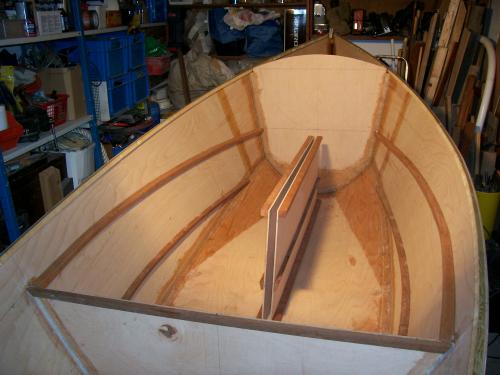 Bending the stringers, particularly the upper ones could have proved interesting. I strapped them to a board - bent, or bent them to a board, poured some boiling water over them once or twice and left them to think about it for a day or three: 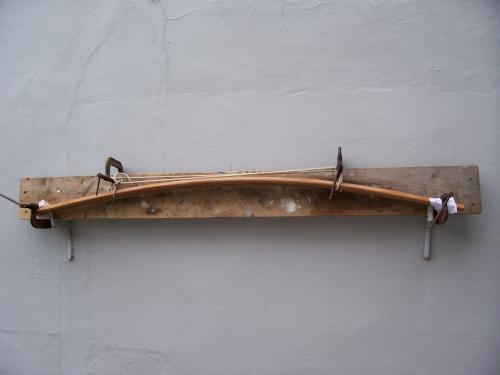 It nearly worked – the upper starboard one developed a small split at the last turn of the last screw, but it’s now sealed in forever along with its three chums. The last of them went in yesterday over still tacky sheathed sides. There was a little colourful language as it’s not actually possible to shove (one hand) the centre of a stringer in place and screw it there (second hand), while also holding the fore and aft ends in line over the still twitchy epoxied sheathing, but eventually I won. The two bulkheads are also sheathed and battened; here is the space representing my future home afloat, me and perhaps as many as a hundred and fifty litres of water ballast – a bloke and three quarters lying in the bilges and not after my beer: 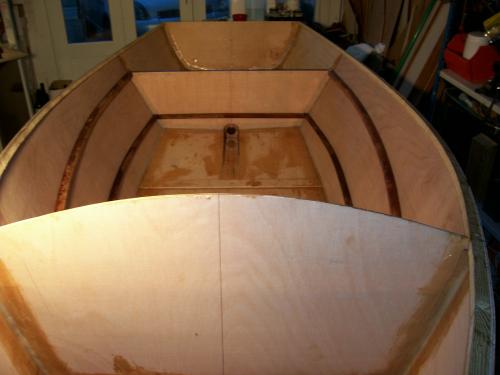 Only the floors plus the in and out sides of the centreboard case to go, then that can go in as I turn her over for ‘The Treatment’. I am not intending to sheath the inside of the fore and aft buoyancy compartments as they are not subject to the salt, sea and sun that specialize in degrading exposed surfaces – take my hide as an example. Out of sight, out of mind - inside the tanks, not my hide CW (I was going to go on to discuss water ballast, but I reckon to save it for something to talk about during the next boring bit: ‘The Treatment’ – sheathing and painting the exterior of the hull.) |
|
|
She's looking remarkably curvaceous despite being made from sheets of ply. I'll be interested to hear more about the water ballast arrangement - it's an idea I may have an interest in for a future project.
Jeremy PS: Despite my recent preoccupation with planners and their machinations, thoughts of building a new boat have been popping up, unbidden. Today I ordered some foam and resin, so there may possibly be another slightly oddly-built boat at Beale Park this year. |
|
|
John Welsford's SCAMP design is just under 12' with water ballast and a small cuddy. The cuddy works very well, and one of the builders has made mast dropping extra quick by cutting a slot in the roof of the cuddy, so the mast falls backwards into the cockpit, raises just as quick and then stays up without stays!
 here's a short video http://www.youtube.com/watch?v=wo7KfBcul4c&feature=youtu.be Brian |
|
|
A couple of points Brian
1. I had thought about a slot through the deck-coaming-cuddy. Firstly it markedly weakens the whole of a very exposed area of the vessel and also makes it much more difficult to keep water out. The other aspect to this is that the Scamp has an offset centreboard case - with 'Polly Wee' the support for the upper forward end of the case will be pretty much integral with the forward bulkhead and mast location so the mast, whose foot is some twelve inches lower would immediately foul it. Offset foils may work fine, but they do not sit comfortably with my idea of a boat. What is the Scamp cuddy for - part protection perhaps, but mostly personal gear and it must create an immense amount of extra windage, while a collapsible canvas arrangement would be just as effective if the crew is getting to the extreme. Once you are overnighting, then the quantity of gear goes up relatively little no matter how long you stay out - three days, or three weeks. (Don't anchor down wind of 'Polly Wee' after I've been out for the latter though.) 2. Instead I thought of a tabernacle and the mast foot rising up through a slot in the foredeck - this could be drained like the mast foot in its own well on the Paradox, or through to the case. But just how complicated do you need to get? Just pick it up and put it in the hole. No muss, no fuss, no strings, latches and hatches Keep to the Meerkat Mantra - Simplz CW |
|
|
That's fine Chris, just posted it to add possible solutions. I don't like the split in the roof either. It's just that Mike races the Everglades and they have quite a few low bridges to sail under so, a bit like the East Coast sailors on the Broads, they shoot the bridge with a fast drop back and re-hoist. My Wanderer had a gated mast at deck level to do the same.
I think the cuddy on Scamp actually works well as cruising protection. Here's Howard Rice keeping comfy out of freezing winter the wind. 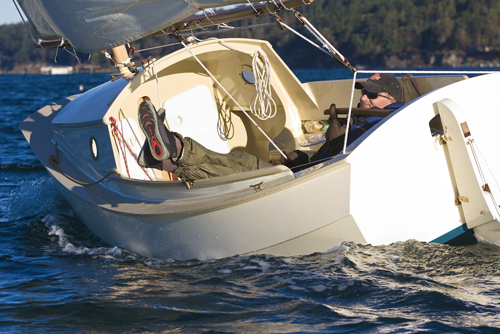 Note how the cuddy is not much higher than her quite high bows. Nice place to brew a coffee 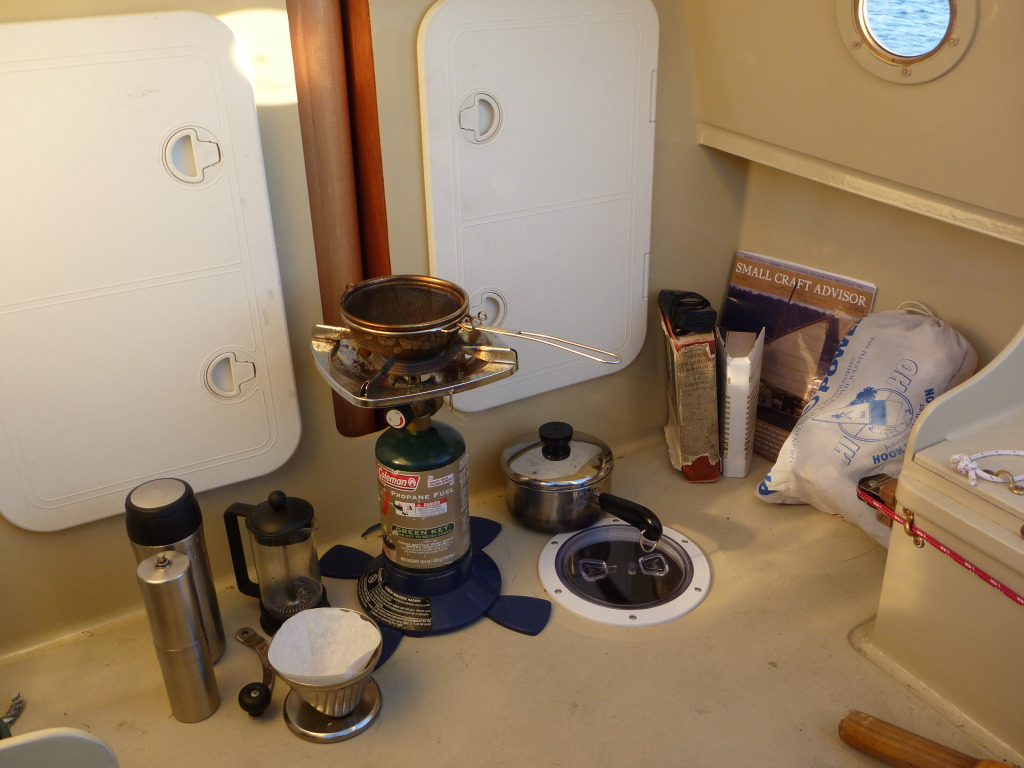 High buoyancy can be as helpful for capsize recovery as low down weight, so I think the cuddy with it's enclosed forward volume aids recovery as well. http://www.youtube.com/watch?feature=player_detailpage&v=wRZNWAkdkXM I am sure your solution Chris will be as well thought through as ever. Brian |
|
|
OK my Bully Boys, water-ballast; time to let the pussy out of the pack, so bring on the engineers
This is an inch and half ID system. The skin fitting itself is Nylon – I wouldn’t use anything less than bronze underwater in a boat that stayed afloat, but I hope to survive installing one in a dinghy. However the next item in line is a (red handle) valve in UPVC and it’s American; I bought it during that lull last Autumn and a ‘Barb to MIP adaptor’ with it. Actually, I bought a couple of them, then lo and behold, the thread on the outside of my skin fitting and the inside of the valve is the same. You gotta be lucky sometime, but have you? 1. The thread seems the same, but after half or three quarters of an inch one starts to creep on the other, so is this the difference between the Chinese and the Taiwanese versions of a standard thread, or is something more interesting happening, or likely to happen – stripping threads for instance? 2. Either way, what is the best method for waterproofing these threaded Nylon/UPVC joints and while on the subject waterproofing, the Nylon through epoxied ply? Bear in mind with these joints I may need to be able to undo them. Here is the whole system: 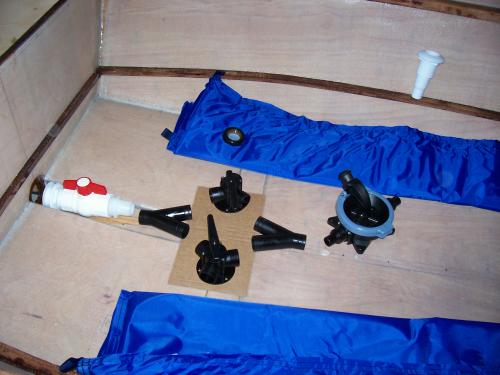 Forward of the main valve is a ‘Y’ joint leading to a three-way valve on each side. These valves flow into Plastimo flexible water-tanks on what will be each side of the centreboard case, held in the bilges by screwed-down floor boards. The forward end of each of these valves runs into another ‘Y’ joint which itself leads into a bilge pump that exits through an above water skin fitting through the side of the hull. So the system is a diamond shape, connected to the water by the red handle valve through the skin fitting within the skeg. This leads to a valved bag each side and the other end can pump out either, or both bags. The theory is that the bags will fill naturally by the pressure of seawater once the red valve is open; but only if their own valve is also opened that way. They can be emptied either individually or together, by opening the red valve once on the beach; on the other hand, they can be pumped out ashore or afloat. Each bag’s three way valve allows it to be connected either to the red valve or the pump, though their design does not allow for the tank to be entirely isolated. They can be separated by turning one valve each way, so this arrangement does mean you can have one tank full and the other empty, allowing you to bed down on the opposite side to a full tank, keeping the boat upright(-ish?), or even keep the windward one only filled, to help in a breeze – if you’re brave enough. Why so apparently complicated? Well there are two major disadvantages to integral fixed tanks, firstly they need large watertight inspection hatches and secondly fully pumping out shallow flat tanks is nigh on impossible as even with a strum box it invariably starts sucking air long before the tank is dry and what if the box is not on the side of the tank that happens to be lowest at the time? This is a closed system, so it can be pumped dry(-ish). There is one more possible advantage, which took me a long time to realize and is entirely unintentional. Think about it, if the boat inverts and the tanks are ‘separated’ by their valves then nothing happens while the boat is lying on one side or the other, because of the pipe-work configuration; the ballast remains on board. However if it ‘turns turtle’, then the tank that is open to the pump will drain through it and out of the skin fitting on the side of the boat, rendering her heavier on the other side and likely to roll upright due to the imbalance…. At least, that is the theory Problems? Yes, two so far. Firstly the tanks are rather stiff and I have a feeling the lack of water pressure at this shallow level may not be enough to properly fill them. Secondly, because of the negative pressure that will be induced by the pump, the hose needs to be ‘armoured’ – the stuff with a strengthening coil in the lay-up. The fittings with the marked ribbing on the outlets seem to be a tad wider than the others and they are not about to accept the hose – any good ideas? Air in the system is a third possibility. So whaddaya think? CW (Sorry to have been fiddling with uploading this, but having got it too large intially, I cannot get the picture to a suitable size - you will need to scroll across to see the whole set-up) |
|
|
Looks interesting, I reckon it should work OK. I used those nylon skin fittings through the hull on my small yacht years ago, as cockpit drains (above the waterline on the transom) and as the galley sink drain (just above the waterline on the side of the hull). I also used a plastic ball valve on the sink drain one. I sealed it up with a smear of Sikaflex on the threads, which worked fine. It also came undone OK a year later, when I decided that having a sink was a waste of space when a bowl worked as well (in fact better) and ripped the thing out and filled the hole in the hull. This also stopped the dreadful gurgling noise that the sink drain made when moored up at night (if I left the valve open).
The threads going tight seems commonplace on these plastic fittings, too. I think that one reason is the fairly high coefficient of expansion plastics have, particularly nylon, because that not only expands a lot with temperature but it also absorbs water and swells. I'd not worry about it, if it goes on for 1/2 to 3/4" it's probably fine, especially with a dollop of Sikaflex (or similar) on the threads. |
|
|
In reply to this post by Chris Waite
Chris,
If you add a 2-way valve either side of the pump you can pump either in or out of the tanks: Tanks Tanks or >>> Pump >>> or Red Valve Outlet The two useful pathways are: Tanks >>> Pump >>> Outlet (emptying) Red Valve >>> Pump >>> Tanks (filling) Extra complication indeed, but what is the risk assessment if the tanks don't fill? BTW: Sparkly Speak means you have 2-way valves in your picture, not 3-way valves. You could merge our 2 designs with true 3-way valves (one in, three out). cheers Paul |
|
|
On 1 Mar 2012 at 6:17, adminHBBR [via UK HBBR Forum] wrote:
> > > Chris, > > If you add a 2-way valve either side of the pump you can pump either > in or out of the tanks: > > Tanks Tanks > or >>> Pump >>> or > Red Valve Outlet > > The two useful pathways are: > > Tanks >>> Pump >>> Outlet (emptying) > > Red Valve >>> Pump >>> Tanks (filling) > > Much what I was thinking. The big advantage, as I see it, is that there is no need for a hole in the hull below the water-line, just a pipe you dangle over the side. Works on Little Jim, though to preserve relaxing time, I use electric pumps. -- Hoping for calm nights Alastair Law, Yeovil, England. <http://www.little.jim.freeuk.com> |
«
Return to Builds in Progress
|
1 view|%1 views
| Free forum by Nabble | Edit this page |