Evolving 'Polly Wee'

1234567
... 11
1234567
... 11

|
|
Graham All your boats look super to me, presently standing about 80 miles away!!
Cee Dubbs If you could put that bow (The first one ) on to a 6ft beam boat suitable for a 9.9hp motor I would be most interested. Tugmeister John Date: Thu, 17 Nov 2011 11:58:24 -0800 From: [hidden email] To: [hidden email] Subject: Re: Evolving 'Polly Wee' Cee Dubbs, All of my boats look better the further away you stand. I'll deny saying this later. Graham. If you reply to this email, your message will be added to the discussion below: http://uk-hbbr-forum.967333.n3.nabble.com/Evolving-Polly-Wee-tp3339755p3516857.html |
|
|
That's the useful thing about this design John
Its a just a notion - you can push and pull and reshape any which way you want, but it is still only a development of a single chine hull with no more seams than a standard flat bottom boat. The forefoot is simply an extension of the stem and I reckon I have the knack for building that now. You tell me what length, beam and an idea of displacement as well as how deep - flat as a pancake to tall as a tower block. Then remind me which bow (the 'first' one?? - what date was the message?) took your fancy and I am sure it can be squeezed into the general 'Premise'. Personally, as I have said before, I try and make best use of the size of a standard ply sheet, but that is your choice. Here is a cardboard model for a 'Premise 16'; that is the 'sides' are made form two eight foot pieces butt jointed; she is fifteen foot six inches LOD with a five foot six inch beam. It would be perfectly possible to make her wider, either by making the floor wider, or increasing the flare on the sides, which would giver her more shear. Or a combination of both to suit you, but at this beam the floor is simply the same width as a single ply sheet - four feet. This model has a vertical stem and a wider transom and with a change of bow, something like this would suit your ideas very well, I would have thought: 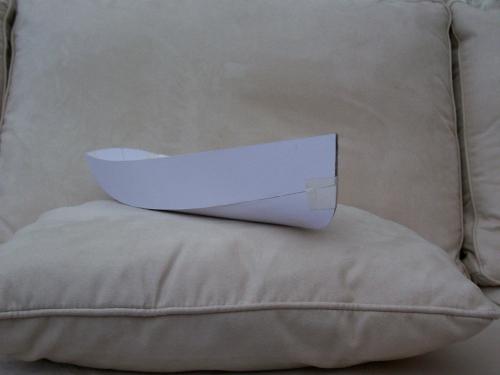 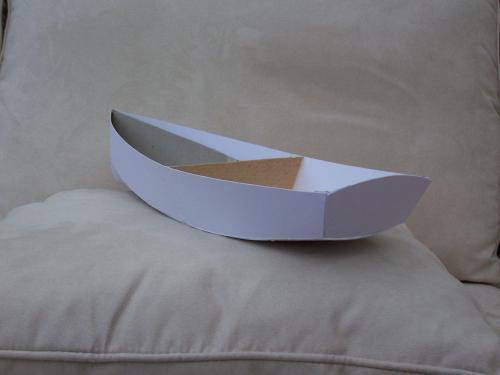 Is this the sort of thing you had in mind? Christo W |
|
|
Good evening Chris
I have to be careful here as I am not a boat designer and I have already got a proven design in mind. Initially I was intending to build Gavin`s Barton Skiff and did make several models and buy some dodgy ply before family illness and then bereavement put a stop to boat building. Now that two Barton Skiffs have been built I was randomly thinking about a "Variation on a theme" and your bow looked as though it would `be right` on the front of the skiff. The bow I was referring to was the first photo in yesterdays post. It was in fact me doing a bit of day dreaming and I certainly would not want to take any more of your time at this stage. I am very conscious of how much effort and time goes into these things that start from a couple of "throw away comments". I do feel I must try and finish one project before I start another. So many boats, so little time! as somebody said. We are away to Brixham tomorrow to spend 10 days looking out over trawlers of all vintages, but that`s another story for another day. Best Regards John Date: Fri, 18 Nov 2011 11:03:54 -0800 From: [hidden email] To: [hidden email] Subject: RE: Evolving 'Polly Wee' That's the useful thing about this design John Its a just a notion - you can push and pull and reshape any which way you want, but it is still only a development of a single chine hull with no more seams than a standard flat bottom boat. The forefoot is simply an extension of the stem and I reckon I have the knack for building that now. You tell me what length, beam and an idea of displacement as well as how deep - flat as a pancake to tall as a tower block. Then remind me which bow (the 'first' one?? - what date was the message?) took your fancy and I am sure it can be squeezed into the general 'Premise'. Personally, as I have said before, I try and make best use of the size of a standard ply sheet, but that is your choice. Here is a cardboard model for a 'Premise 16'; that is the 'sides' are made form two eight foot pieces butt jointed; she is fifteen foot six inches LOD with a five foot six inch beam. It would be perfectly possible to make her wider, either by making the floor wider, or increasing the flare on the sides, which would giver her more shear. Or a combination of both to suit you, but at this beam the floor is simply the same width as a single ply sheet - four feet. This model has a vertical stem and a wider transom and with a change of bow, something like this would suit your ideas very well, I would have thought:   Is this the sort of thing you had in mind? Christo W If you reply to this email, your message will be added to the discussion below: http://uk-hbbr-forum.967333.n3.nabble.com/Evolving-Polly-Wee-tp3339755p3519415.html |
|
|
Well now R/C John
First things first – I have obviously been drooling my daydreams over the keyboard again; those two bow-on pictures are the same boat. I was attempting to show what standing too close can do to perspective – that is your first one where I stood just far enough away to get the hull reasonably in frame. The second, I backed up some eighteen feet so that the light rays to the lens were more parallel allowing more of the sides of the hull to become visible, then cropped and enlarged the picture. I tried the camera optical zoom, but because there is nothing square on for the camera to focus on, it persistently came out fuzzy. I think it reckoned I wanted to picture the junk in the back of the garage. Now, this is going to be difficult to suggest without possibly causing offence and none is intended, but the ‘flattie’ or ‘sharpie’ is a well defined and proven hull form, which has been used for centuries. It is the simplest shape after a punt or pontoon. You can tweak the measurements here and there but it has a flat bottom and more or less vertical sides based on a single hard chine running the length of the hull with some, or not much, rocker and usually a pretty straight stem and rectangular transom that may or may not be raked a tad or so. The hull is smaller or taller, wider or narrower, longer or shorter and comes out as a Paradox, or a Goat Island Skiff, or one of Gavin’s designs, or one of Conrad Natzio’s, or a Raid, or whatever. It can then be finished with or without a deck and whatever rig the owner prefers, or an outboard if that suits. The next step up is a Stacking Dory, which is specifically designed to be not only simple, but flared and raked so that the hulls can be carried aboard a mother ship stacked like disposable cups with ends. The Thames Barge was a real working vessel, developed over centuries from something that looked like a very stout punt – a ‘Swimhead’ barge. They were designed specifically for the Thames estuary to be shallow enough for all the sand banks and shallow creeks and able to sit upright on the mud when the tide went out. Incidentally they also had superbly clever designs in the rig. The final form was blessed with a large cuboid hold mated to very elegant ‘sailing’ ends. What they did was to soften and lose the chine at those ends making for much less drag. That is what I was attempting to apply to the flattie, while keeping the simplicity of a single seam and I think that is probably what you have spotted that appealed to you. The hard chine on the Paradox is intended to give her more grip on the water, including when heeled and she is also fitted with enlarged lateral chine runners to achieve the same objective, hence manages to avoid having a centre, or dagger board. The American designer Phil Bolger and his chums also used to talk about seas of peas, trying to describe the way water flows across these sharp edges forward, but the fact remains that they cause more drag than a rounded chine and the flat surface forward tends to slam in anything of a seaway, unless the hull is sufficiently ballasted to hold the forefoot below the troughs of the waves. And that's about it really Cee Dubbaya |
|
|
Just to cheer up those of you who feel that it’s about time this pompous old goat had a little dose of come-uppance, I wish to report a small dollop of egg over the face. This last week, while plucking up courage to start drilling holes, I thought I would cut out the bulkheads; all very well and eventually I got to the point of forming the curve of the foredeck over the forward bulkhead.
I reckoned to set up a glassfibre batten going through the vital points. To produce a more even curve I clamped on a reasonable deal (softwood) off-cut some fifteen inches long, so that the corners bowed the batten upwards from two points rather than just centrally. I pencilled in the curve and then in a moment of unmitigated stupidity, casually unscrewed the clamp. I have to tell you that the tension in the curve of the braced batten and gravity between them drove the off-cut smartly downwards and it only stopped when it had forced one corner through my suspect forefoot by about an inch or so. I hadn’t meant to start doing the bit about epoxy for strengthening holes until the bulkheads were actually in place However, it seems I’ve already started CW |
|
|
Ouch!
But so easily done.
On 24 Nov 2011, at 21:53, Chris Waite [via UK HBBR Forum] wrote: Just to cheer up those of you who feel that it’s about time this pompous old goat had a little dose of come-uppance, I wish to report a small dollop of egg over the face. This last week, while plucking up courage to start drilling holes, I thought I would cut out the bulkheads; all very well and eventually I got to the point of forming the curve of the foredeck over the forward bulkhead. |
|
|
In reply to this post by Chris Waite
Chris Waite, Dramatical builder of tortured small crafts.
 I hope your foot is ok. (Is this boat speaking to you?) |
|
|
Now come on Cee Dubbs, we've spoken about cross threading posts before and this will not do!
The archery discussion is over there. How-to-build-a-longbow I'm getting a bit concerned that our next trip will look even more like a Viking Raid than usual. Graham |
|
|
A Viking theme for the Thames raid sounds like fun.... |
|
|
Good afternoon Chris In reply to your question over on that other thread, where, incidently, I do admire your choice of phrase, whilst I would have been limited to something like " Mi boat fell over and I tipped out!" you come up with literary elegance. Back to this topic, yes I did read your reply of 19th but only after we returned from Brixham where they have proper boats, it was one of 178 emails awaiting my return and as the thread had moved on to "The Archers Go Viking Raiding" or something I had got well left behind (nothing new there then!) Regards R/J
Date: Fri, 25 Nov 2011 06:08:33 -0800 From: [hidden email] To: [hidden email] Subject: RE: Evolving 'Polly Wee' A Viking theme for the Thames raid sounds like fun.... If you reply to this email, your message will be added to the discussion below: http://uk-hbbr-forum.967333.n3.nabble.com/Evolving-Polly-Wee-tp3339755p3536214.html |
|
|
It’s been a tedious couple of weeks
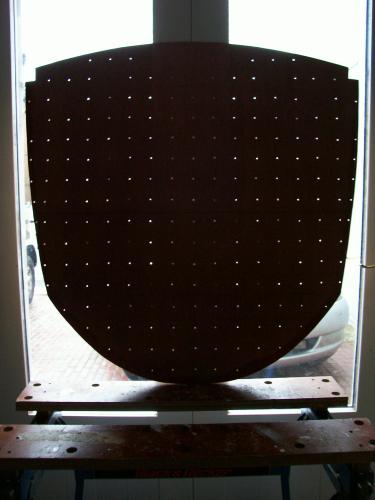
Life seems to come knocking at my garage (workshop) door every few minutes demanding that I cease to think entirely about boats and do stuff like birthdays and working through Microsoft’s cunning defences to find something simple like the ‘Word’ ruler for my Honey and shopping and anniversaries and getting Christmas table cloths out of the topmost cupboard and even going to work and such. Then I spend an inordinate amount of time writing reams of marginally obnoxious tosh on this website; as the Minister of the Interior persists in reminding me. I also have to pay attention* while waiting to be fed (*Be sociable) Shortly after I promised to go away and drill my hull full of holes it occurred to me that it might fare better if were to give the whole thing a lick of epoxy first. What is more, it would be less likely to break up while under the drill if I put in the bulkheads too. However putting in the bulkheads means doing all major work in the forepeak first, as it is a diminishing three foot triangular hole: 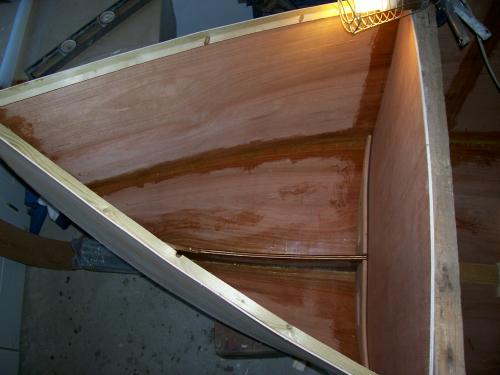 The support will need to be based around the forward main bulkhead; just aft of it actually, otherwise the mast will be standing in the forward buoyancy compartment. It will need to be strengthened fore and aft, taking the stress along the forefoot, (which itself needs to be able to run up a beach), thence on up the stem. So there is now a three quarter inch ply web of diminishing depth running from the bulkhead round the forefoot and up to just short of the stem head, where there will be a micro-well, just large enough to put a handle across for holding her ‘head’ when necessary. Have you ever noticed how many dinghies do not have a decent grab handle forward and something transverse is much easier to hang onto than anything fore and aft: 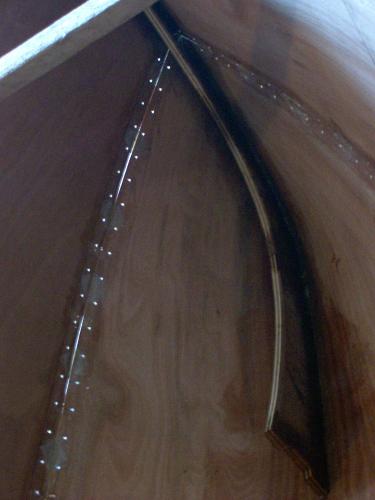 The bulkhead itself will need to be strengthened across the bottom to transfer lateral pressure from the foot to the floors; and up to the chines I have decided - devilish cunning, you can see it by the way the lightening holes are watching you: 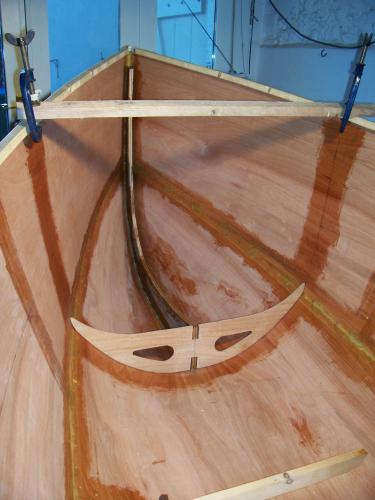 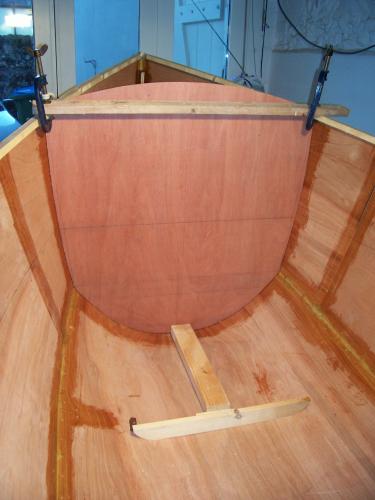 I also started to release her from the baulk of timber to which she has been lashed (screwed actually) since her inception and that damn forefoot instantly began to creak again. Battles are there to be fought, so I rapidly screwed her back down and have epoxy taped the insides of the chines to help dictate the shape. But first I did do a double row of sub-tape holes, marching each side of the seam, as this is obviously one of the most likely places for future disintegration. I’d have had to do it before the bulkheads went in anyway - you can see them (and all the other ghastly gaps), in the picture of the forefoot web above. The aft bulkhead is an altogether easier proposition: 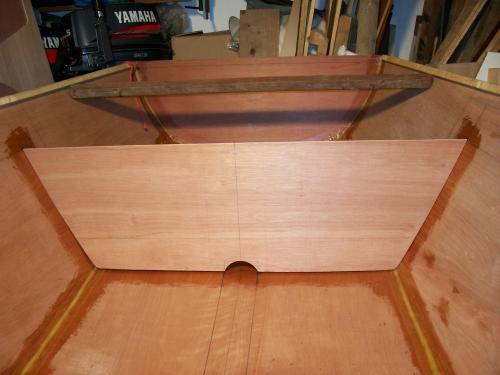 And another thought squeezed in just in time – if the skeg is to contain the water inlet for the ballast system, then some fiddledy-dee has to go on at the base of the aft bulkhead to accommodate the skin fitting. More delay. Interestingly one sheet of 6 mm just does the transom, those two bulkheads and the two sides of the centreboard case; fortune smiles a brief smile. Even as I write; behold, postie is at the door with a large box – My ballast system from Force 4 CW |
|
|
I’m beginning to think I support the turkeys on the matter of Christmas – It can really take over your whole life.
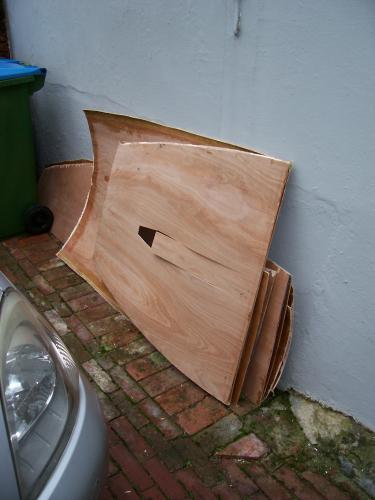
Anyway, I still hold with the title of this topic as “Evolving ‘Polly Wee’”. You know how in evolution some of nature’s experiments fall by the wayside; otherwise we’d be having Neanderthals over for Christmas drinks and Sainsbury’s would stock Tyrannosaur steaks and such. Well the last three months have just been consigned to historical experiment I’m starting again. The other day, I mentioned to my personal Scotsman that I had found a small nest of qualms hiding under one of the chines. He was quite nice about it; he didn’t say – “I told you so, idiot!” or anything, he just advised that I am prone to more sort of 6 mm sailing rather than 3 mm. So thank you Port-na-Grum. There were two things wrong; firstly I have to admit though the ply was always strange and not in any good way, I reckon I could have made it work, but it would always have made me wonder – qualm one. Then there was the shape of the hull; there was something awry with the chines. The model was based on shaping the sides of the hull, setting them up on an internal jig, then applying the floors to fit. As the forefoot was going to be the hardest piece to produce full-size, I felt constrained to start there and add the rest; the chines became oddly bent out of shape in the process – qualm two. I think if either of these two had not occurred, I would have made the other work, but it would never have been the boat I still hope for. Chin up though chaps, just remember that amateurs built the ark* and professionals built the ‘Titanic’. *I know, I know – “Just the once dear”. So back to ply perusal; I spent a couple of days in Christmas week touring the stockists. Eight inspections later, I eventually decided on Travis Perkins who have some light khaki-coloured stuff in 5.5 mm. I also found some real 6 mm birch - beautiful, but it was so solid it would never agree to a ‘Premise 12’ forefoot and Mr Travis and Mr Perkins offering is sufficiently loose-knit that I have hopes. It also consists of three main laminations covered in external skims of similar stuff, while still having the feeling of real wood, rather than a brittle balsa/polystyrene cyborg, though they both have the same construction. So I bought four sheets and because of all the heart-searching, well head-scratching, that has already gone on, I have been able to cut myself out the next, fractionally adjusted set of floors and sides in the last couple of days: 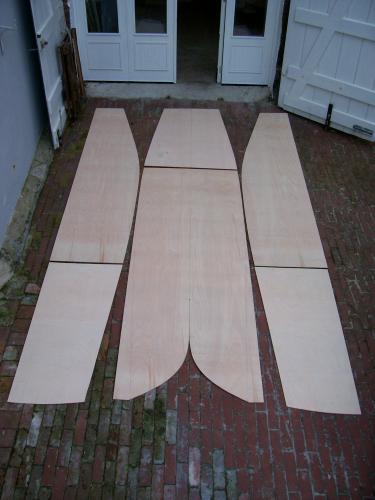 I have marked the anticipated upper edge of the floors forward, but not actually made the cut, as it is so embarrassing to end up with even a sliver of an elliptical hole where the chine ought to be. Though I think I have now worked out what I hope will prove a more effective way to produce ‘Premise’ forefeet, I’m beginning to wish I hadn’t set myself up for this damn shape in the first place…. Forefeet Time will tell; time will Cee Dubs |
|
|
It takes a brave man to recognize errors and start all over. I´m looking forward to building part 2. Can you remember that I made some cardboard experiments with a 2 sheet design from Flo-mo? I turned a doubleender into a shorter doubleender, a wineglass transom and a round transom. 3 different models. What I learned there was to stich from the middle and let the ends take their shape just helping them a little bit in one or another direction. I think you might have been to obsessed with the "correct" shape on the bow which came out very nicely but then the rest.....
Good luck with the building |
|
|
Thanks for the thought on stitching the seams from admidships Anders. I prefer to start from the stem as a fixed entity and sew round until I reach the stern, then insert the transom as far back as the ply will allow, otherwise there are too many variables for my tiny mind. Here are pictures of the forward main bulkhead that was going to go in, to demonstrate that I really was going for the grid of holes option and another to show that I have actually destroyed the first hull:
  I spent the New Year break doing more really ghastly things to the first sheet of ply on this second attempt. As I mentioned to a co-conspirator, this is becoming less and less about building myself a boat and more and more about the Battle of the Bow Bottoms, otherwise known as the Forefoot Farce. Among other things, this was meant to be about simplicity of construction, but simplicity seems to have flown out of the window. The sequence of photographs shows that I started with a substantial and suitably sinister, inverted cross:  I then produced a similarly strong ‘V’ screwed over the top: 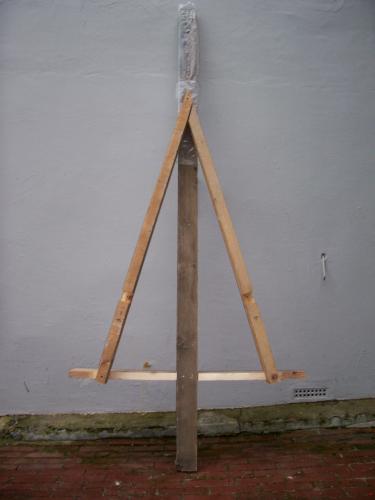 The ply actually goes between these two: 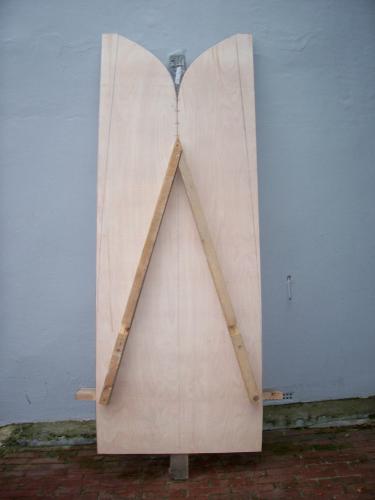 Note that the seam of the forefoot is cut back and stops under the ‘V’. It is also pre-stitched with copper wire and screwed down with a wide, bent washer to discourage any rocker, forward: 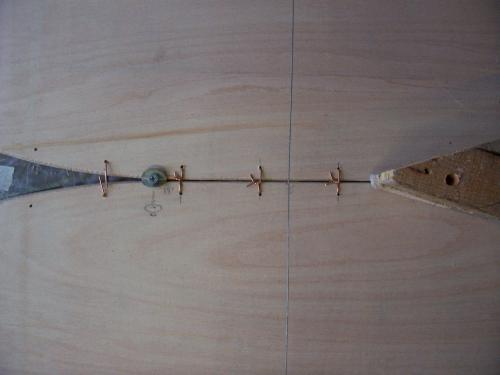 Next, I have guesstimated where I think the line of the chines will be (see top side of ply) and put some battens on the underside: 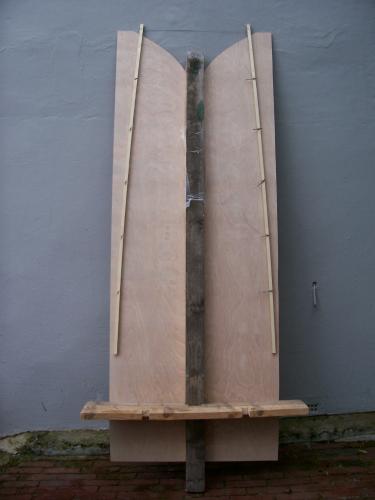 These are wired to each other through holes in the ply 1.25 inches below the anticipated chine, so that there is room to epoxy-fibreglass tape the seams (eventually), before removing the wire. Note, I have left the excess on at this stage as I may need it to reach the lower edge of the ‘sides’:  Now lie it down inside up, if that makes sense and start propping under the wires, moving back ward and forward as they go slack in turn:  Make sure you use BIG screws to clamp the ply down, or even through bolts, as it is not a willing partner in this exercise. I was horrified when I heard a vicious ‘crack’, as I was already trying to re-screw one corner of the frame I assumed the uneven tension had allowed the ply to give-way. However I could not find any sign of this, but the forward screw at the point of the ‘V’ had come adrift; it now has the largest screws I could lay hands on. Most proper amateur boat builders would work out a way of ratcheting up the wires, but I have loads of off-cuts for props of various lengths and have also run out of the time and enthusiasm to work it out. This is alright for a couple of goes, but to really get to grips with the problem the ply, (this stuff is actually only 5.5 mm WBP), needs wetting down with boiling water over towels - as suggested by our Calendar Chap himself; unless you have a way of steaming the whole thing. I think the outside is in more need of this treatment than the inside; how do you wet down the under-surface of a piece of ply that you need to work on the top of?? This took me a while to work out; turn it back over upside down and set up with towels: 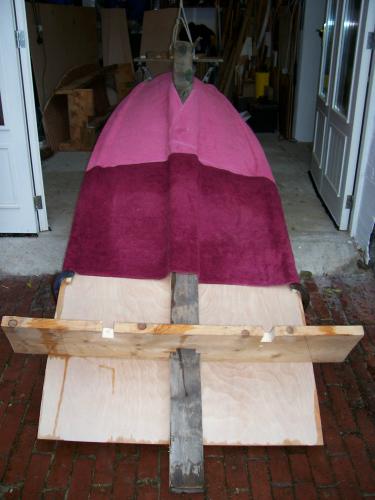 Now pour kettles of boiling water over them and cover with polythene to try and keep the heat in a little longer: 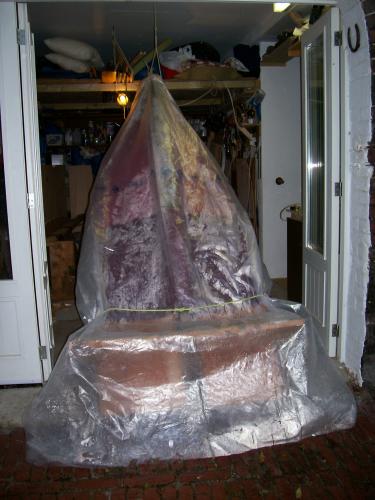 Lift the (forward) end high enough that you can work from underneath – crawling around under a dripping timber lash-up – my favourite: 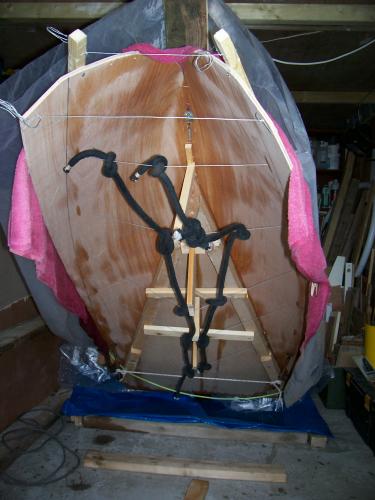 The last picture is at the end of play right way up again: 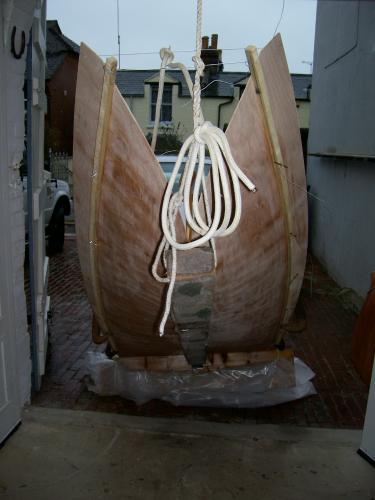 And after a couple of days: 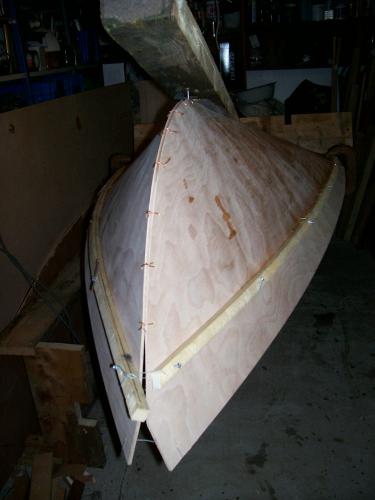 OK, the ply has bent to shape, but it is showing real signs of strain, one side more than the other. I just don’t know whether I can pull it straight, lavish epoxy on it and carry on, or not. The black rope? I was using some rather thin wire – all I had at the time and worried that it might snap, I tied some rope over it to discourage it whipping back and removing any of my vital facial features, ugly though they may be. So is this the answer? Well I've managed to pull it nearly straight by putting in more wires asymmetrically, but I am allowing my self time to think before deciding whether to go on with it Or go for Forefoot III CW |
|
|
I reckon you have two options.
Put some tuning pegs on all that wire, and Anders could no doubt get a very nice tune out of it, or Push-on and see where it takes you. Personally I push on. If the forefoot is the most difficult part then the worst is over, lets see how she sails. Your faithful co-conspirator, Calendar Chap, and builder of Cee-Dubs designed Katie Beardie. |
|
|
I'm keen to see the outcome, so vote for push on. But I'm not doing the work!
Some justice here, you are torturing the ply (to a considerable extent!) so you experience some pain in return. It's all about cosmic balance. The boat will be a beauty when she's done and the ply will appreciate what it's become and thank you for it. Timmo
On 4 Jan 2012, at 23:06, Port-Na-Storm [via UK HBBR Forum] wrote:
|
|
|
With respect of building cosmic boats and other cosmic things, one has to work with an open mind and always try to be in inner balance with one self. Maybe you could help the process by listening to some relaxing new age music in the workshop or have someone to come and make a session with Tibethan gongs. Give the boat its space to express itself. Maybe if it gets the chance to decide wheather it wants to be a boat or not it´ll turnout as the prettiest boat ever seen or maybe it´ll transform itself into something completely different, something that´ll open your mind for a new dimension of boatbuilding and living. Peace. |
|
|
I tell you what, TimmO
The ply sure as fireworks ain't thanking me at the moment; what's the motto for that noisy breakfast cereal? Anyway Anders I have peered over the edge of my Cosmic Piece; while listening to Classic FM actually, (as gongs clash with my tinnitus) and I can see it staring me in the face - this boat was never meant to be beautiful. Traditional style, clinker boats with brass fittings and varnish and thwarts and such are beautiful and it can really hurt to be beautiful. If I have anything to do with it, and madame is materializing in my garage; she is meant to be a pragmatic answer to: 1. Simplicity of construction, (forefeet excluded it seems) 2. Simplicity of rig 3. Reducing the effects angulated gravity, (drying out upright) 4. Displacement ashore 5. Space to lie out 6. Possibly self righting, (I have a cunning plan) 7. Seriously rely on sail and oar, (and Ped-yuloh) 8. Seaworthiness, (to carelessly visit at least the Isle of Wight, from Chichester Harbour) 9. To 'Raid' effectively from the rough to the smooth 10. To fit in the garage and between my local bollards, (see the initial entry on page one) Apart from that I can do anything I like. We previously mentioned the chines and I have worked out what went wrong. With the models I made a simple 'T' frame and spread pre-designed sides round them to a transom, then 'applied' the floor afterwards, trimming to suit. For practical reasons, I had already reckoned to start with the forefoot on the real thing, I bypassed relying on the chine-line from the sides of the model - mistake. It gets worse; on the original cardboard cut-out, the sides tucked in strangely under the 'bustle' aft and with the first full size version there was a visual discrepancy between the chines and the slightly tortured stern. I hope to iron out both of these by straightening the line here, but I already fear I may have overdone it. Still, I now have a new forefoot to play with and another idea in my pocket for later. However, not being varnish-fondlingly beautiful does not mean having to forego a soupcon of aesthetic proportion. She ought to turn out no less attractive than my other working girls. Serious stuff CW |
|
|
I like the esthetics of your "working girls" They are inspiring and often I find yacht finish multi-clinker ply boring. But I think you should try a session with those tibetan gongs.
 Timmo is right Timmo is right
|
|
|
Can I leave the Tibetan gongs for later Anders?
I know I keep harping on, but I have only just managed to reduce my forefoot to six strings, to make it easier to play. Anyway it will have to be a seriosuly high tide to get to those gongs. Everybody else’s workspace always looks so neat – everything ship-shape and Bristol fashion; as for me, there always seems to be this slightly jungly, desperate, Heath Robinson air, pervading the garage. Here is the interior of the forefoot as it is finally wired and propped:  I do get a lot of help from ‘Molly’, our Yaris; on this occasion she is pointing out that the stem is slightly past upright. And here are the three Spanish windlae, (well what is the plural of windlass), that are causing the problem: 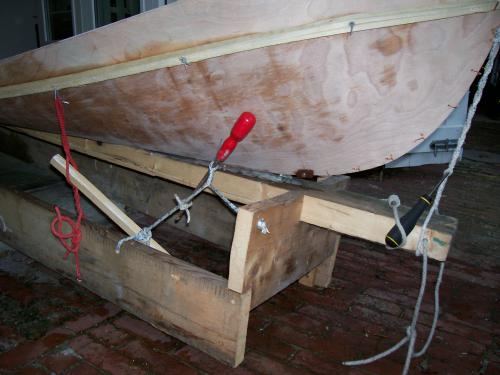 This is an attempt to take the pressure off the incipient cracks that are appearing on the same, side where the bend starts; until I can get a good splash of epoxy over the whole forefoot and capture my creation for eternity: 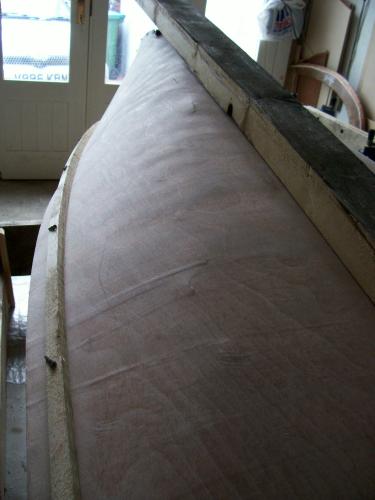 Makes cellulite look like quite an easy option, doesn't it? 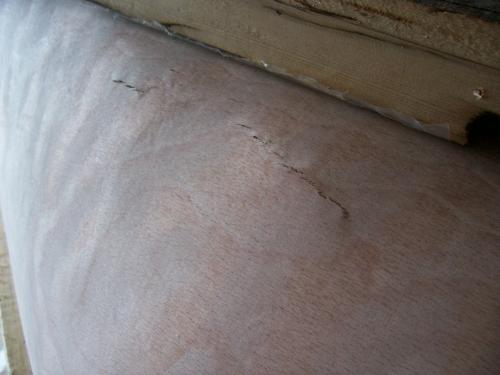 I have to say to anyone thinking of taking on a Premise 12 build that my third option would now be favourite; good quality 4 mm for the tortuous forefoot, with the spare cut off the same sheet used to strengthen the flat section inside the ‘V’, where the board case is to stand – there is just sufficient to do nicely. Actually this second version is about through with forefeet and today I've been wiring on the sides Maybe I'll have a boat yet CW |
«
Return to Builds in Progress
|
1 view|%1 views
| Free forum by Nabble | Edit this page |