MilliBee with a haircut?

classic Classic list List threaded Threaded
339 messages Options
1 ... 1314151617
Timmo Timmo
Reply | Threaded
Open this post in threaded view
|

Re: But does the washboard fit?

This post was updated on .
Gotcha, can see your problem very clearly now.

Possible options off the top of my head (not well thought through but will hopefully inspire others to have better ones!)...

Create doors with a hinged top section on each that flips up against the hatch lip when closed (or can be left folded down for ventilation.) will need a system for holding the flaps up internally and another one externally when closing up from outside.

Boards that slot into groove on one side and are held in place against the front frame of the entrance by turnbuckles on the other side from the groove. Top board will need a way in which it can be inserted from outside and inside though. Maybe groove in underside of Hatch so it slots up and then locks to board beneath it (from inside or out depending which side you are.)

Either of above solutions except with flap attached to underside of hatch that fold down to seal gap when hatch is closed.

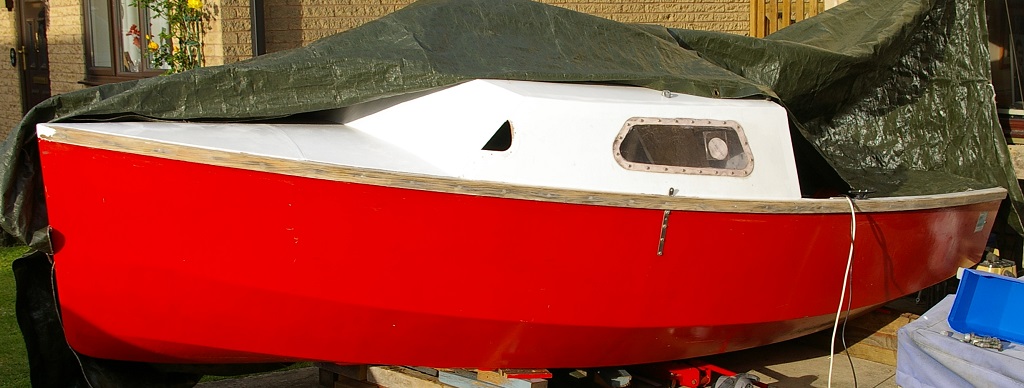
Reinstate the V shape to the entrance (though shame to lose the space and freedom to move about, especially as age inhibits athleticism.)

That's my halfpence worth.

Tim.


> On 26 Apr 2015, at 09:48, Paul (admin) [via UK HBBR Forum] <ml-node+s967333n4028701h44@n3.nabble.com> wrote:
>
> Port-Na-Storm wrote
> Indeed Oops.
>
>
> or
>
>
> Oh Bugger.
> Carpe Diem
>
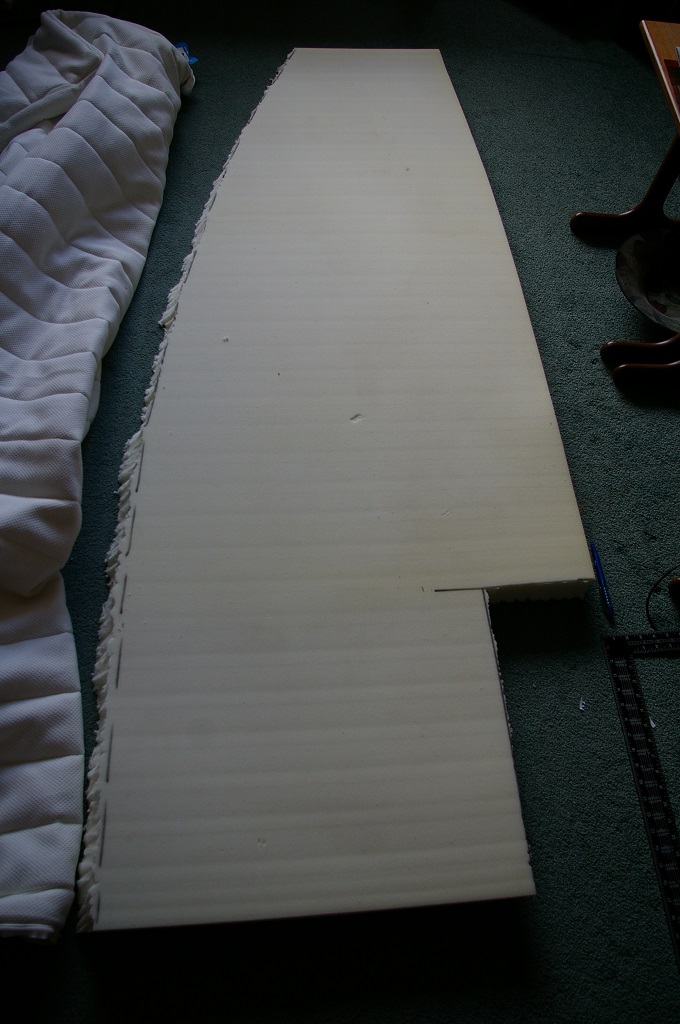
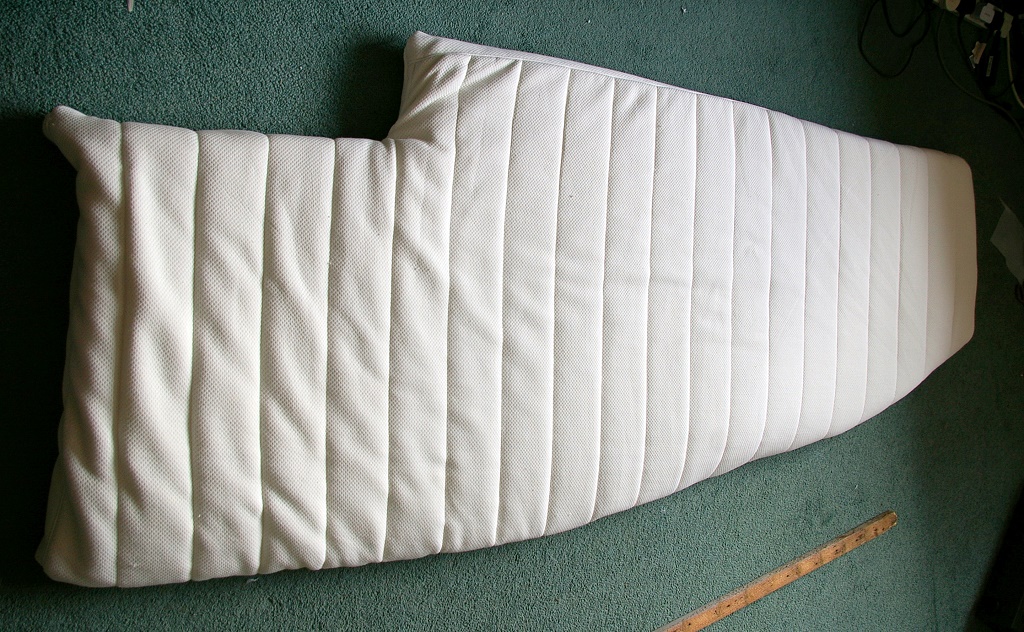
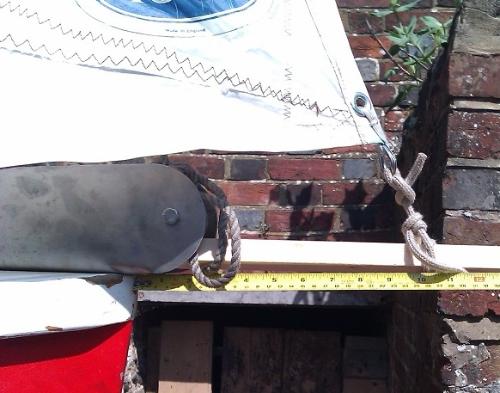
> Got up at 7am and already had lots of ideas. My Evolution Rage 3S sliding saw cuts 210mm wide.....so it's very easy and accurate to make washboards 210mm high...or at least prototypes from scrap to figure out the correct angle to cut.
>
> Holding the vertical oak rebates at the side of the bottom rebate looks ok...with just a thin sliver of a hole in the bulkhead at the bottom. They used to be on top of the bottom rebate so that's 74mm wider at the bottom already.
>
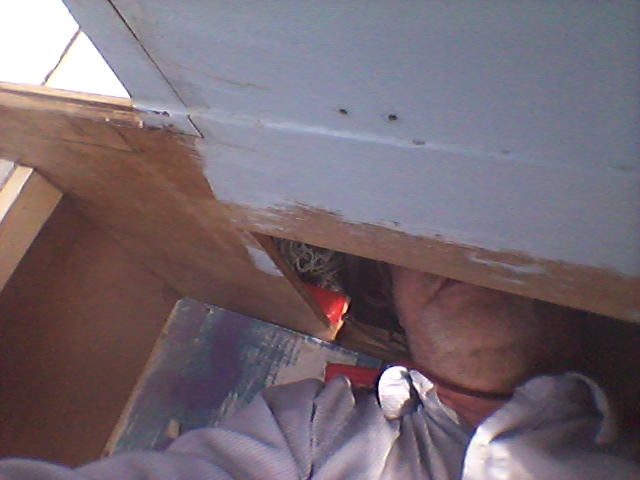
> Timmo, here's a photo of the "skeleton". See how I accidentally cut the opening square.
>
>
>
> The washboard can slide up about 40mm behind the front side of the hatch, then pop out of its groove and stowed to leave the companionway clear. It all works because the "V" shape get wider as the boards lift. Likewise at night I lift it high and drop it into the V groove, sliding the hatch atf to seal the gap. It has never let any rain in.
>
> So there must be a "V" for this system to work. D'oh
>
>
> Other systems don't rely on the "V"; the hatch slides aft to touch the inside of the boards, but there is often an overhang on the hatch to keep some of the rain off. The YMS works like this, all the rectangular washboards slide in from the top, then the hatch goes aft. Personally I think the V system is better as the overlap of the hatch should provide better rain/wave protection.
>
> The oak is a bit weathered so I will sand the whole lot of paint it, hiding epoxy fixes along the way.
>
> -Paul
> Sail when you can, motor when you can't http://www.millibee.com 
Paul H (admin) Paul H (admin)
Reply | Threaded
Open this post in threaded view
|

Re: But does the washboard fit?

Timmo,

Some interesting ideas there, glad to be inside reading them because its soooo cold and damp outside.

A few micro cruisers have had doors but that leads to space problems when open.

Washboards are flexible because you can remove just the top board for cooking ventilation...and the closed hatch and bottom board(s) protect you from the wind and rain.

I've prototyped some scrap ply to fit the new V angle, it seems to work ok. That's good as the new angle is shallower, approx 3.5 degrees; the old about 5 degrees. I need to try a wider piece to be sure.

Some great craftwork coming up in the next post.....

Paul


Paul H (admin) Paul H (admin)
Reply | Threaded
Open this post in threaded view
|

How to make a boat mattress?

Up-cycling Ikea Stuff

We had a spare Ikea mattress topper - 60mm of memory foam with padding. It fits on a normal mattress but I found the combination a bit too soft. After falling over the thing several times (its huge rolled up) I  thought of a way to up-cycle it.

We stripped the "topper" and took out the foam, I layed MilliBee's internal panels on the foam and traced the curve of the hull. If you watch professional upholsterers on You Tube they have rotating blades (like a band saw) to cut the foam at the measured hull angle. But I just eye-balled it with a serrated kitchen knife!


The cutout fits around the main bulkhead, there is a 2ft wide gap under the cockpit seats and the bridge deck. Wide enough to stick ones feet sleeping and stowage space underneath.

Dilys spent a few hours making paper patterns to pin to the mattress cover, keeping most of the zip aligned with the keel, then some magic on her sewing machine. This was a challenge fit for the Sewing Bee TV programme! The result is a stunning custom mattress for MilliBee of which I'm very proud:


-Paul

 
Paul H (admin) Paul H (admin)
Reply | Threaded
Open this post in threaded view
|

Hull Bottom Finished

After much sanding, an undercoat of Jotun Penguard HB and one coat of Jotun Hardtop AS (both 2-pack) here she is:


Slightly patchy, but nobody will ever see it!

Touching up some scratches, the "Signal Red" colour of the hull painted in April 2005 was a perfect match for the new paint. The two pack Hardtop AS has performed extremely well...........apart from one batch where I forgot the hardener and a few places I cut corners by skipping the undercoat.

I'll give the centreboard a coat of Hardtop AS White, and use the spare white paint to touch up the undercoat on the Oak that caps the centreboard case. Board and case insides are all white to easily see where any mud/stone jams are. Plus the polyurethane Hardtop is 'slippery when wet' which will cut down friction and wear as the board is raised and lowered.

The capped bilge-board slots are very strong, a perfect location for trailer rollers.

cheers
Paul
Port-Na-Storm Port-Na-Storm
Reply | Threaded
Open this post in threaded view
|

Re: Hull Bottom Finished

Well done that man!
Paul H (admin) Paul H (admin)
Reply | Threaded
Open this post in threaded view
|

Re: Hull Bottom Finished

Port-Na-Storm wrote
Well done that man!
Also Well done that woman!  Dilys did most of the last coat, and I brewed the tea. Bizzare....

-Paul
Port-Na-Storm Port-Na-Storm
Reply | Threaded
Open this post in threaded view
|

RE: Hull Bottom Finished

If I make her a cuppa will she come and paint mine?

From: [hidden email]
Sent: ‎12/‎05/‎2015 21:01
To: [hidden email]
Subject: Re: Hull Bottom Finished

Port-Na-Storm wrote
Well done that man!
Also Well done that woman!  Dilys did most of the last coat, and I brewed the tea. Bizzare....

-Paul
Sail when you can, motor when you can't http://www.millibee.com


If you reply to this email, your message will be added to the discussion below:
http://uk-hbbr-forum.967333.n3.nabble.com/MilliBee-with-a-haircut-tp3727803p4028739.html
To start a new topic under General Discussion, email [hidden email]
To unsubscribe from UK HBBR Forum, click here.
NAML
Paul H (admin) Paul H (admin)
Reply | Threaded
Open this post in threaded view
|

Undercoat or B&Q Decking Stain

The Port outwhales have had a hard life, bumping into the bank, riding up and down against broken moorings for larger boats. From the older pictures you can see the paint had flaked off and looked messy.

Over the Winter condensation or rain leaked onto the outwhales - when I scraped away some paint there was a worrying dampness underneath. That side catches the Sun also, so there was evidence of the wood shrinking in the warmer, dryer weather causing the paint skin to ripple and then crack. But its all dray now.

So after more scraping, hand sanding and 20 minutes with the belt sander we have:


So should I go for grey primer or Graham's tried and tested B&Q Oak Decking Stain?

My preference is B&Q decking stain, varnish is a no-no.

It's only Pine, darkened already and there are epoxy filled screw holes every 8in for the entire length. I thought it was a good idea to leave them in [pause for laughter]. If the surface deteriorates I will screw a D section of Oak as a sacrificial capping and keep the UV off the epoxy fillings.

regards
Paul

Timmo Timmo
Reply | Threaded
Open this post in threaded view
|

Re: Undercoat or B&Q Decking Stain

This post was updated on .
Personally I'd choose decking stain/oil. So much more forgiving of being bashed around and also very easy to top up.

Tim.


> On 24 May 2015, at 19:45, Paul (admin) [via UK HBBR Forum] <ml-node+s967333n4028793h96@n3.nabble.com> wrote:
>
> The Port outwhales have had a hard life, bumping into the bank, riding up and down against broken moorings for larger boats. From the older pictures you can see the paint had flaked off and looked messy.
>
> Over the Winter condensation or rain leaked onto the outwhales - when I scraped away some paint there was a worrying dampness underneath. That side catches the Sun also, so there was evidence of the wood shrinking in the warmer, dryer weather causing the paint skin to ripple and then crack. But its all dray now.
>
> So after more scraping, hand sanding and 20 minutes with the belt sander we have:
>
>
>
> So should I go for grey primer or Graham's tried and tested B&Q Oak Decking Stain?
>
> My preference is B&Q decking stain, varnish is a no-no.
>
> It's only Pine, darkened already and there are epoxy filled screw holes every 8in for the entire length. I thought it was a good idea to leave them in [pause for laughter]. If the surface deteriorates I will screw a D section of Oak as a sacrificial capping and keep the UV off the epoxy fillings.
>
> regards
> Paul
>
> Sail when you can, motor when you can't http://www.millibee.com <http://www.millibee.com/>
Paul H (admin) Paul H (admin)
Reply | Threaded
Open this post in threaded view
|

Re: Undercoat or B&Q Decking Stain

Timmo wrote
Personally I'd choose decking stain/oil. So much more forgiving of being bashed around and also very easy to top up.
Agreed. I painted one coat of B&Q Oak Decking Stain yesterday, so easy, and it looks good. The usual dark stain of Pine blends in to give a weathered look. Pics later, struggling with mudguards at the moment!

Snipe have changed the design now and sent me the newer brackets. I had to drill them to match the holes in the older brackets, no problem, but the "L" tags are not wide enough to cover the 8in wheeel. All fixable but the clock is ticking.

Now that the keel is 20mm higher, I'm wondering if she will clear the old 10in mudguards. That would be good as they are very strong and would probably take my weight if I needed to hop onto the boat. Plus I can fit them quicker than the 8in mudguards.

Need to scan back through the old pictures.  If only I could raise the centre keel roller - they welded it to the frame.

-Paul
Paul H (admin) Paul H (admin)
Reply | Threaded
Open this post in threaded view
|

MilliBee goes hybrid-electric

This post was updated on .
Bought a small 40cc 700 watt 4-stroke generator for £190 in Screwfix, just in case there are not enough charge points for the Thames Raid:


So the "illegal" 2-stroke outboard will stay at home - no oil pollution and nasty fumes at paddler level!

Being a 4-stroke this genny is far cleaner and complies with EU emission regulations. So she is hybrid-electric.

The 24V 12A charger needs about 330W peak so jenny will run in Economy mode under half-speed, automatically running slower (quieter) as the batteries become charged.

Running it in the cockpit should send the noise up and away from the rest of the gang. Hopefully I will never have to use it though.

-Paul
Chris Waite Chris Waite
Reply | Threaded
Open this post in threaded view
|

Re: MilliBee goes hybrid-electric

I've just been trying to send Paulie a photograph

It only took three-quarters of an hour's struggle to fail to upload by email and this has taken three re-boots here on HBBR:


....he can explain the significance if he cares to

CW

Paul H (admin) Paul H (admin)
Reply | Threaded
Open this post in threaded view
|

Re: MilliBee goes hybrid-electric

Chris,
Time uploading very much appreciated.

Unus pro omnibus, omnes pro uno.  

Paul
Paul H (admin) Paul H (admin)
Reply | Threaded
Open this post in threaded view
|

Extreme wiring

Head in a dark place wiring battery cables to speed controller:


#extremewiringselfie
Port-Na-Storm Port-Na-Storm
Reply | Threaded
Open this post in threaded view
|

RE: Extreme wiring

We will be waiting for your triumphant arrival tomorrow.
Grum

From: [hidden email]
Sent: ‎30/‎05/‎2015 16:30
To: [hidden email]
Subject: Extreme wiring

Head in a dark place wiring battery cables to speed controller:


#extremewiringselfie
Sail when you can, motor when you can't http://www.millibee.com


If you reply to this email, your message will be added to the discussion below:
http://uk-hbbr-forum.967333.n3.nabble.com/MilliBee-with-a-haircut-tp3727803p4028851.html
To start a new topic under General Discussion, email [hidden email]
To unsubscribe from UK HBBR Forum, click here.
NAML
Paul H (admin) Paul H (admin)
Reply | Threaded
Open this post in threaded view
|

Mast splicing?

In reply to this post by Paul H (admin)

The Story

A long, long time ago in 2011 Cee Dubs helped me prototype a new Gunter mast from a (swashbuckling) Vagabond and a go-faster Wayfarer genoa.

From the rear you can see how we lifted the mast (50mm rounded square) about 42cm or 16.5in:


The genoa just fitted, with 10in on the bowsprit-ready bow. I have built a bowsprit from the old bilge cases, it just needs fitting.


The Mast Problem


Here I can reuse the original boom for MilliBee which I think was a mast from a small dinghy, and somehow attach it to the bottom of the Vagabond mast. About 62cm, just, under 2ft brings the mast to about 4m......the idea being the genoa will just clear the cabin roof.


So I have a few options:

1) Butt joint with some pieces of harder wood. Quick but ugly.

2) Splice it with epoxy and screws. A splice length of 220mm just fits into my sliding saw which will cut both sections very accurately and trim until she is straight. Otherwise its a finger trembling ride on the table saw with a jig set at a shallower angle.

3) Replace the clamps with 6mm bolts, cut the old boom down and bring the whole kit of parts to Cobnor for endless discussion and fine tuning.

4) Look for a 4m wooden mast. Nothing heavy.

Any suggestions?
-Paul
Jeremy Jeremy
Reply | Threaded
Open this post in threaded view
|

Re: Mast splicing?

I've repaired a much thicker wooden mast with a long birds mouth splice and epoxy.  It worked very well indeed and was near-invisible after I'd finished, as the break was up where the gaff jaws were, so was wrapped with copper.  Even without the copper this would be a good way of joining two spars with no really obvious joint (unless you look really hard at it).
momist momist
Reply | Threaded
Open this post in threaded view
|

Re: Mast splicing?

This post was updated on .
In reply to this post by Paul H (admin)
Hi Paul,

The traditional way of lengthening such a piece of timber would be the joint illustrated here:
http://www.libertyheadpostandbeam.com/traditionaljoine.html   (middle pic, without the side piece).

Remember that when cutting this joint, the wood ends up shorter on both pieces, as the long scarf cut is done almost through, then joined by the short shoulder, then the point is cut off to match the shoulder on the mating piece.
This reduces the length of both scarfs.

I would much rather use hand tools for such a job, even at the expense of accuracy.  I have played around with powered saws and routers enough to have learned a healthy respect for the dangers involved, and now I choose to avoid them whenever possible.  Slow, careful work with hand tools seems to take less time than setting up the machines, and is much less stressful.

YMMV.

Ian
Paul H (admin) Paul H (admin)
Reply | Threaded
Open this post in threaded view
|

Re: Mast splicing?

Ian, Jeremy,

Thanks, the long splice/bird's mouth joint in the web link looks mechanically strong. I can see how hand tools can do it, but its also crying out for a good bandsaw.  That reminds me, the cheap bandsaw I bought from Axminster many years ago is slowly falling apart.......so I have the perfect excuse to upgrade!

-Paul
Chris Waite Chris Waite
Reply | Threaded
Open this post in threaded view
|

Re: Mast splicing?

This will be enough to make our consummate clinker carpenters clench their lands

But I have always find a wisp or two of epoxied glass-fibre cloth wrapped round any suspect spar, or part thereof, works a treat.  Epoxy is also why all my spars and oars end up painted white.

Sacrilege, but epoxy thickens and strengthens

All in one swell foop

Christo von W

1 ... 1314151617