Renovating a Mirror
12
12
|
|
This post was updated on .
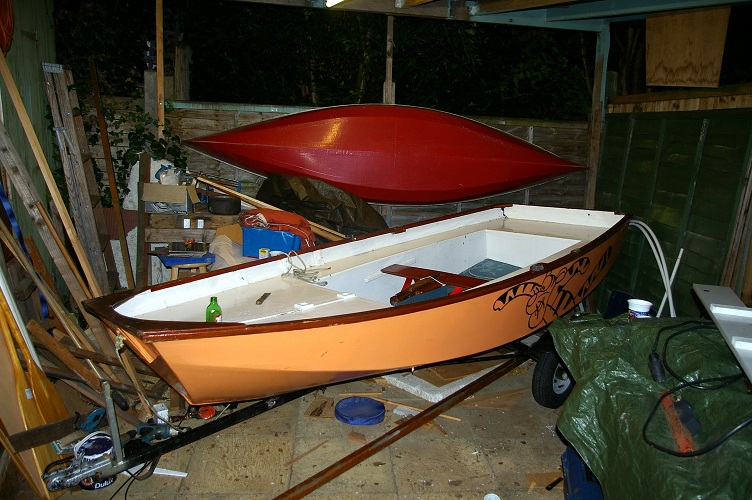
I picked up Tigger today, a Mirror sail number 15137 (circa late 60s), from ebay complete with trailer and 2 new tyres. Luckily she fits snuggly under my shed roof extension:
 Although it was sold "for spares or repair" the hull is basically sound and the worst rot is a previous repair above the deck, which should be easy to fix: 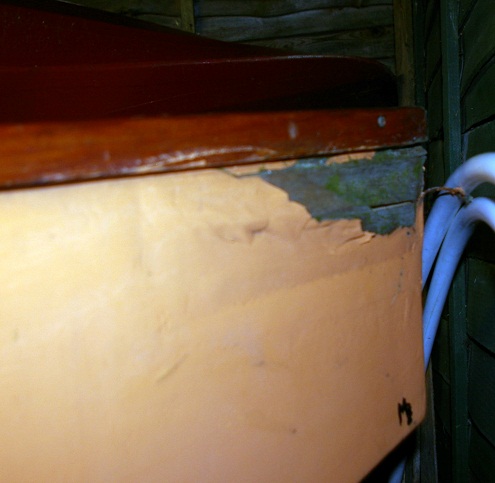 The Cascamite glue has cracked at the corner knees (it came off in my hand!) and the inside shot shows the naff repair probably used interior ply: 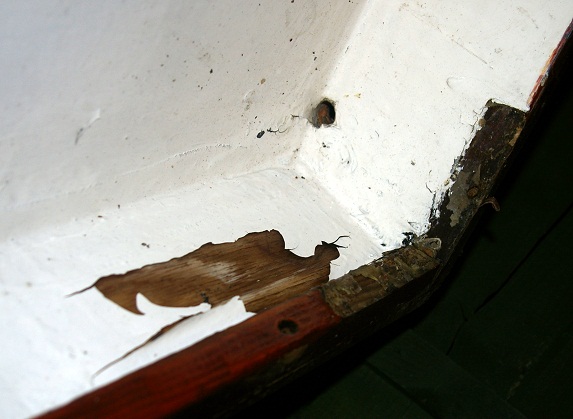 I easily peeled off the tape in the other corner, probably water had collected underneath which I'm told is the key failure mechanism for tape sealed with polyester resin. 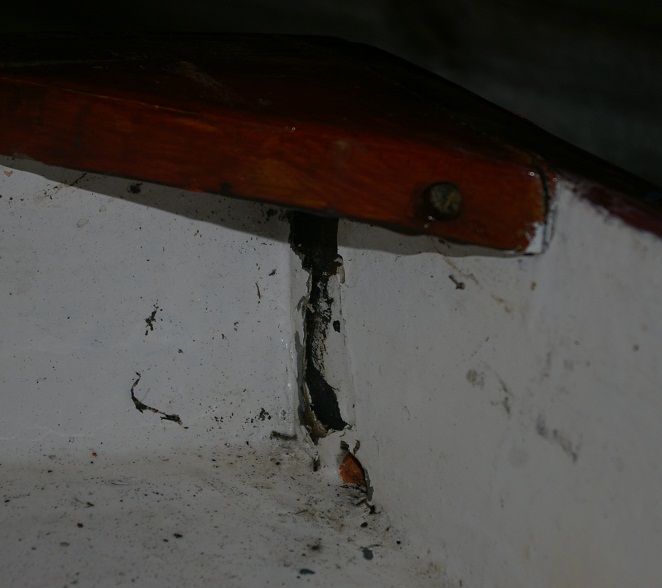 The floor was painted a rather offensive metallic blue, thankfully it is starting to peel off. The outer transom ply is soft in one place, I might get away with serious scraping/wire brushing then filling rather than replace the whole panel. So she basically needs to dry well, a good sand and scrape, a ply patch and lashings of epoxy. As I said before, I think the Mirror is the perfect compromise. -Paul PS: The Minister of the Interior has decreed a boat quota of 3, so Illusion needs a good home. |
|
|
Chaps - I'd like some advice on patching the rear starboard corner.
Today I checked the seams and quite a few were weak - its well known that polyester resin does not bond well to wood. Here is the progress so far. Most of the deck seams removed and the paint scraped off. Scarily underneath the seams and the paint the wood was damp. 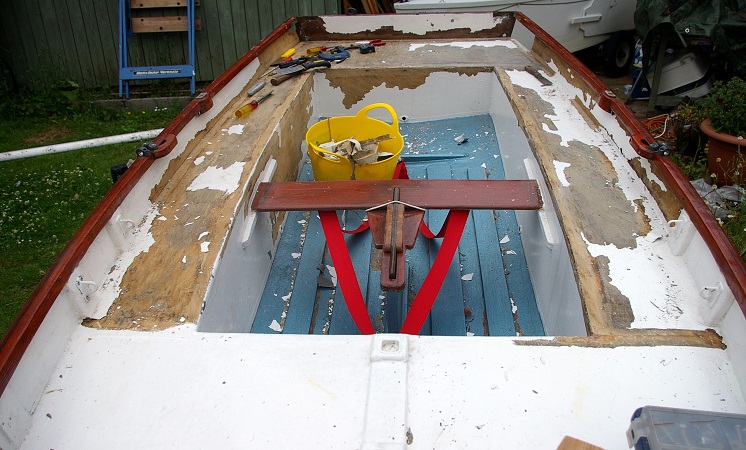 The transom was built badly. The 1/4in ply was only glued to the hardwood about 1/2in at the top so a good 6in of the over lap was simply nailed in place...consequently the glue cracked and transom had rotted in places so the whole lot will be replaced. You can see the staining where water leaked between the hardwood and ply 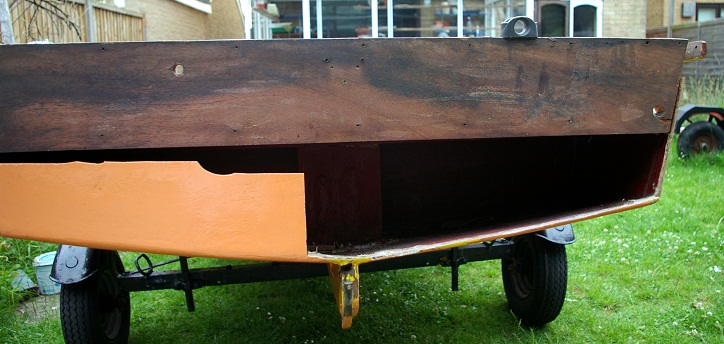 The rear corner has suffered water penetration and the side panel rotted a little: 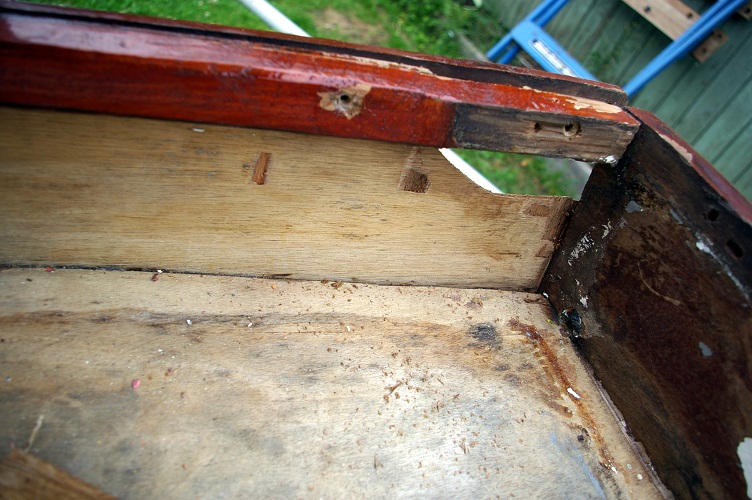 The gunwhales split easily: 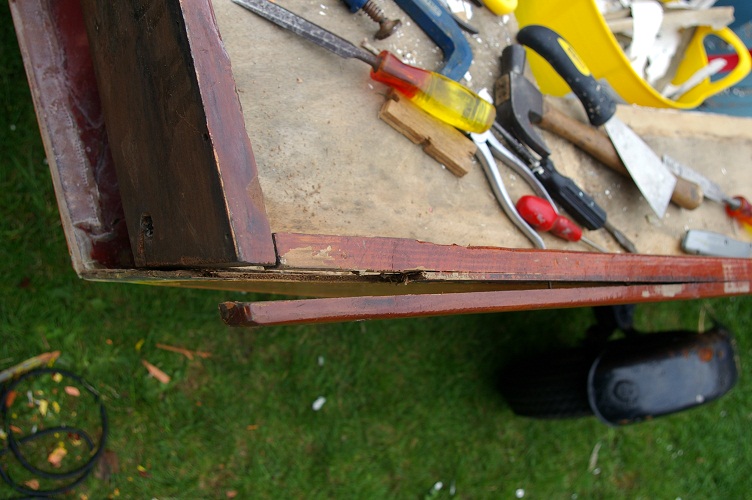 So the question is the best way to replace the rotten edge - the jigsaw cut confirms the wood core is damp in that area: 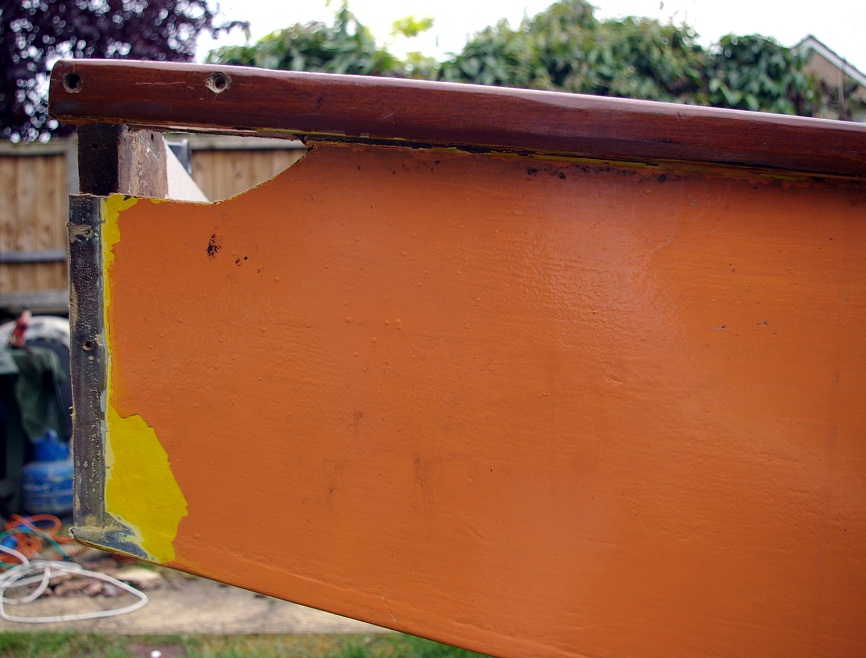 Unfortunately the inside is painted and it will be difficult to get down bare wood. I don't know whether to scarf the whole end panel or just fix the top part. Likewise I'm a little concerned the wood may be damp further along. I'm not bothered about a tape bump on the outside as she is showing her age in many ways - remember built in the 60s if the sail number is correct. It seems the decks were painted when built - where the paint is scraped off the grain is open with no sign of resin or varnish. The paint leaked water hence the damp wood. So what do you all advise? -Paul |
|
|
Many years ago (mid-70's) I acquired a ply built Sunfish-like lateen sail dinghy that had exactly the same problem. I first tried to just do repairs and a re-paint, but a year later paint started just peeling off, because the ply was damp.
The fix that worked was to remove all the paint on the whole boat, erect a clear polythene tent over it and leave it in the garden to bake for a few weeks. I was surprised how seemingly rotten ply seemed to recover once the damp was driven out, although it did look a bit like balsa in places. This was pre-epoxy, so I fixed all the slightly soft bits of ply with polyester resin thinned with styrene. This worked a treat, the dry ply soaked it up like water and I then just glassed taped up the hull again, filled and sanded it and painted it. It held up well for the next couple of years until I sold it. Nowadays I'd use very thin epoxy, rather than thinned polyester, although to be honest there is a question as to whether or not it's worth spending out on epoxy, as polyester may well last another ten years or more, after all it's lasted for 40 odd years on that hull. Jeremy |
|
|
In reply to this post by Paul H (admin)
Hi,
putting some hatches in those tanks would be a good idea, then warm remove all exterior paint and warm from inside with a hair dryer. Soon dry out the damp stuff
Steve
From: adminHBBR [via UK HBBR Forum] <[hidden email]> To: LASER41420 <[hidden email]> Sent: Saturday, 2 July 2011, 20:40 Subject: Re: Renovating a Mirror Chaps - I'd like some advice on patching the rear starboard corner. Today I checked the seams and quite a few were weak - its well known that polyester resin does not bond well to wood. Here is the progress so far. Most of the deck seams removed and the paint scraped off. Scarily underneath the seams and the paint the wood was damp.  The transom was built badly. The 1/4in ply was only glued to the hardwood about 1/2in at the top so a good 6in of the over lap was simply nailed in place...consequently the glue cracked and transom had rotted in places so the whole lot will be replaced. You can see the staining where water leaked between the hardwood and ply  The rear corner has suffered water penetration and the side panel rotted a little:  The gunwhales split easily:  So the question is the best way to replace the rotten edge - the jigsaw cut confirms the wood core is damp in that area:  Unfortunately the inside is painted and it will be difficult to get down bare wood. I don't know whether to scarf the whole end panel or just fix the top part. Likewise I'm a little concerned the wood may be damp further along. I'm not bothered about a tape bump on the outside as she is showing her age in many ways - remember built in the 60s if the sail number is correct. It seems she was painted when built - where the paint is scraped off the grain is open with no sign of resin or varnish. The paint leaked water hence the damp wood. So what do you all advise? -Paul If you reply to this email, your message will be added to the discussion below: http://uk-hbbr-forum.967333.n3.nabble.com/Renovating-a-Mirror-tp3123845p3133033.html To unsubscribe from UK HBBR Forum, click here. |
|
|
In reply to this post by Jeremy
Jeremy,
I did similar with Illusions lee board that had a rotting tip - a quick dry with my DeWalt adjustable hot air gun then air dry for a day or two, wirebrush the rotten stuff and it absorbed a coat of epoxy like a sponge that sealed the surface and improved the strength. Then I filled it with thickened epoxy back to the original shape. The adjustable hot air gun is great - you can get the wood hot enough to soften paint but it won't burn. Small areas can be surface dry in 30 seconds, then I leave it for a while for deeper moisture to wick to the surface. How did you remove the paint? The builder coated Tiggers decks with polyester resin, then grey undercoat then white topcoat. However the polyester lost its grip on the wood so I could peel off all 3 layers with a flexible scraper much like removing wallpaper. But the cockpit well is proving more difficult to strip - I wonder if paint stripper is useful? The hot air gun works well but the grey undercoat tends to melt into the grain. Steve - yes Phil Ox. fitted inspection hatches in all the buoyancy chambers on his Mirror and I will do the same. Perhaps the larger rectangular type on the foredeck because it is offers good storage for camping stuff. (btw when you reply to emails can you remove the pictures? it saves duplication etc.) many thanks Paul |
|
|
In reply to this post by Paul H (admin)
First problem is to get it all dry. I find a domestic fan heater better than a heat gun - for one thing you can leave it on a low heat for hours. I think you may need to get a fair amount of paint off first. I don't know whether paint stripper will remove polyester, but it should remove the grey undercoat. BTW the originally recommended glue (it may even have come in the kit) was Aerolite 306, not Cascamite.
You've got the transom off, so you have good access to check the rest of the panel inside the tank. To fill the hole, I'd use tape and scarph in a piece of ply. When it comes to replacing the transom, I'd build up epoxy fillets round the edge (use a scrap bit of something to which epoxy won't stick to give you something to build the fillets against), or maybe use a timber fillet into which you can nail, then stick a new transom (5mm ply BTW) on the outside. Good luck Simon |
|
|
In reply to this post by Paul H (admin)
I used a blowtorch (this was pre-hot air gun) and found that 90% of the paint lifted off easily. I though it'd be a big job, but to be honest it didn't take long once a more experienced friend introduced me to a nifty Scandanavian scraper (something that sounds like sarsen? my memory isn't what it was). This made the job much easier. There were patches on the hull where the primer melted into the grain, but I just sanded this back and painted over it. Don't underestimate the time it may take to dry the ply right out, I suspect that gentle heat over a few days will work better than a lot of heat over an hour or two. The plastic greenhouse I built worked exceptionally well. The boat was raised on trestles on the lawn, with the plastic tent fixed to a frame mabe from bamboo canes, with gap underneath for ventilation. The tent allowed the sun to heat the hull up and the water condensed on the inside of the plastic sheet and drained away. Jeremy |
|
|
In reply to this post by simplesimon
Simon,
I will glue and screw a 30x25 wooden cleat to the bottom panels and side panels. I found the best way to remove the tape and polyester is a sharp chisel under the tape - soon the whole lot can be pulled off. Then to clean up the large lumps of polyester a hammer and chisel at the correct angle will knock off a big chip leaving clean wood, with practice. Under the tape the remaining polyester was removed with the sharp chisel flat, with hand strokes. With care I could cut a sliver of wood and polyester to leave clean wood to epoxy the 30x25 cleat. 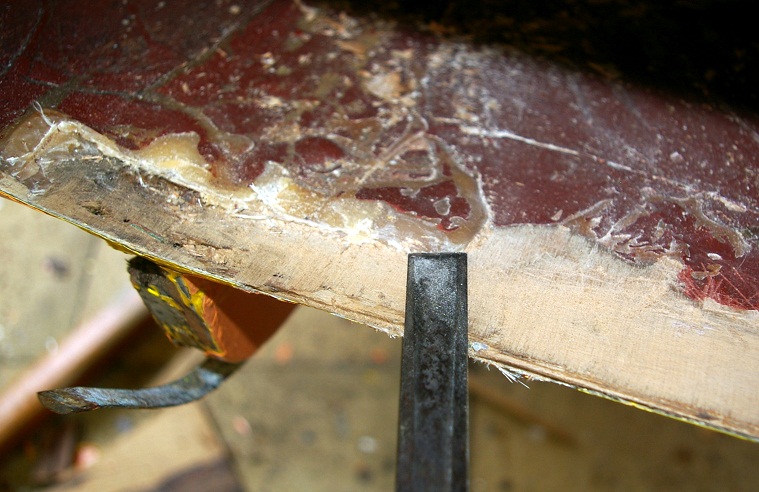 The above relies on the fact that polyester does not penetrate far into wood. I'll use 6mm for the outer transom panel which will bond well to the 30x25 cleat, giving a firm anchor if there are problems in the future with the bottom panels. I agree about tape and scarph to fill the hole - the chine joints seem strong and dry so best left alone. cheers Paul |
|
|
In reply to this post by Jeremy
Jeremy,
With practice the hot air gun works well - I can peel off a continous strip the width of the scraper blade leaving the wood reasonably clean with a few traces of undercoat that might well sand off. I'll see how the wood looks after a few coats of MAS low viscosity epoxy and some thick epoxy fillets along the side panels and transom. If its reasonable I'll finish with varnish because then I can monitor the condition of the old wood. I don't think I'll need tape over the fillets, as the fillets will give far more strength than the original tape and stiffen the gunnels. cheers Paul |
|
|
In reply to this post by Jeremy
Jeremy, you're thinking of the Skarsten scraper, which is now unavailable, although replacement blades are still on t'internet from several different manufacturers. The little "hand 4 inch" variety I never found very useful, but the bigger version about 10" long with the 3" blade was a wicked tool.
Ian |
|
|
You're right Ian, that's the name of it! Pity it's no longer available, as you say it was a truly wicked tool.
Jeremy |
|
|
|
|
Yes, that looks very much like the one I borrowed years ago.
Jeremy |
|
|
In reply to this post by LASER41420
Yup, thanks.
It's longer than I remember it then. I still have one of the short ones, like the head without the handle. Maybe I should make a handle for it? Nice rainy day job. Ian |
|
|
In reply to this post by Paul H (admin)
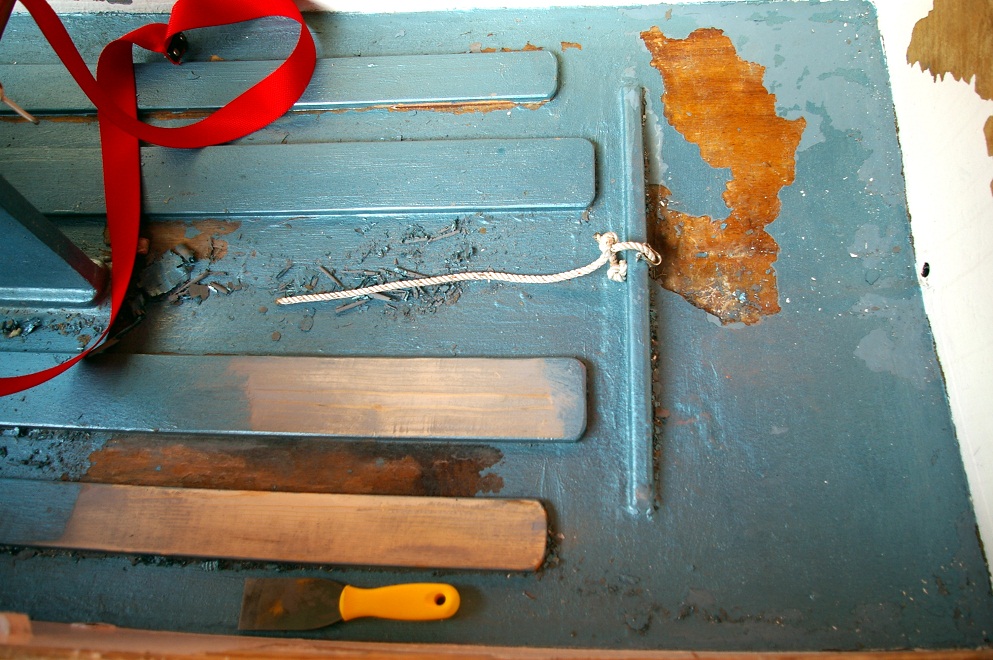
A quick test proves the hot air gun removes paint easily from the floorboards and they will sand down to bare wood. The area on the right was literally filled with car body filler! It chips off remarkably easily.
 I have a 475Watt half sheet sander, but I think its time to invest in a good quality belt sander..Bosch, De Walt etc. Can anyone recommend a good belt sander? A 3in belt would conveniantly fit between gunnels and deck, but maybe 4in is better all round?? cheers Paul |
|
|
It sounds like you'll be able to get the paint off OK, Paul. Once it's all off I'm sure the wood will dry out and things will look much more promising.
I can't really advise on belt sanders, as I bought a secondhand Black and Wrecker one about 25 years ago that's still going strong, despite having been used to fair the whole hull of a 22ft gaff cutter I restored many moons ago. It's been seriously abused over the years and is only now beginning to show signs of its age - a rubber washer from the belt tensioner split and came off a few days ago. Overall I find that I end up using a detail sander far more than the belt sander, just because the belt sander is really awkward to use and very vicious in terms of the rate with which it removes material. It also makes a helluva mess unless the extractor is hooked up, as mine has a blower that spits all the crud out the back, usually covering me in the stuff or liberally spraying dust around the workshop (not nice if it's itchy fibreglass, or worse, nasty black carbon fibre). I recently bought a new Bosch multitool sander saw thing that seems to remove stuff almost as fast as the belt sander (but with a better finish), is easier to control and has a small head that can get into fairly tight places. It creates a lot of dust, but at least the dust stays put around the area you're working and doesn't get thrown several feet away. The unit I bought was the PMF 180E, it was around £65. I've been using it to sand and fair the composite tunnel I'm building for the electric Winsome and found it easy to use and control, with not too much noise and vibration. Jeremy |
|
|
Jeremy,
I'm sold on the PMF 180E! Its an amazing bit of kit - probably worth it just for cutting copper pipe in awkward corners which is always a pain. I like the plunge routing and the ability to cut slots in plasterboard and breeze block. 180 Watts over the small sanding area probably equates to my 475Watt 1/2 sheet sander in terms of removing material. Presumably with 40 grit it will strip paint quickly? -Paul |
|
|
In reply to this post by Paul H (admin)
Flexible Plastic Padding used to be a standard part of every Mirror builders toolkit! Simon  |
|
|
In reply to this post by Paul H (admin)
I've not tried it with 40 grit, or on paint, but can confirm that the 60 grit pads don't clog when sanding epoxy and remove material at an impressively fast rate, so my guess is that it should work OK on paint. The thing I find most useful is the design of the head, it makes getting into awkward nooks and cranny's easy. Up until now I think that the only tool that comes close to this is a similar one made by Fein, but at a much greater cost. I've not yet used the cutting tools with it, but from what I've read it gets rave reviews as a versatile saw for use in tight spots. I bought it primarily as a sander, which is all I've used it for so far. Jeremy |
|
|
In reply to this post by simplesimon
Like Jeremy, I do have a belt sander but it is not one of my frequently used tools, it can be over aggressive and you often cant use it in confined spaces. I find that the most useful electric sanding tools are:
* A small angle grinder - for rough shaping etc. * A detail sander - for the places other sanders cant get to * Random orbital sander - for large flat areas - this seems to work much better than a rectangular half sheet sander. I dont yet have one of the multi purpose tools with an oscilating blade but from what others say it would seem that these are similar to a plain detail sander for sanding but can also do certain other jobs better than any alternative tool. If that is true, then if I were starting from the beginning I would buy one of those instead of the detail sander. Back in the 90's I had a job making metal work for use by orthopaedic surgeons. The power saws that the the surgeons use for slicing through peoples femurs are much like the Bosh multitool, although generally air powered rather than electric (faster cutting I guess!). I suspect that the woodworking tool manufacturers got the idea from the surgical equipment companies, although I dont think Bosh was actually the first in this. I like to keep the number of tools that I need to store to a minimum, but unfortunately it seems that you sometimes need to buy and try a tool before you realise that it is not as useful as you hoped it would be. If I were to make a list of most useful and cost effective electric boat building tools I think it would include the following: Battery drill/driver Jigsaw Angle grinder Multi-tool detail sander/saw (assuming that is as good as people say it is) Random orbital sander Electric plane Router and router table (table can also be normal workbench) Hand held circular saw (A small handy one, not a big clumsey one) What do others think? I have not included big pieces of equipment such as bandsaws, table saws and planer/thicknessers since although these tools may well be useful they are much more space consuming and arguably less cost effective than the above. Also, the list is based on typical boat building/boat repair jobs, if you want to do metal work then you need a whole different range of tools and generally much more bulky and expensive tools at that. John |
«
Return to Builds in Progress
|
1 view|%1 views
| Free forum by Nabble | Edit this page |


