Argie 15


|
|
Check this out. Finally the real deal.
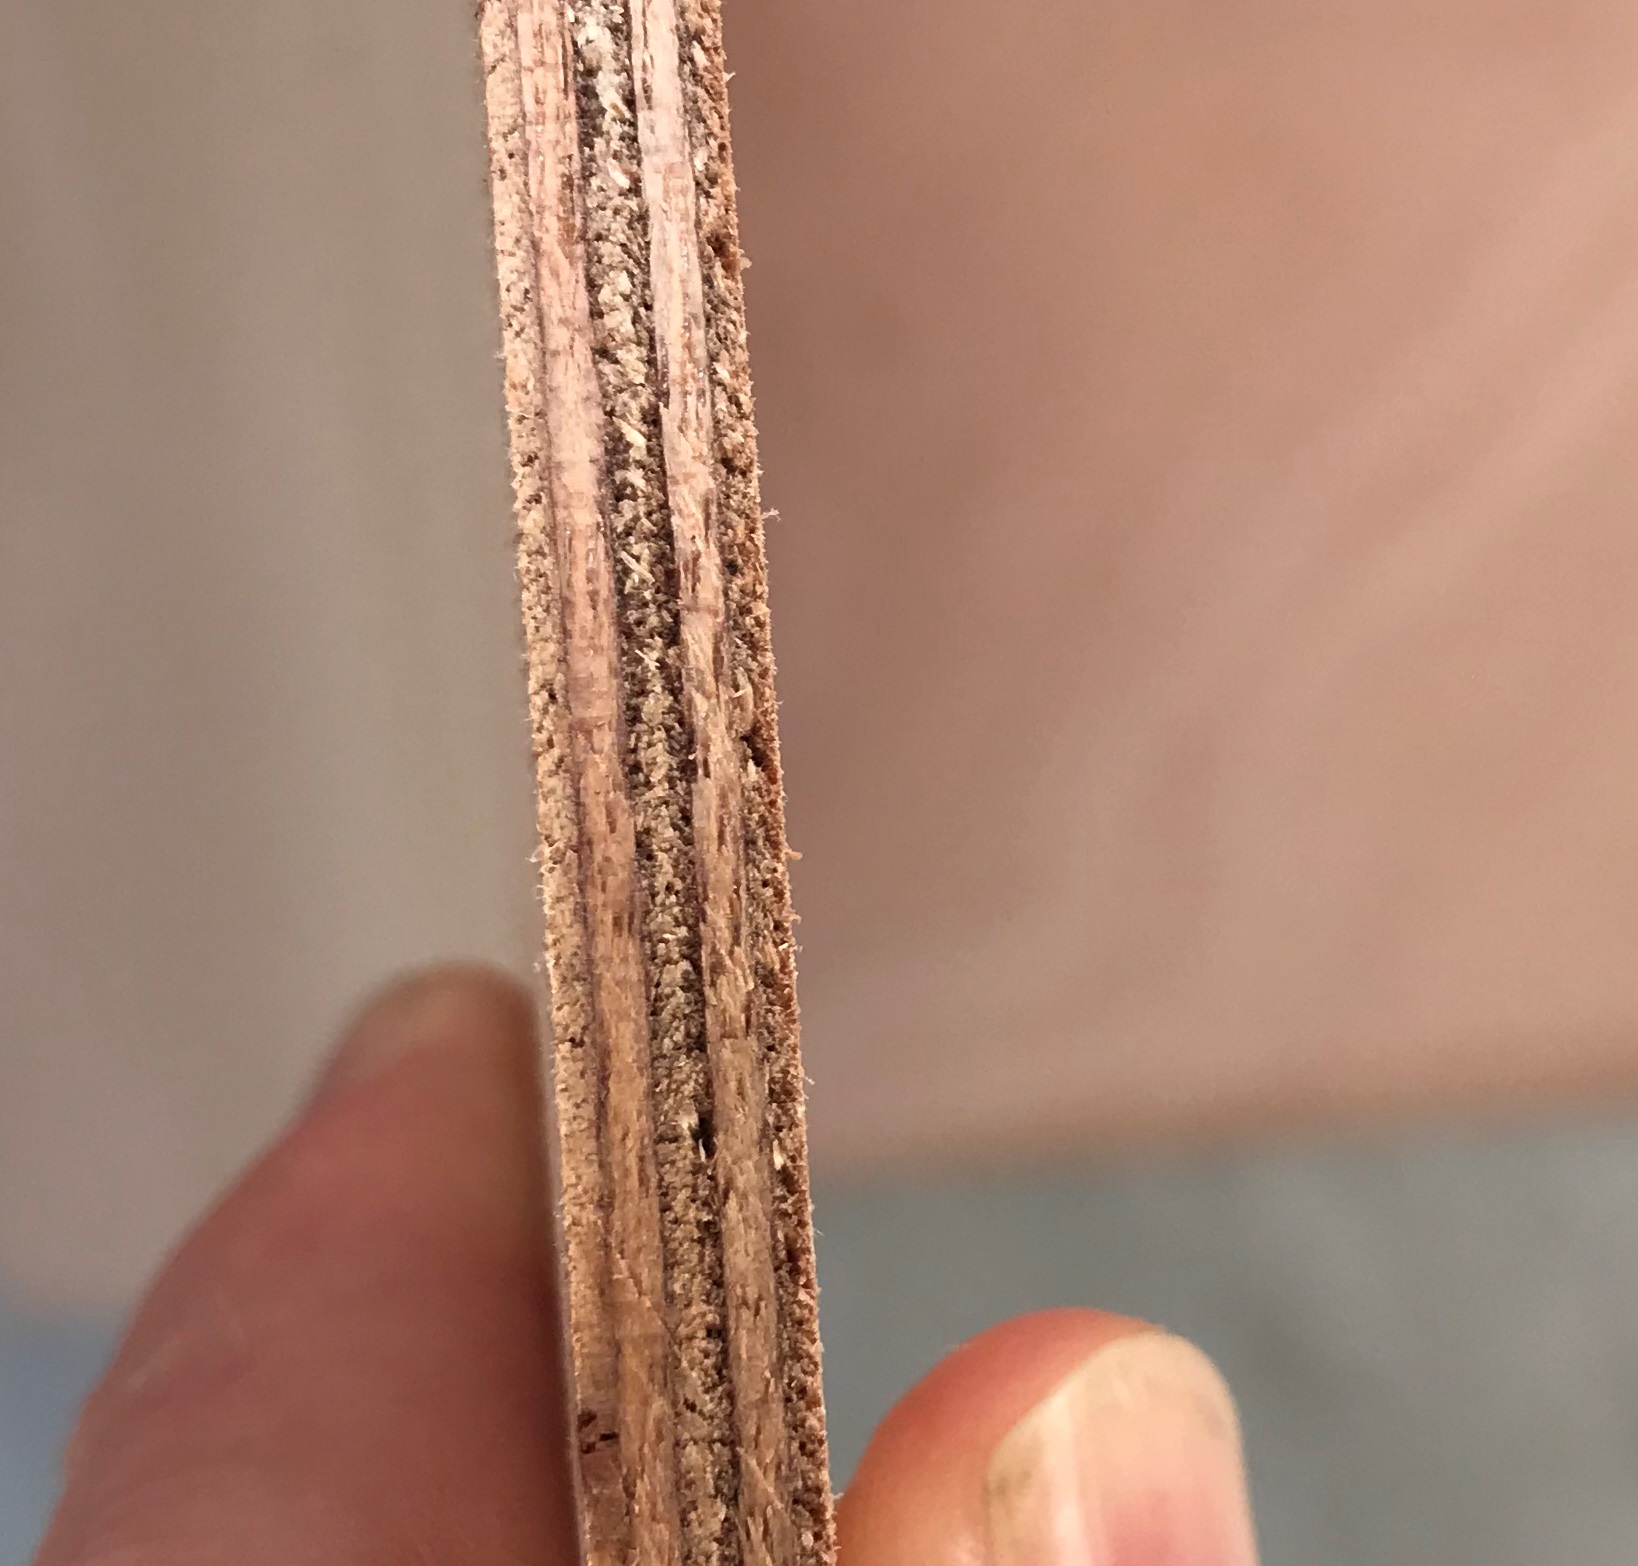  These edges are still rough sawn, not even cleaned up yet. 5 even plies (close to anyway). Magnificent faces......it'll be a shame to paint it. I'll have to be really fussy with my joinery and see what I can leave plain varnished. West African Okoume, manufactured in France. Don't ask how much.....I am already forgetting that part as I sit in my garage caressing my beautiful new wood panels. Those are not knots in the faces, they are only discolourations where knots may have been in the virgin timber. It adds character. Jason....remember....measure twice cut once.... |
|
|
This post was updated on .
In reply to this post by Jason Mayer
I’m very late to this discussion but looking at your brief:
"So.....what is it I want. Firstly an open cruising dinghy capable of coastal cruising (Moreton Bay is well protected from big swells but can put up some choppy conditions at times). Able to sleep aboard (single hand but with an offsider on occasion). Flattish bottom to take the ground at low tide. Pivoting centreboard for the shallow mud flats at the exit of my creek. At this point I only need the hull. Everything else I have well sorted from Eadie Mae - traditional balance lug rig, kickup rudder, small electric outboard for boat ramp manoeuvers, etc, etc. I might install a mizzen because the rig I have is going to be "small" for a larger boat." ... what do you want is one of these: http://www.jwboatdesigns.co.nz/plans/walkabout/index.htm |
|
|
Hi Chris P, yes I did look at that one but the clinker put me off. I'm still a rank amateur at this stage, this is only build no. 2....I'm committed to Argie now.
Started building today. Disaster avoided today in fact. I started cutting the panels. I measured thrice and cut once. I discovered why my scale model looks low in the back end and not like Paul's recommended sketch from earlier. The sheer height measurements are from the bottom of the cut side panel not the edge of the ply sheet. Found my mistake when I marked out the full size ply today. Mr Dix put some sneaky little dimensions between the bottom of the panel and the edge of the ply. Quite obvious in hindsight but caught me out initially when I built the model. Lucky I went super slow and careful. That explains why the photos I've seen look like the back end is higher and my model doesn't. Certainly have a scale model has been beneficial because it had some doubts floating around in my head which helped me discover the mistake. I added 100mm to the sheer height for the full length of the boat so that should work well for me to make the ride a bit drier. Her sheer now has a nice curve like Paul's sketch.  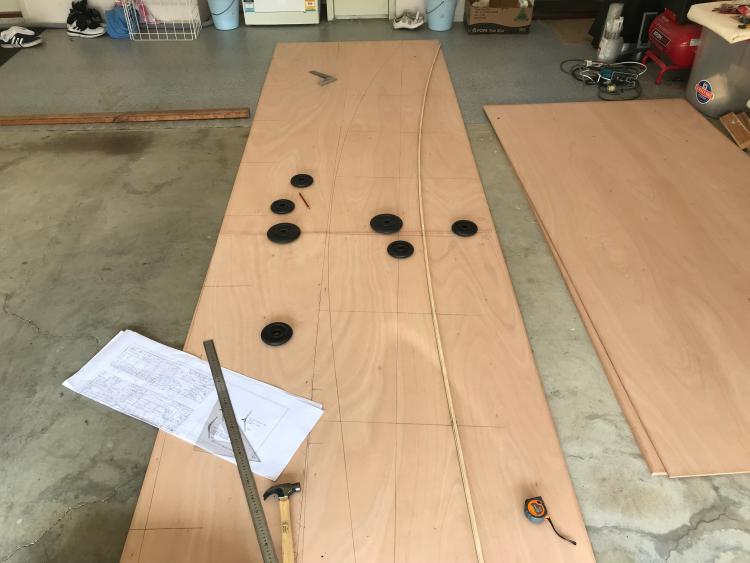 |
|
|
Hello Jason,
Graham Neil messaged me about your build. I have been away from this forum for a while. I live in Lennox Head which is just down the road and have wrecked more bits of plywood than most so happy to help if you want to ring me. I also have a CNC machine which I can put at your disposal if you need something done accurately and repetitively. My mobile is 0434 004 895. Cheers Rob |
|
|
Hi Rob, pleased to meet you. I have seen your lovely boat via Graham and Chris. Thank you for the kind offer, I will certainly reach out to you at some point. Then we should go for a sail. I have a great desire cruise the Clarence River at some point. I might be a while though, I’m only at hull stitching stage. Realistically I’m aiming to be back on the water by Easter…ish…. Jason From: Rob Blackburn [via UK HBBR Forum] [mailto:[hidden email]] Hello Jason, If you reply to this email, your message will be added to the discussion below: http://uk-hbbr-forum.967333.n3.nabble.com/Argie-15-tp4031943p4031998.html To unsubscribe from Argie 15, click here. |
|
|
You nearly made a terrible error by saying "by Easter". But you saved yourself by omitting the year.
We did a 2 day sail on the Clarence years ago with a mate and our two eldest daughters who were about ten at the time. Managed to knock down some sort of power/telephone wire at the boat ramp and arrived with no cooking gear or tent pegs. We had to scrounge from all the oldies in their caravans etc who were sitting around shaking their heads at the rank amateurs. Otherwise we had a great time. You being in Brisbane would know of Peel Island. We did a boys kayak trip there and we took our boat as the support boat for the weekend. Saw a huge Dugong population between Moreton and Straddie. https://photos.app.goo.gl/b8410pUEgr907MCh2 Talk to you later. Rob |
|
|
Rob, Jason,
We'd love to join you. By the time we sail in, your borders will be well and truly open ha ha. Mid 2022 at 3 knots! Paul |
|
|
Hi ladies and gents (are they any ladies on this forum?)
Here is my progress for the week. My car is out in the hot sun this week as I use the flat garage floor as my reference plane. The aim is to have the boat out the back by Sunday night sitting on it's trailer so I can continue within arms reach of my tools in the shed....but only once the hull is glued and has some bulkheads so that it is "fixed" in terms of twist. I know you've seen this all before but here is my obligatory hull panel photos. 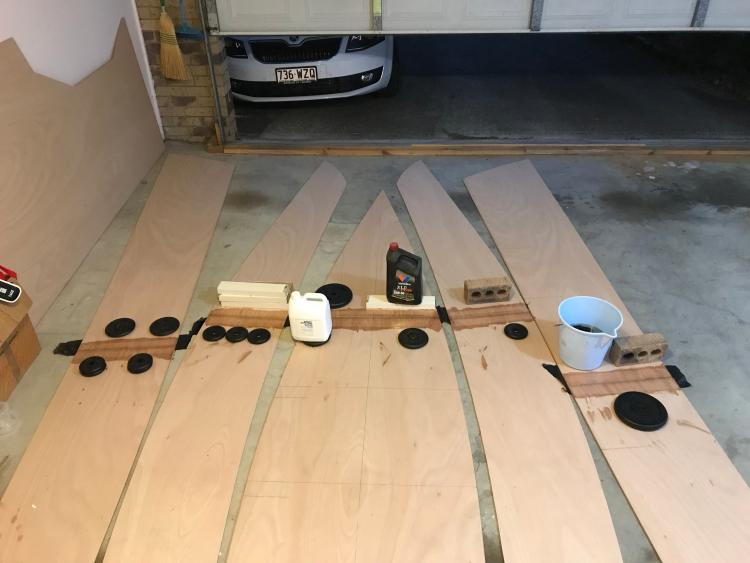 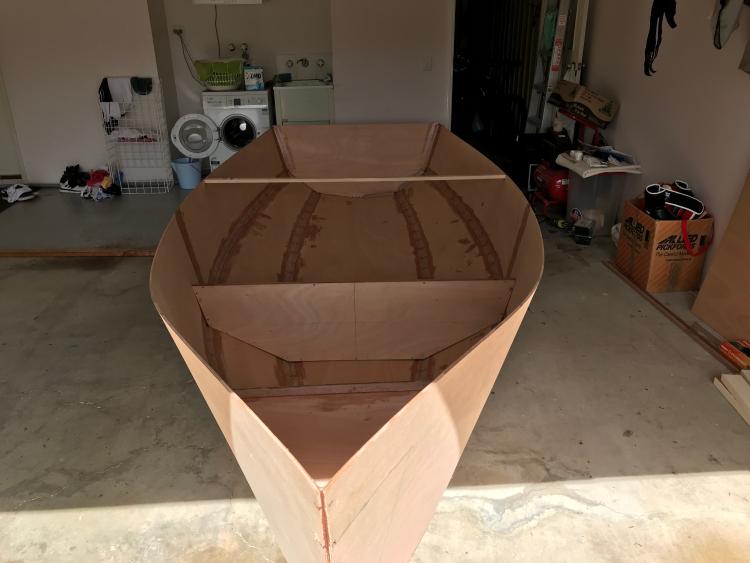  Paul, you will note that it now looks a bit like your sketch from earlier in this thread. Hull depth is a little over 2 feet in the middle and more than 3 feet at the front. I'm pretty happy with that given that LWL is less than 6 inches above the bottom. I have to say I have never experienced something so satisfying as the stitching process. I was totally amazed as I put the cable ties in and the panels grew into a 3D structure. I tweaked and tweaked and managed to get +/-5mm to the centreline over 15.5 feet hull length and I measured 6 locations around the hull from sheer to the floor and got within 3mm of perfect so it has no discernable twist. So I fibreglass taped the seams and jammed two bulkheads in whilst it was straight. It should stay put now but over the weekend I will fillet all the seams and put in another bulkhead in the aft, to be sure. Mr Dix's plans are spot on. I got nothing more than 2mm gap between the panels and only in a couple of spots. The rest mated up perfectly. I guess his design has been around since the 80's and has the bugs removed. Still, my $50 plans were amazing value given the near perfection I got. Till next time.... Jason |
|
|
Hi Jason,
That's amazing progress you've made, the boat is looking great. Excellent work. Graham. |
|
|
Hi folks.
Weekly update. The hull now lives on it's trailer outside the shed. All internal seams are filleted and glassed. Three bulkheads are now filleted into position. The next job is the centreboard which is part of the 4th bulkhead (presumably for lateral strength).  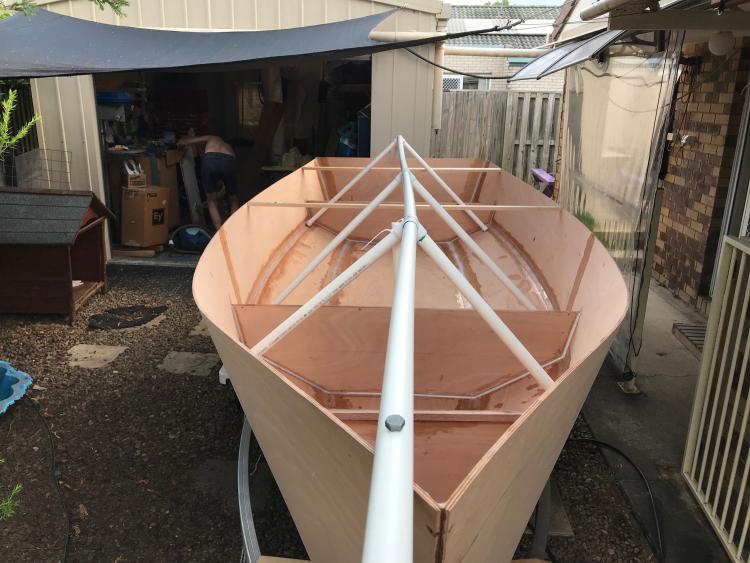 The PVC pipe frame is to hold the tarp so that rainwater flows off and doesn't pool. The centreboard case is built in two halves and glassed inside. The centreboard is glassed both sides. Here they are with a coat of 2 pack epoxy primer, ready for painting later today. 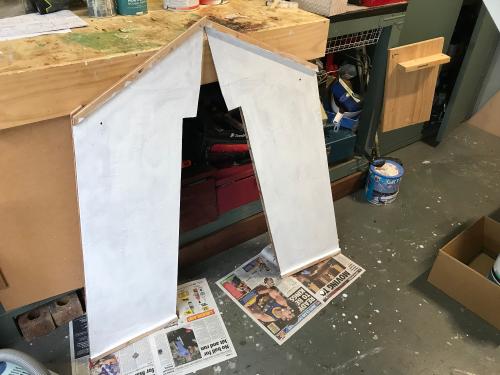 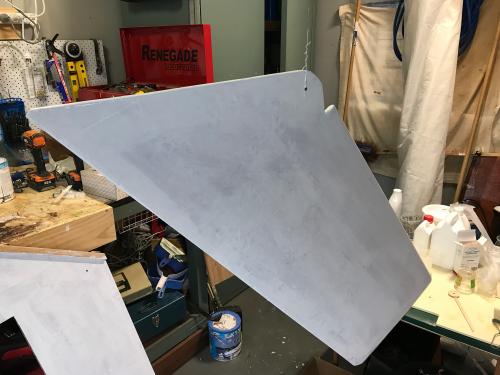 It is hard to see, but I oversized the pivot bolt holes in the case and the board and epoxied aluminium tube into the holes so that the pivot bolt has something solid to bear onto. All going well so far. Jason |
|
|
Whoa, I think I have a painting problem.
I bought a 2 pack epoxy undercoat and 2 pack polyurethane top coat. I undercoated the glassed centreboard and case yesterday and top coated today. However in very fine print on the can it says that the hardener goes off within 48 hours of opening the can and you have to use the whole lot before then. Big problem.....the rest of the boat is not ready for paint.....have I just blown a bunch of dollars on a big can of paint that will be unusable in 2 days? Has anybody ever used these 2 pack paints and come across this problem before? The instruction datasheet on their website which I did read beforehand says nothing of the sort. Paint shop said nothing when I bought it. I'll have to contact the manufacturer on Monday I suppose. Jason |
|
|
In reply to this post by Jason Mayer
At this rate, Jason
You should be sailing the week after next; well maybe not quite then. As for two-part paints - I've not used anything other that two-part polyurethane on boats, for decades now. I never bothered with epoxy primer, which as far as I can detect, is just that - primer made out of epoxy; not some primer made to stick to epoxy, while being suitable as a substrate for polyurethane. I finish bare (WBP - water and boil proof) ply in a coat of epoxy, then sheath on cheap polycotton bedsheets as a next layer, often before the first is set. It does a very good job of protecting and holding the outer veneer together, as it covers over any micro crevices in the wood itself. Then sand down lightly the next day and give it a final epoxy coat (if I'm feeling generous), which I also sand down of course, to provide a 'key'. Once that is hardened off, I just go straight to a couple of (Jotun) two part polyurethane topcoats. A bit epoxy thirsty, but the boats last for ever; well decades then. I suspect that the warning is to prevent air left inside the tin reacting with the hardener, though it shouldn't make any difference to epoxy hardener, but does tend to make polyurethane hardener go off. This does not concur with my thoughts on the primer above, but it is the only thing I can think of. Maybe scientist Jeremy who frequents this forum could enlighten us? Minimizing the air above the hardener in the tin, (a blown up polythene bag??), could well help. One more thing; I notice you mention an aluminium tube as a bush. I fear it might corrode quite rapidly as the salt laden moisture lurking inside the case after each outing has no morals and quite an appetite for causing corrosion. It's all 'go', isn't it? Chris |
|
|
This post was updated on .
Hmm yes you are probably right. I wonder if I should dispense with the
aluminium bush and just drill out a bigger hole to get rid of it. Then use a 10mm stainless bolt instead. I could try and get a plain shaft bolt with just a little bit of thread on the end. Then I won't have dissimilar metals down there. Slop a little thickened epoxy glue around inside the drilled hole to seal it up. Then redrill to 10mm. That will give me a small layer of epoxy between the bolt and the wood to stop if flogging out? Jason |
|
|
This post was updated on .
In reply to this post by Chris Waite
Chris, what is your view of glassing the whole outside of the hull? The
plans only call for glass taped seams inside and out, just like my Eadie Mae. However I was going to beef it up with complete outer glassing. However I am now baulking the enormity of the task of getting a neat job across such a large hull with different chine angles..I'd have to do 2 or 3 one metre wide strips of glass 5 metres long. Without a team I think I am kidding myself. The official plans say glass tape and polyester resin the seams only and then resin the hull inside and out, but I wonder if glass tape and epoxy seams plus a couple of coats of epoxy across the whole hull might do the trick? Maybe with the bed sheets.. Plus a layer of glass on the flat bottom which will be easy to manage. Jason |
|
|
In reply to this post by Jason Mayer
Jason,
Who manufactured the paint? If it's Jotun I've used the hardener several months after opening. Regarding undercoat, I found the Jotun Penguard HB (High Build) undercoat thick enough to smooth out scratches etc in the glass layer. Comparing areas undercoated with those not undercoated, I think undercoating has the edge 15 years later. However, if the wood expands due to moisture content the epoxy won't expand. Then paint and epoxy can flake off. The weakness seems to be changes of wood grain or type where moisture can creep in, e.g. plywood cabin sides meeting the pine gunnels which have suffered the most. My bad as the design specified Iroko or similar for the gunnels. -Paul |
|
|
Good to know about the primer. I've got 2 litres of it so I might as well use it on the bits that I want to look real smooth. Like inside on the floor and walls where the passengers will sit and stare...and judge... Jason
|
|
|
Jason,
I noticed the lid of the hardener slowly became crystalline, where traces collected in the rim. Decanting to glass bottles is a good idea, just be wary with plastic caps which can dissolve in the strong chemicals! Try to keep it cool. Keep sawdust to clear spills, which can become very sticky if left untreated. I spent several weeks painting, looking out for dry weather. I don't think it affected cure time or hardness. I did have to buy more hardener years later, because the old tin was destroyed by removing the stuck lid. I wouldn't rush the job, with experience you will realise the hardener works ok. As Graham said you are making amazing progress. Well done. Also keep the paint tin airtight, so you don't lose the solvents. The old trick of inverting the tin for 10 seconds helps. My dad taught me to gently tap the lid tight with a flat block of wood; a hammer will dent the lid making it harder to open and it might leak more. Paul |
|
|
This post was updated on .
In reply to this post by Jason Mayer
OK Jason
I used the bedsheets originally as a substitute for the old fashoined way of sealing decks by painting on canvas. Two things - firstly the decks on the little gaffer have a marked camber and that strains the outer veneer, opening up the grain. In the tropics, as I was at the time and your climate sounds very similar, the sun would have taken anything like that apart quite rapidly, so I wanted an outer layer to protect the ply. I did not have access to any canvas and I reasoned that trousy was quite strong. We had a one-camel village behind the naval base where I was living and if you took a pair of pants, or anything else and the material down to a tailor there, "Same, same" would get you an identical pair, usually in twenty-four to forty-eight hours; cheap as chips. My Ruthie ended up with a lovely skirt this way.... including the patch that she'd sewn over a hole in the original example. I was so pleased with these pants, that I still have all of them, more than a dozen, though my four favourite blue ones, are now holed at the knees, spattered with epoxy and polyurethane, and long overdue for the bin. Twenty-five years later; being an obsessional old toad, I am trying to use them up; they refuse to die though. The material, cotton-poplin twill came from another town further along the coast; so I bought enough to 'do' the decks and again over two decades later, they seem as tight as a duck's nethers. That's where it all started. I wish now I'd done the outside of the hull as well; it actually seems quite sound as, I had the time, energy and ambient temperatures to apply multiple layers of long hardened plastic sludge (epoxy and polyurethane), but the lower chine-wide garboards have taken the odd ding, which I've had to address. But I digress By the time I got back to good old Blighty and started building again I decided to protect all the ply in this way as is seemed at least as good a method of preserving my 'exterior grade' creations as paying for real marine ply.... and so it has come to pass. Canvas is not always so wide, but definitely thick and not very distortable and such a trick is, er, 'epoxy rich', so I reduced the layer to poyester/cotton bedsheets, with satisfactory results. "Now is the Winter of our discontent made Covidious misery." At least I think that's how Shakepeare would have put it; so after nine seasons of neglect, little grey Polly Wee is currently upside down in the garage, as I have discovered what a 'hard' can really do to your hull, given enough time and determination - 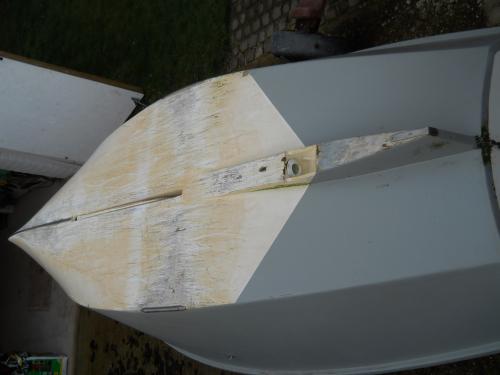 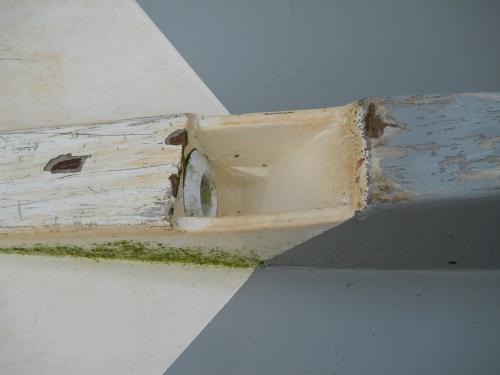 You mention, a layer of glass across the flat bottom and that is exactly what I did with Polly Wee there. Two layers of lightish woven matt and then draped a layer of bedsheet over the outside of that, the sheet only extending up the hull to the gunwales, all epoxy stippled in place, one layer at a time. Should the glassfibre have been over the top of the bedsheet? Looking at those pictures, I do wonder, but epoxied bedsheet makes a very fine surface if sanded once cured and I'm not sure the glass would have come out so well. Here are the advantages of bedsheets - 1. They are thin enough not to use too, too much epoxy 2. They are thin enough to be quite easily distorted, so they are likely to accept being stretch-stippled over chines and the like, without having to cut out separate pieces. I think I did cut a (horizontal) dart into one area forward. 3. A 'double' (in bed-size not thickness) will likely go over half your boat, so you may well only need two sheets to do the whole of the outside. I do any exposed area inside the hull as well. Hint - Iron them first unless you are particulary fond of crepe-effect hull finishes and start at one end amidships (keel, sort of thing), so that you are stippling toward the leading and side edges of the material at all times - forcing it out and flat as you go. Next hint - Without a break, I epoxy the bare ply, then re-epoxy it and immediately lay the cloth over the top and stipple it on which is a laborious process. If you think the epoxy is going to set before you get to it, gather the material in a loose roll/fold in front of the leading edge you are working on. Double sheets are huge and you need to keep a 'wet edge', or you'll end up with wrinkles. Prepare sandwiches and cool beer alongside you beforehand; have one for me when you're finished. Last hint - Use this method on the cockpit sole, but do NOT sand it, then after painting it will likely have develped a good NON-SLIP surface How's that for a shaggy dog story? Chris By the way; what you describe for the centreboard pivot is exactly what I have done as well. I use a stainless plain shank bolt and cut the thread-end off to suit. Then I make a blind-ended hole into a pad on the outside of the case, with another fully holed pad opposite, and cut a hollowed-out a 'cap' that screws over the bolt head. With the board in place, shove the bolt though and then smearing silicone sealant to waterproof the joint, screw the cap down, being sure to epoxy the holes, but remembering that one day, you're going to need to take that cap off. I release the screws by a turn as soon as the epoxy is set so that they're not stuck, then tighten them back down for the duration. Actually best do this first with a layer of polythene in the seam to stop any unintentional adhesion.... Hint - make sure the opening cap is on the same side as your leading hand when you're grovelling around trying to sort out the little B. There's nothing like having to work cack-handed in a tight corner. |
|
|
Excellent thank you gentlemen, lots to think about and some really good ideas. The best idea is “don’t rush”. I will consider this carefully before jumping to action.
I have glassed my centreboard and inside the centreboard case and after that experience I was concerned about the level of effort required to get a smooth hull finish because the epoxied glass was still dimpled after two coats. Maybe I have a golf ball dimpled style super aerodynamic centreboard now. It was clear that it would need at least one more coat of epoxy and lots of sanding which I would like to avoid where possible for health reasons. The better I can get the surface straight after epoxy...well....the better. My plan is to finish the inside first so that any holes, screws or even temporary screws in the hull can be removed prior doing the outside. The biggest mistake I made with Eadie Mae….um….well…one of the big many mistakes I made with Eadie Mae was to 100% finish the outside first. Then I spent the next month patching screw holes for things I attached on the inside. Amateur mistake! Anyhow the outside will be towards the end. I am starting to think about colour scheme too. Simply because I need to think about staining before adding some bits onto the hull and I am close to adding some of those bits (seat tops for example). The outside hull will be white with varnished gunwales. The inside will be white too but I would like to make a feature of the Gaboon ply because it is lovely. So the idea at this point is to do the inside floor and everything vertical up to the seat top level in my super duper 2 part poly white. Then everything from seat top level and above in marine varnish over epoxy (with or without staining with my lovely Jarrah stain). Sort of like this. 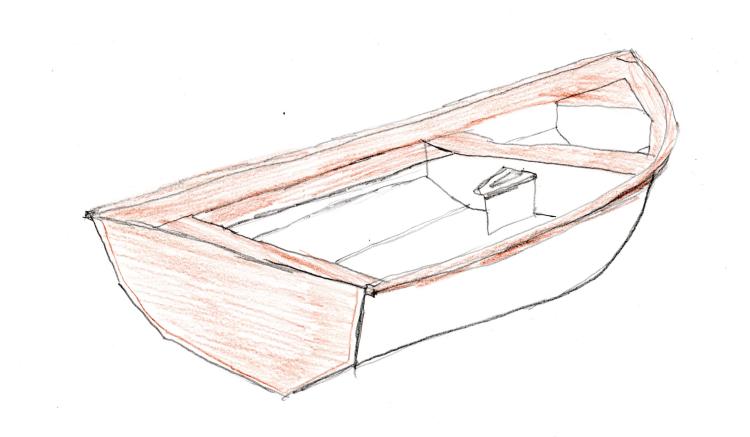 Sort of inspired by this guy: 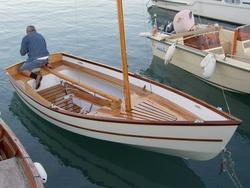 How's that for a ramble. I'll paint some scrap pieces and post the photos this weekend. Jason |
|
|
One point Jason
From another who once sailed in the sunshine; pure white can have a serious glare, but white, 'broken' in some way - grey (smart), or cream (happy), takes a lot of strain off the eyes, without the surface getting too hot Chris |
| Free forum by Nabble | Edit this page |