![]() |
Jason,
In a few years you will feel very pleased about the time and work spent on runners and sheathing. She will take on the Great Barrier Reef with confidence ha ha. Are we soon going to see the launch streamed live? because "I come from a land down under". Paul |
![]() |
Hey yeah what a great idea. I'll play that and hopefully won't end up like Captain Cook on the barrier reef.....
|
![]() |
Hi team, I need some urgent advice!
I have just put a coat of primer on the outside of my hull (over the two very very light coats of epoxy resin that is sealing the ply - I rolled the epoxy on so it's thin). It's a 2 part epoxy high build (50% solids) primer. I have some left over, do you think a second coat of primer tomorrow before 2 pack top coating would be overkill, beneficial or stupid? So that would be......marine ply, thin epoxy, thin epoxy, 2 part primer, (2 part primer?????), 2 part poly top coat, 2 part poly top coat. Jason |
![]() |
Jason,
If the 2 part high build primer has good coverage then you will be ok with 1 coat. With a roller the paint thickness is likely to be thin, compared to a brush. I think I touched up areas that looked too thin or where I could see flecks of epoxy or glass in the grey primer. It's a personal judgement, some like to admire perfection, others just want to sail! For the top coat, expect many layers until the colour is solid. Brenda, our neighbour a retired school teacher, walked past daily saying "you still need another coat". Eventually she declared "that's looking better!", so I breathed a sigh of relief. ![]() Btw: As the primer is epoxy based you can fill awkward gaps with thickened epoxy, prior to a 2nd coat. They bond ok. Paul |
![]() |
I don't do 2 pack so don't ask me, but I can't see that a second coat would do any harm and I have come to the conclusion with one part paint that a solid undercoat is very important. If you have the paint and don't need it for anything else, then put it on the boat. Graham. Sent from my Xperia by Sony smartphone ---- Paul H (admin) [via UK HBBR Forum] wrote ---- Jason, If the 2 part high build primer has good coverage then you will be ok with 1 coat. With a roller the paint thickness is likely to be thin, compared to a brush. I think I touched up areas that looked too thin or where I could see flecks of epoxy or glass in the grey primer. It's a personal judgement, some like to admire perfection, others just want to sail! For the top coat, expect many layers until the colour is solid. Brenda, our neighbour a retired school teacher, walked past daily saying "you still need another coat". Eventually she declared "that's looking better!", so I breathed sigh of relief. ![]() Btw: As the primer is epoxy based you can fill awkward gaps with thickened epoxy, prior to a 2nd coat. They bond ok. Paul If you reply to this email, your message will be added to the discussion below:
http://uk-hbbr-forum.967333.n3.nabble.com/Argie-15-tp4031943p4032231.html
To start a new topic under Builds in Progress, email [hidden email]
To unsubscribe from UK HBBR Forum, click here. NAML |
![]() |
Holy toledo. Graham was 110% right. "Paint doesn't cover mistakes, it highlights them"
This top coat I'm using is "ultra gloss" and it's like a big roadside bill board saying "imperfection here" Lucky they are all on the bottom where I was pretending to do a neat job of glassing. My decision to leave the side strakes just bare with thin coats of rolled on epoxy just paid me back in spades. The sides look fantastic. I'll send photos tomorrow. Jason |
![]() |
Hi again,
Here is a non hull painting update. I finally dressed my new Tasmania oak spars and fitted my new sail (sailrite kit). I suspect it's a bit small for this boat (it was oversized for my last tiny boat). We'll see. You will see the Waite Boom Lift is back in action (except for the cleat which will live on the hull). ![]() Here are my cringles. Forward cringle has a simple hook to connect to the bar on the forward end of the boom. Aft end has a reefing pendant through a fairlead to a jam cleat. ![]() ![]() "pull the yellow one!!" Here we are reefed. Slack the halyard, clip the front cringle down, pull the aft reefing pendant down and haul up the halyard. Tie the reef knots to tidy up the sail. Waite boom lift holds everything up in the air like a 2nd set of hands. ![]() ![]() ![]() It's kind of reminiscent of the CW reefing system on the front and the Ross Lillistone Pheonix system III on the back. |
![]() |
Jason,
It's looking good. I wonder if Sailrite would ship to UK, about 10 sq m. Are the two dangling black ropes the ends of the boom lift aka lazy jacks? Cleating both on the hull gives flexibility. It's on the end of my todo list. I need to fix the big cockpit holes first.... Paul |
![]() |
Yeah if Sailrite ships to the bottom of the world it should be too easy for them to ship to the UK. I was amazed at the personal attention to detail on the Sailrite kit. The sail panels are all pre-printed with seam and hemlines but then the kit maker puts little hand written post-it notes on everything explaining what each bit is and which bit connects to which bit. I learned to sew in home economics class 35 years ago but managed to do a reasonable job. My mum's old sewing machine struggled a bit with the multiple layers like cringles and patches but it was fine. 10sqm isn't much bigger than mine so I don't suppose it would be much thicker.
Yes the dangly black lines are the Waite Boom Lift.....can't call them lazy jacks they are so much more than that. ![]() Courtesy of CW. I did mine slightly differently to this. In essence I use stainless pad eye at the top of the mast and a stainless ring at the bottom instead of blocks in the diagram. |
![]() |
In reply to this post by Paul H (admin)
Solent Sewing https://shop.solentsew.co.uk/manufacturer.html appears to be a Sailrite dealer in the UK. they don't list sail kits, but may be able to help..
|
![]() |
In reply to this post by Jason Mayer
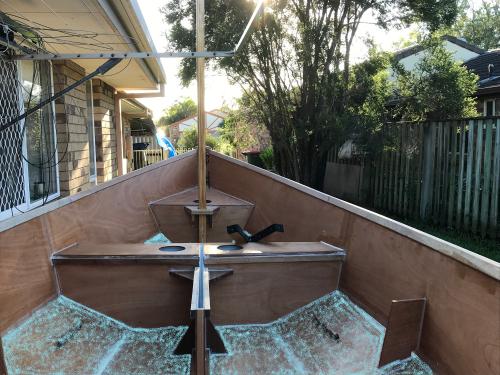
That's coming along nicely Jason
I'm thorougly impressed with the kit-built sail and glad to see the doggo is refusing to be left out of the picture. I embarrass myself by wanting and often being unable to to restrain my urges to comment and today is no exception. Just send an email to Grum and Paulie and I'm sure they'll come round and make sure I never get ideas above my station, ever again. "Care to step into this big bucket of wet concrete Christopher?" 
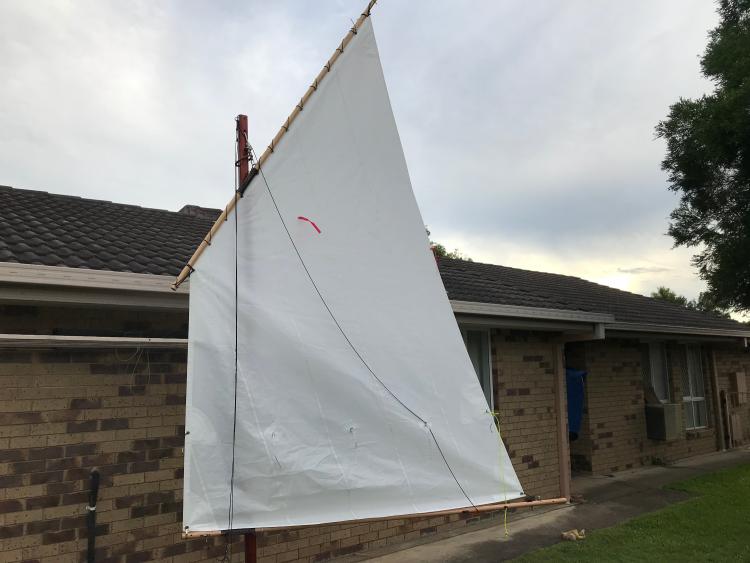
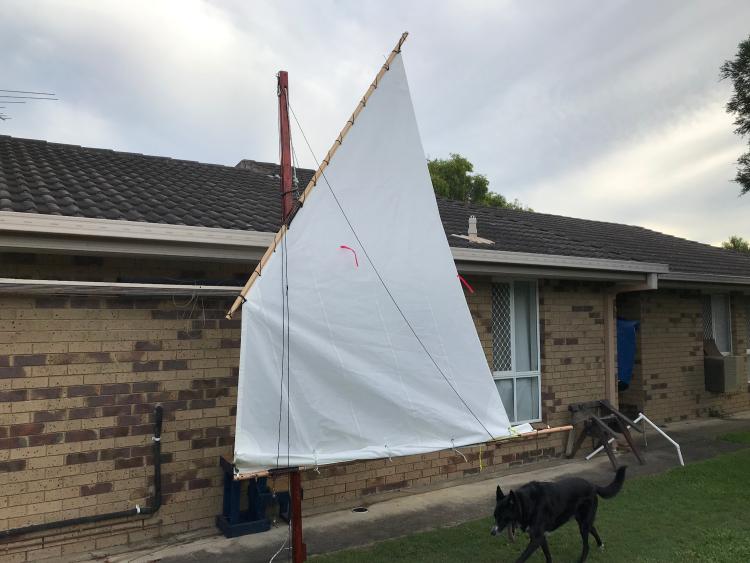
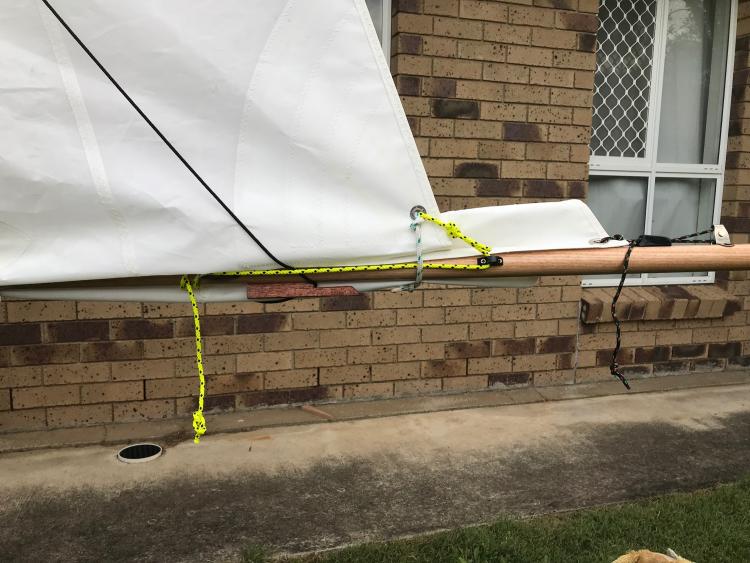
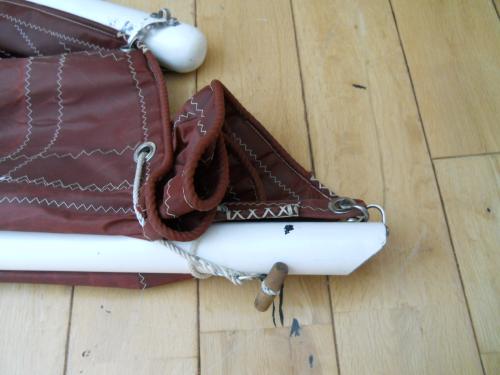
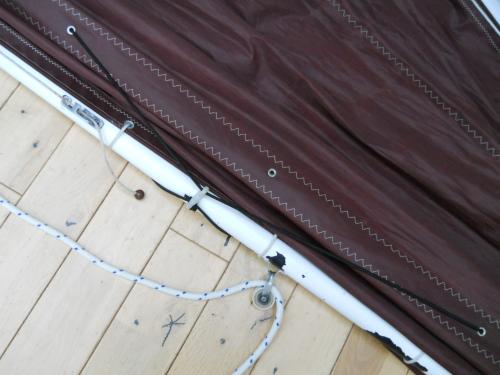
As the wind rises everything starts to shake and move around and get out of phase with itself, just when you rather wish at least something would keep still. In this case you need the sail flat as a board and it is as well to make sure the reef is tied in tight to the boom; but only at the luff and leach cringles (eyes) and well stretched between them. If you look at your two cringles, the luff one is perhaps six inches off the boom; two things - firstly it is almost straight above the tack; none of the tension is along the reef. The second problem is that this is transferring all the vertical strain to the first reef point; you can see the crease from there to the throat. 
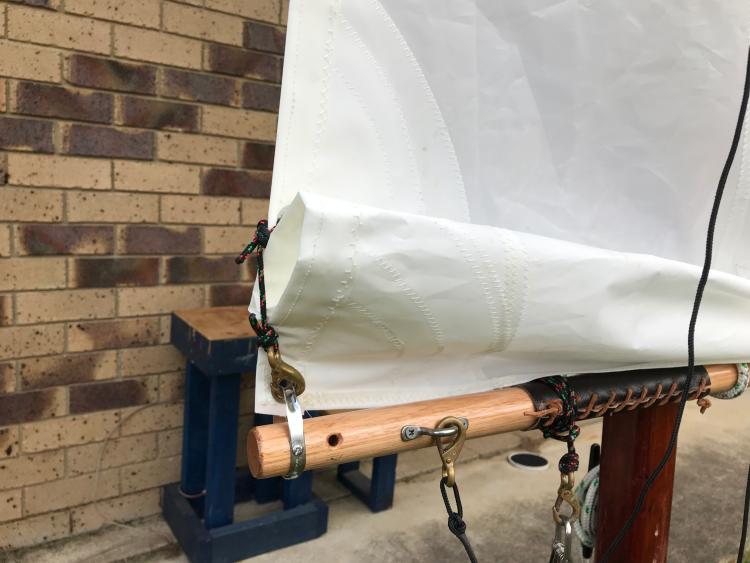
One way to reduce this effect would be to take the bronze clip and feed it onto the stainless hoop, with the tack eye. Then you could simply hook it straight through the reef cringle and do away with the short length of line altogther. However there is another teensy-weensy problemette waiting in the wings. The sail is brand new and stuffed full of its own importance, like starch. Once your climate has taught it who's boss it will become much more supple and at that time when the wind blows and you take in your reef, the breeze will get inside the canvas there and blow it into a balloon, like puffing up your cheeks; not quite the slipstream you are aiming for. 
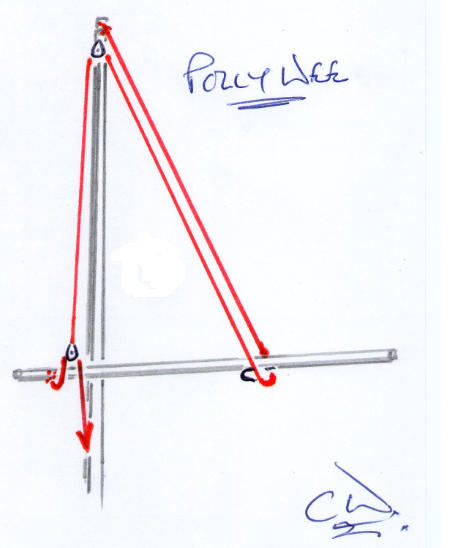
The problem can be solved by small forward facing hook under the forward end of the boom in conjunction with a strop through the reef cringle. I originally had a light rope hoop through cringle and stuffed the whole luff through it before slipping it over the boom end and into the hook. However, even a well exercised luff is a lumpy awkward piece of sail, so I eventually used a single line, now with a toggle in one end and a stainless ring in the other, (a toggle in each end being too bulky) - ![]() ![]() ![]() 
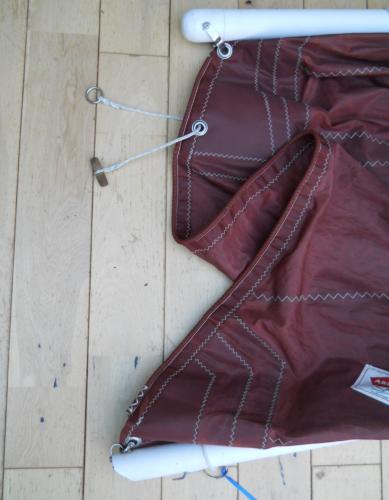
Notice that the tension on the strop is at about forty-five degrees; two actions for the price of one. 
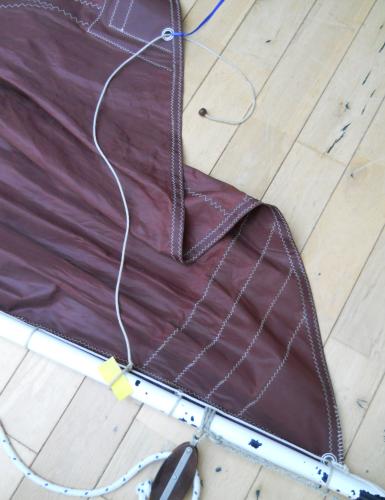
(The blue ribbon is an experiment to see the wind direction under the forward end of the boom.) 
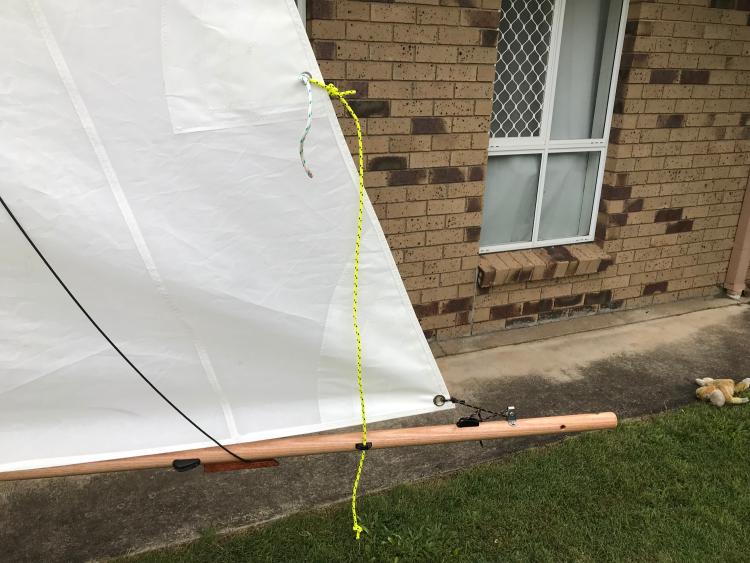
At the other end your leach cringle is held down with a reef tie while being extended by the pennant. It is possible to have the pennant looped loosely round the boom so that it can slide, then take it up through the leach reef cringle and back down to your eye on the boom - again two jobs for the price of one - ![]() ![]() 
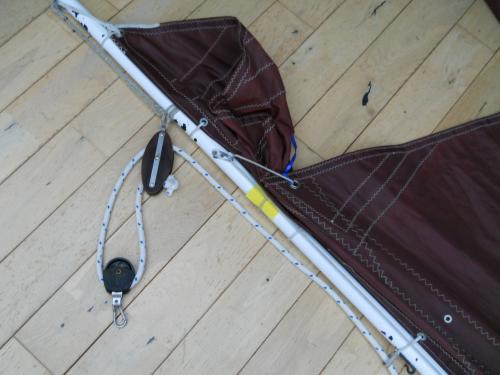
Pulling it taught brings the cringle down onto the boom and back along stretching the reef it all in one move. This sequence is in essence how racing yachts run their slab reef pennants. Being the original cheapskate, I only have the first half rove with a stopper and (round) an aft facing hook (Ronstan RF 88), before taking it forward along the boom to be cleated off. Almost no string at all; the yellow tab is just to show the loose (bowline) knot that can slide aft under tension to tighten the reef. Now I pointed out your reef ties - the first (causing a crease) and the last holding the leach down; you have four in all. As explained to me quite a few years ago there are two things about reef ties; one is that they are only there to stop the 'bunt' - the baggy collapsed folds, from billowing about; the sail is not usually sufficiently reinforced at the 'points' to take any strain. So secondly, if the ties are tight and/or round the boom (rather than just under the foot), then any irregular stress induced can tear the sail by shearing, or other strain; (note your first tie is doing all the downward work for the forward half of the sail). Again, a long time ago I plagiarized another system.... 
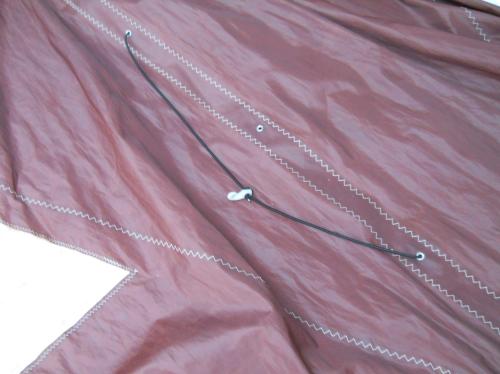
For our baby sails, a piece of light bungee horizontally (??between your points one and three) in a loop through the sail and a hook on one side is plenty. Once the reef is down, grab the hook and under (the foot or) boom, hook it over the bungee on the other side. Rather than four reef knots, that is one swift move and quite adequate to restrain the reefed canvas - ![]() ![]() When taking in a reef, start by hooking down the luff cringle, then haul the pennant as tight as possible through the leach cringle down through the boom eye (or hook) and make it off. Lastly, loosely tie in the reef points (or hook the bungee to itself). Feel free to shout, "Ah, you old Pommy wuss!" And carry on regardless Chris |
![]() |
Thank you for the photos, they really do show the differences and potential issues I have. I take your point, that brass clip could certainly be put on the stainless hoop and I could ditch the string.
I don't know if our sails are different shapes but my forward reef cringle comes "straight down" so it's hard to tie a 45 degree strop as you have done. I'll think about it some more and see what I can craft. Jason |
![]() |
Jolly Good Jason
Having clipped it down first, my luff cringle also starts off vertically under the luff, but.... I then go to the leach, haul aft like bu**ery ('buttery'? No, it's got more 'g's in it) and forty-five degrees is where it lands up, with any puff in the luff trapped and submissive in its garotte-like snare. Only after that, do I slip the bungee hoop and hook over the bunt, just so that it doesn't feel left out; it really is an afterthought. (When shaking the reef out, I go on sailing with one hand and unclip the bunt bungee with the other then let off leach pennant too, while still under way. Then it is a mere moment to impede the tiller, let the mainsheet fly [a bit], release the boom downhaul so you can unhitch the luff hook, haul on the halyard and retension the downhaul. In fact I'd use a plain hook with no latch, as gravity tends to leave it resting in the eye until the tension comes on, making any retainer superfluous, but I hope I might have persuaded you to go for the under-boom hook and garotte-strop. Slipping the garotte-strop of its hook is too easy; people watching hardly realize you've just increased to full sail.) Yup; it is that important to get the reef from luff to leach as bar taught as you can manage. Chris |
![]() |
Aha, the penny dropped. Now I see what you mean.
Thank you Mr CW. Jason |
![]() |
Meanwhile on the bottom.....
I'm calling it 100% on the bottom now. This morning I set some aluminium strips in epoxy on the runners and skeg (with epoxy set screws for good measure). This will give me the ability to drag her up on a concrete boat ramp if needed and I can laugh off the awful scraping sounds because they won't be touching her paintwork. Are there any particular ceremonies for hull turning....apart from beer.....hull turning is next. ![]() ![]() |
![]() |
Hi folks, back from a short holiday not far from home...
Kalliope is now on her trailer and here is a sneak peak with the main mast in place. ![]() ![]() The thing is now I have hit a bit of a writer's block for boat builders...... I actually wish to maximise the natural wood grain inside. So my thoughts are to use the light blue internal paint on the floor and up the first strake only (to hide the filler). I'd leave the seat sides and tops raw and the upper strake and outwales raw (varnish over epoxy). ![]() Here are two ideas floating around in my head (courtesy of MS Paint) ![]() ![]() Any suggestions or examples out there? BTW I do like varnishing so varnish is OK. The stuff I use is very good in UV light and the boat will be kept under cover. Jason |
![]() |
Jason,
In my experience over 15 years, floors and seat tops show the most damage. Definitely paint the floor with 2-pack. Varnishing seat tops allows a yearly recoat, however lines between varnish and paint are tricky especially if that coincides with a joint. As for outwhales good luck. Tough rubber bumpers would be my choice! Paul |
![]() |
Well Done Jason.
Of course if you give me two options, I'll always come up with a third, sort of. If your side benches carry forward to the centre thwart, which I think they do then I would paint the floors and strakes right up to the bench level. I would also paint the faces of the centre thwart to keep everything nice and light giving a contrast to the seat tops and top strake which will be varnished. I think varnishing the vertical faces of the thwart will look boxy. The question then is what to do with the space between the thwart and the forward bulkhead. I think the paint needs to come up to the level of the benches for continuity, and I know its a bit late but I'd be inclined to add some kind of bead or trim, to look like a seat riser, between the thwart and bulkhead to give a definite clear edge to the paint. Best I can do. Regards Graham. |
![]() |
It's a matter of function versus form, or beauty in this case, isn't it?
I love looking at beautiful boats; other peoples' - I could potter about surreptitiously fondling them for hours.... As I have pointed out elsewhere quite a while ago though; my own boats are 'working girls', progressively more subdued in colour to a light, but less than white, which reflects the sun's hotly destructive little intentions, while attempting to minimize any dazzling of the occupant(s). Two opposing functions which benefit from being carefully balanced if going sailing. My favourites are light grey, or cream. It's unfortunate that light blue reminds me too much of babies, but is up there on the list. I am actually involved in an enforced experiment. I ran out of, (OK, couldn't find the dregs in the garage - until after the event, of course), matt light grey two part polyurethane and had been wondering.... I do have some Ronseal satin, grey, floor paint - https://www.homebase.co.uk/ronseal-diamond-hard-slate-floor-paint-750ml/12839737.html?utm_source=google&utm_medium=cpc&utm_campaign=shopping&affil=thggpsad&switchcurrency=GBP&shippingcountry=GB&gclid=EAIaIQobChMIpJijgKr47wIV4RoGAB06IAPREAQYAiABEgKYIvD_BwE&gclsrc=aw.ds So she is lightly touched up around the tush with that. 'Interior', but diamond hard and washable; run that past me again? Maybe it doesn't like sunshine either; must ask Ronseal who will be cagey and provide a non-answer. That's alright as there's epoxy under it and if it fails, I'll sand it down a tad and go back over with the two part polyurethane remnant. We'll see which is diamond harder, floor paint, or my local hard itself; I think I know the answer. While very close, it is not quite the same shade of course and with the two sloshed lovingly next to each other it appears slightly, slightly red; or is it the polyurethane that appears slightly, slightly green? Anyway they do white as well, so it should be possible to mix up a fractionally lighter shade, bringing her back from Amercian warship grey to the British version. But to your question Jason - the answer is a question Do you want to go sailing, or spend More time painting? Chris |
![]() |
In reply to this post by Paul H (admin)
OK gents, thank you for the ideas.
Graham you mean something akin to this? I think that's a good idea because the varnish is only in "accessible areas" then. I can run an 18x18 strip glued on the inside easy enough as it will glue straight to the epoxy coating. I can paint blue right up to the underside of that. Then it is just seat tops and upper strakes in varnish. ![]() Paul, Chris, I understand, so it would appear from the idea above, that I will now only do a smallish sacrifice to the varnish gods and if it all goes yucko I can simply keep painting up the sides. And I am going to get that blue paint tinted a bit darker. I did a sample panel and it came out too baby blue as you noted. I was looking for something closer to Roger's (Avel Dro) internal blue which I quite like, but I cannot find the recipe for it. This weekend!...oh drat it's only Monday.... JM |
Free forum by Nabble | Edit this page |