Argie 15

123456
123456

|
|
May I seek the opinions of the brains trust again. This time on the order of proceedings.
In regards to painting. I will paint the inside floor and vertical surfaces with the white paint (Chris I take your point on glare see below). All my horizontal surfaces will be dark stained timber with varnish over epoxy and I will have my nice grey industrial carpet on the floor to reduce slip and glare. This means I limit the amount of white I'm staring at. So I have two ideas on how to proceed with the seat tops to get a nice line between the white walls and the stained seat tops. I intend on thick epoxy gluing the seat tops to the 20x20 stringer frames that are on the bulkheads and hull and support the seat tops. Then on top of the seat tops I intend to put some 25mm glass tape between the hull sides and seat top. Here are my ideas: 1. Paint inside the seat tanks with white only up to the 20x20 stringer. Stain and epoxy coat the seat tops then glue them on (to be varnished later). Add the glass tape. Use masking tape to protect the stained seat top and paint the white from the seat top junction up the rest of the inside hull. 2. Paint inside the seat tops and all the inside of the hull. Stain and epoxy coat the seat tops then glue them on. Put the glass tape on last meaning that it will be stuck over the white paint and onto the seat top. Does this sketch help? 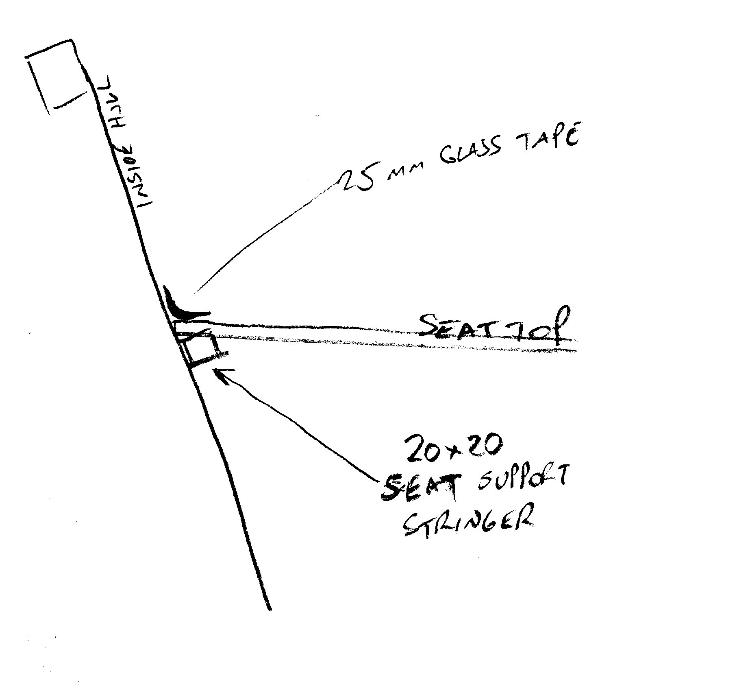 No.2 probably gives a neater line between the stained seat top and white hull (assuming the glass becomes transparent(ish) but means I have epoxy over paint rather than epoxy onto bare wood. I think I'll do No. 1....... Any advances on No. 1? Jason |
|
|
Hi Jason,
Have you ever noticed that you never get a straight answer to a straight question, especially around here. First up, I would ditch the glass tape. I don't like the stuff, it harks back to old school stitch and tape using polyester resins. Its a bit unsightly and hard to disguise. I admit I have used it on Katie Beardie where panel joints are too obtuse for a fillet but even then I try to keep it hidden. A good thickened epoxy fillet will do just as well. It's difficult to second guess what's going on without seeing either the plans or the boat but my thoughts would be thus; First of all make absolutely sure you don't think you will ever want to remove the thwarts once they are in place. It may be that bedding them down in some kind of sealant then screwing up from underneath would better suit your needs. If not then carry on. Bedding the thwarts down in thickened epoxy should be quite strong enough, if you don't think there is enough bearing on the seat riser/stringers then you could double them up by way of the thwart i.e. 40mm wide by 20mm high. At the edges where the seat joins the hull sides I would lay a fillet but leave a shallow open-ended gutter so that the seat edge is well defined for painting but so that any water would drain off to the bilges. Something about the diameter of a tongue depressor should do. Now apologies if the next bit is teaching granny to suck eggs but it is something I have struggled with many times and only fairly recently read the obvious solution. The question is how to get a clean crisp edge when using masking tape without the paint seeping under the tape and leaving a ragged edge. I know that the new types of Frog Tape now available are a lot better and very much worth the extra money but this is how to do it using the old stuff. First paint your base/main colour (varnish) and let it harden. Once you have masked off where the paint edge is to be, give the edge of the tape another coat of the main colour (Varnish). This will seep into all the little crevasses and fill them up stopping the second colour (white) getting in. Once this extra layer has hardened then paint over the edge with the second colour (white) . Once you are happy you have good coverage and while the new paint is still soft, carefully peel off the masking tape. Et Voila clean crisp lines. Pour yourself a beer and admire your handiwork. Graham. |
|
|
In reply to this post by Jason Mayer
Some years ago now Jason
I took a few days to sail round the Solent with Cliff Martin who comes up on this forum as well as the DCA. We ended up one evening in Newport on the Isle of Wight -  I was sailing my little gaffer and he was in his trusty Mirror Daydream, which you can see immediately astern in the image above. The harbour master came round to collect his ransom and after he discovered we had sailed over from the mainland, he took my money, but seeing the diminutive and no longer young Mirror, charged Cliff only half the fee. I was lightly miffed, not for Cliff's good luck, but for my bad. I would have no compunction regards sailing a Mirror round the Solent, so I started to think about this Always dangerous - thinking It was BPW, that is Before Polly Wee, but I think I had her in mind.... 1. I do not do varnish; very beautiful, but it has traditionally tied you to a grizzly annual upkeep schedule. Modern materials may ease this somewhat, but in the same way I do not put to sea to be offended today's lurid cordage, I am out there to commune with nature, as easily and unobtrusively as possible. That's what Cliff was doing - managing to be unobtrusive; keeping officaldom and the light of finger at bay. 2. Sunshine is lovely, but as I pointed out above, the glare from bright reflective surfaces can be hard work if you have to tolerate it for hours. The only other aspect to this is that if your surfaces are a dark colour, then they can become uncomfortably hot from the sun's rays; not often a problem in the UK, I grant you. The little gaffer originally had a white shearstrake over black topsides -  A mistake in the tropics, particularly when the boat's mooring exposed her to the afternoon sun; I ended up hanging a piece of canvas over her port bow to protect it. Fortunately no permanent harm done. So light unobtrusive colours; I used to have a standard colour scheme that was cream decks, a bold lightish blue shear strake with white below that, but it does stand out in a bit in a crowd -  3. Being older, wiser and in view of all the above, having finally decied to try and draw less attention to my activities, I went for a light, matt, naval grey. Be warned, I have found the matt paint does not have the abrasion resistance of the gloss. Couldn't resist the white shark's mouth though - 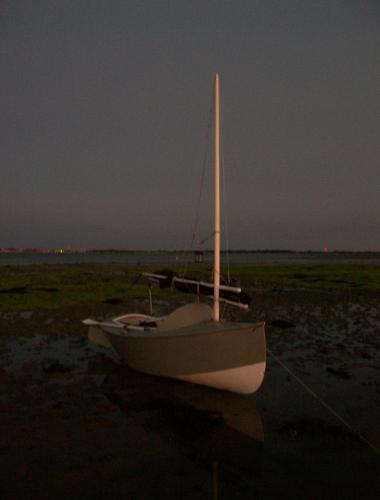 And white spars; smart and varnish free. 4. But you asked about painting up to the edge of the side benches - all my horizontal(ish) surfaces are light grey, same as the hull, but offset with the more vertical ones being matt white inside - 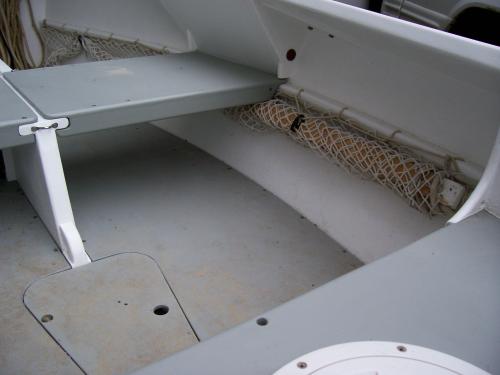 5. And finally after all that hyperwaffle, to the question you asked; on the transom I have used white, with the grey as a trim around the edge, like some older working boats, look at the contrast on these barges - 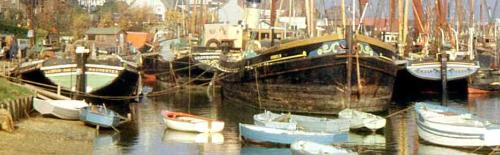 You can pick out central panels in varnish, or whatever you choose, while leaving the border the same colour as the surround; this avoids having to create a sharp edge on a taped and filleted joint. Here is Polly Wee's stern to show you what I mean - As ever, I hope this helps Chris |
|
|
Thanks chaps, OK I will go with that wisdom. Graham you are right the tape always leaves an edge.
As it turns out Eadie Mae was cream on the inside. No issues with heat or glare that I was aware of. The decks were dark varnished and the air tanks would heat up something shocking. Like putting your hand in an oven when I'd retrieve my phone from inside the aft chamber. 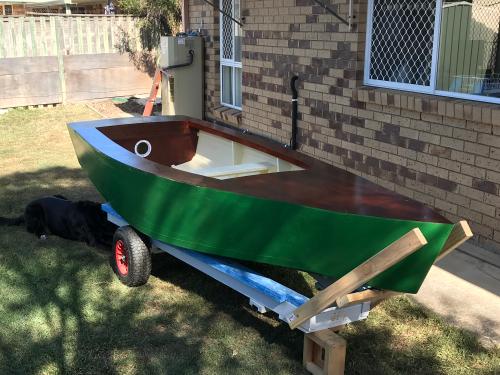 I might save the hard core white paint for the outside of the hull. I only bought 4 litres so I'll probably get through most of that with a couple of decent coats. Unless I can get it tinted. I'll find out. I stained a scrap of Gaboon ply and put a coat of epoxy over it. The stain dissolved and polluted the epoxy as I brushed it around. So that's the end of the stain idea anyway. I'll post some pictures of the plain Gaboon with epoxy coating when it cures. But I'm leaning towards the no varnish idea. Except maybe the rub rails on the gunwales. Jason |
|
|
In reply to this post by Jason Mayer
Jason
As Graham alluded taping the seat edges is not needed. A small fillet is good as it stops water collecting near the joint; also it can prevent long term cracking of the joint. If you want more strength screw the cleats from the outside, bury and fill the screw heads. What I did is use screws to pull the frames into place, then remove them after cure. The West brothers say the best colour is white. It reflects the maximum amount of UV, which you have a lot of. The Achilles heel of epoxy is UV, causing it to break down and weaken. My white cabin sides/roof are much cooler than the red hull in sunlight. So if you want to minimise UV damage have white topsides and store her away from the sun. Paul |
|
|
Oooh I just had an idea about flotation whilst sitting the garage staring the the boat. I'd like to do simple varnished timber side seats without big permanent tanks underneath. Trying to keep the space flexible. I could make them slide to the middle against the centreboard case and they would turn into a bed (Ross Lillistone idea).
 Underneath the seats I could put a sheet of XPS foam for added flotation when the boat is on it's side. The seats are 1900mm long and say 300mm wide. Probably built from 65mm x 18mm meranti planks. Therefore a 50mm foam piece would give 28kg of flotation (approx 25% of total hull weight with rig and gear). The remaining sealed tanks aft, forward and middle have roughly 350kg of flotation, so about 175kg to lengthwise centreline if floating on it's side. With another 28kg along the side seats it would mean the boat should float slightly higher than it's centreline but maybe not too high that it wants to turn turtle. Better still the flotation is not right in the bottom and no too high on the gunnel (as per Chris/Graham and Paul ideas and discussions recently). Plan view. 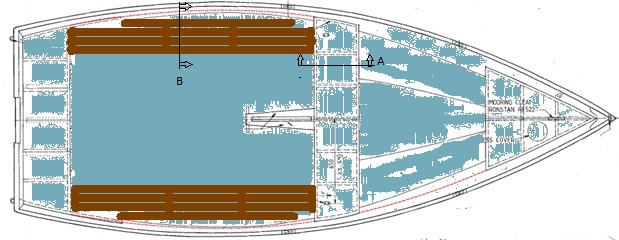 Section A 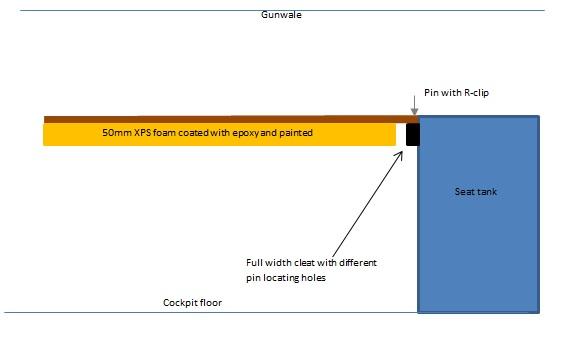 Section B 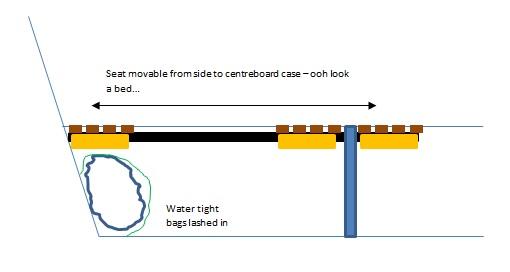 I'd need to get the seat support rails in place before gluing the seat tops on, so I'll have to make a decision on this soonish. The foam would be "adjustable". I could add more or remove some. Jason |
|
|
A simple mast head float is the best way to avoid inversion, beware a hull that has too much buoyancy in case it floats too high after a capsize and you are not able to get on to the centreboard to right it. Righting lines might help you out there though and don't forget a bucket to bail out all the water afterwards.
Key thing if you are going to use this boat for cruising is to make sure everything is secure i.e. not likely to disappear if you capsize, actually make it two buckets/beer coolers just in case! Steve 
|
|
|
In reply to this post by Jason Mayer
Jason,
The seats would certainly look good, as well as being flexible. The simplicity of the Mirror with combined seats and bouyancy and a foredeck always appeals to me. Often it's down to personal choice, what you like to build and what you enjoy sailing. Don't forget every boat is a compromise! The Americas Cup AC75 yachts are exciting at 50 knots and turn as fast as a dinghy. But they have to be towed in and out of Auckland harbour.  Paul |
|
|
In reply to this post by Port-Na-Storm
Ahh, the secrets of the master painter. So the second varnish coat will seal under the tape yes? Then its impossible for the white to bleed over. I relied upon a foam roller to give a reasonable edge between white and red, using the underside of the outwhales to hide the colour transition. The transom colour edge is not brilliant but one's eye rarely notices it. Plus its ruined by 15 years of mud, sand, rope, outboards, docked boats bumping into her and overhanging trees on the Thames scraping the topside. That's life. My daughter insists on Frog tape when decorating, "other tape is rubbish dad". She has an artistic eye and only crisp lines are good enough. Maybe she should paint my boat, as I relax with a drink, as compensation for grandchild duties ha ha 🍺🍹🍾 Paul |
|
|
Thought it was time for the post weekend update.
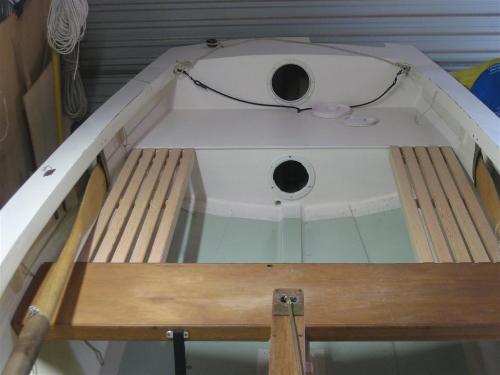
Seat/flotation tanks internally epoxy coated and painted with 3 coats of 2 pack. The white takes a few coats to stop showing through. I guess I can prime the outside of the hull to help with that later. 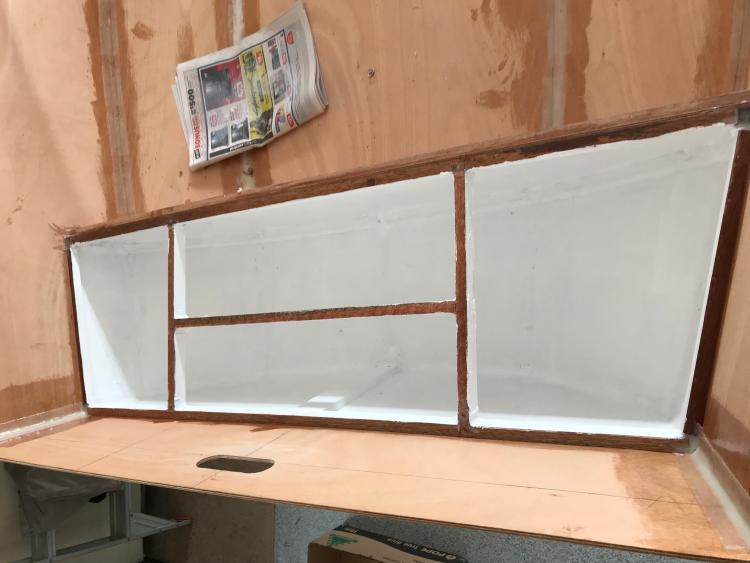 First layer of outwales on. These are 41 x 12mm Meranti (light hardwood). There is a rounded over 8mm Meranti layer to go on yet. Plus a 8mm rounded over Meranti inwale yet to go inside. That will give me 34mm total thickness at the gunnel. 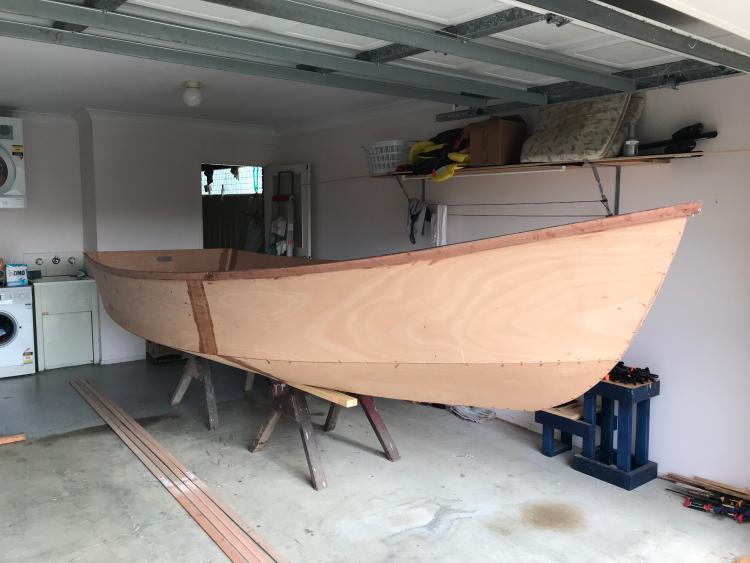 Seat tops are now glued on. Yet to be filleted. 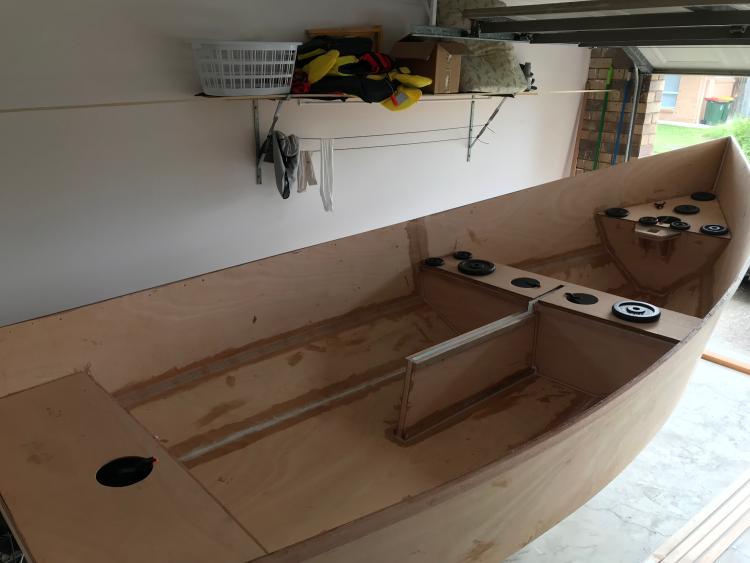 Inspection port covers are DIY rather than the cheap Chinesium plastic garbage we get over here that don't seal properly. I have some neoprene to go under them to seal.  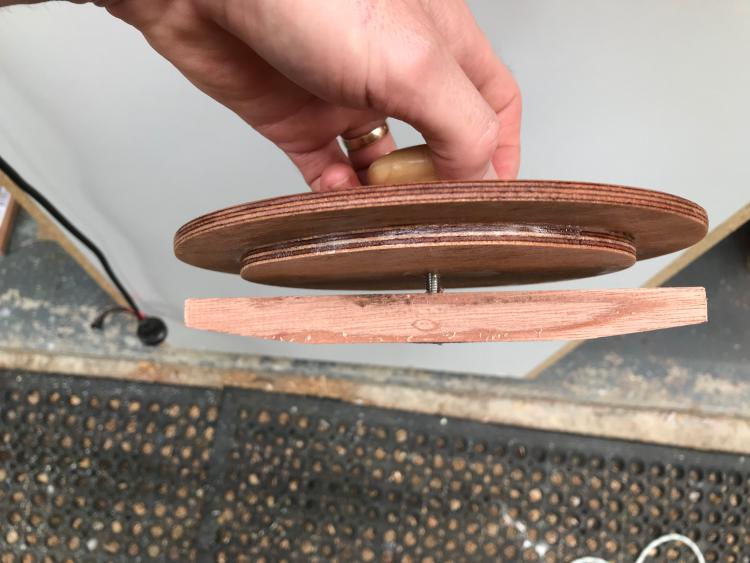 I have run out of epoxy so that it's for this weekend. Jason |
|
|
It's all looking good Jason.
I like your DIY hatches, did the neoprene come in circles? Paul |
|
|
Hi again. Today was rather cathartic.....just bits and bobs. Firstly catching up on posts....
Paul, the neoprene comes in 5 metre lengths of 3mm x 6mm rectangle cross section and my plan is to stick it on the finished painted seat top with silicon roof and gutter sealant. I thought about sticking it on the cover but then any water sloshing around on the seat top can fall into the hole. Public announcement.....I hate sanding. Surprise surprise. Friday afternoon, 30 degrees, 70% humidity, fully suited up with disposable overalls, full respirator, latex gloves, safety glasses. The water was pouring out of my gloves everytime I held up my hands. I was my own dust suppression system. Anyhow I used an angle grinder and 120 grit flap disk to feather the edges of the glass tape and an orbital to go over everything else. Ready to put a coat of epoxy on tomorrow. Just one coat, and I'll spread it with a brush and a 150mm scraper just to get it into the grain but not need sanding after. I hate sanding. Thanks for the idea Graham. Here are some shots of progress today. Firstly inwale no. 1 in place. They say you can't have too many clamps. I don't have too many clamps. 4 more would have been good. 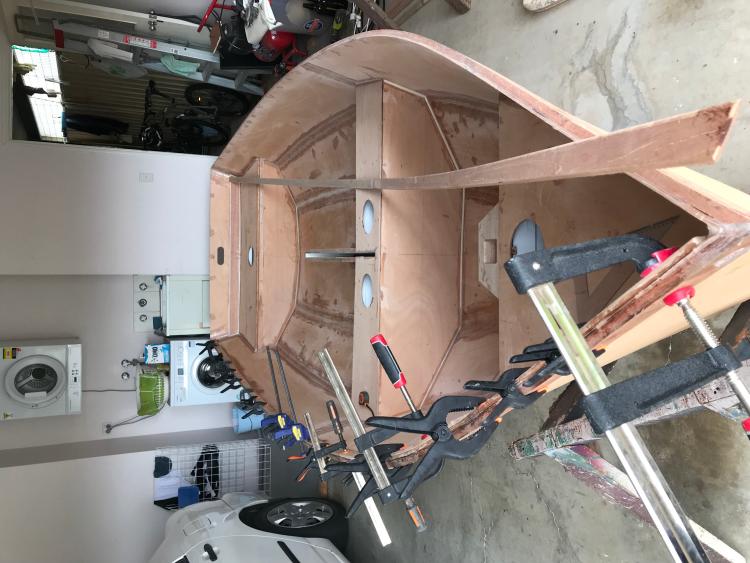 Then I put in some triangle reinforcing for the centreboard case.  Reinforcing across the transom. Similar piece of timber vertically inside the tank was done a couple of weeks ago. 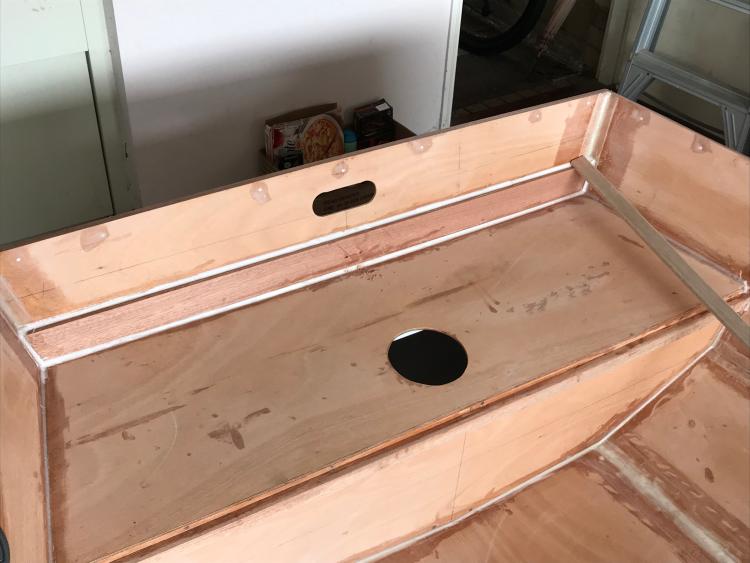 There was some flex in the side panel because I am not putting side tanks in and I was worried about a fatigue crack in the upper to middle panel. So I put in a knee to hold it. And this will support the seat approximately mid way along the seat. 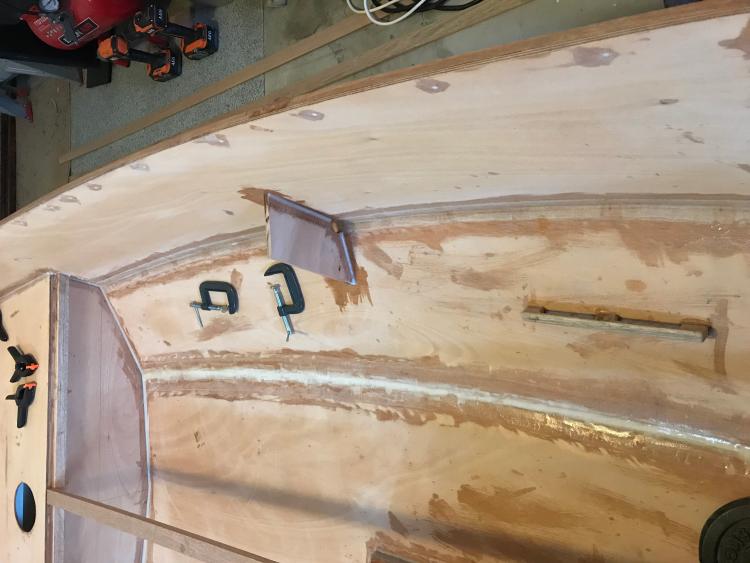 Notice half way up the middle side panel, there is a little hand made tie down rail. The plan is that this will allow cylindrical waterproof bags to be lashed under the seat. Rather neat I thought. Drilled holes and cut out. Ran them over a 6mm router round-over bit. Closeup 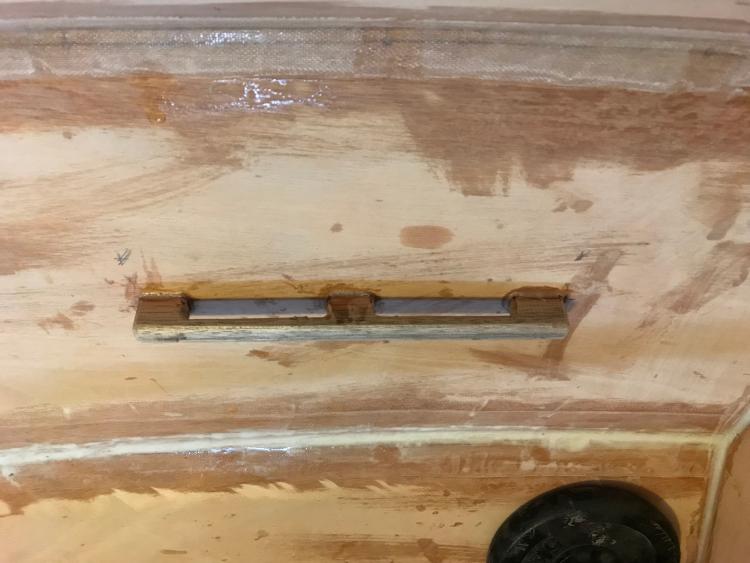 Tomorrow is epoxy coating the inside day..... Jason |
|
|
Excellent progress Jason. Maybe your nickname should be Hasten Jason ha ha.
One observation: the end grain of the CB case and thwart look vulnerable. You might be planning to cap them, it's worth the extra work. I'll be capping them in MilliBee's refit, I should have done it sooner. I'd be using the DIY hatches for inspection within the cabin, to check for hull leaks; so sealing is less of a problem. Phil Oxborrow painted the insides of his Mirror seat compartments white, for easy inspection. Paul |
|
|
In reply to this post by Jason Mayer
You're rolling right along there Jason
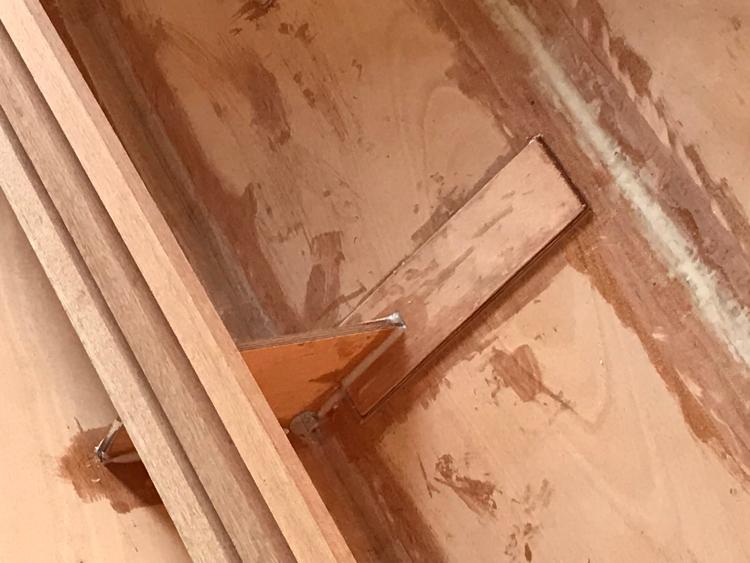
One teensy weensy problemette I see, is with the knee under the side bench. The lowest point is just that - a point and it ends in the middle of a panel, a strake. I fear it may 'work' enough to cause a fatigue fracture there. I have one particular problem like that in Polly Wee, with the coaming on the side deck, as it runs forward over the top of the aft main bulkhead. Yours is simlarly going to have bottoms lifting on and off it for ever. It might be an idea to make it more 'kneesy' by cutting a concave curve into the inboard edge - 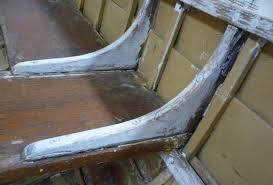 These ones are not 'hanging' as yours would be, but you can see that they would flex more readily. And/or you could install a batten attached to the lower edge of the knee and continue it right across the strake to the next chine. Depends whether you want to get out the belt and braces now, or wait and see if my predictions of doom are really that relevant. Just a thought Chris |
|
|
Very good Christopher. Your physics was spot on. The flex moved from chine to the middle of the hull panel. Although it stiffened up substantially and is only very slight, I looked at your ideas and decided on a version of the second one. I didn't like my chances of cutting a nice curve on that awkward angle. The stiffener is 300mm x 100mm ply and engages on the edge of the glass tape at the bottom chine. It has a slot that encompasses the base of the knee and is completely epoxied around it and to the hull panel. It should be one big solid mass by now. I beveled the edges so it is not a trip hazard.
 Here is a mock up of my seats, still missing one plank but you get the idea. 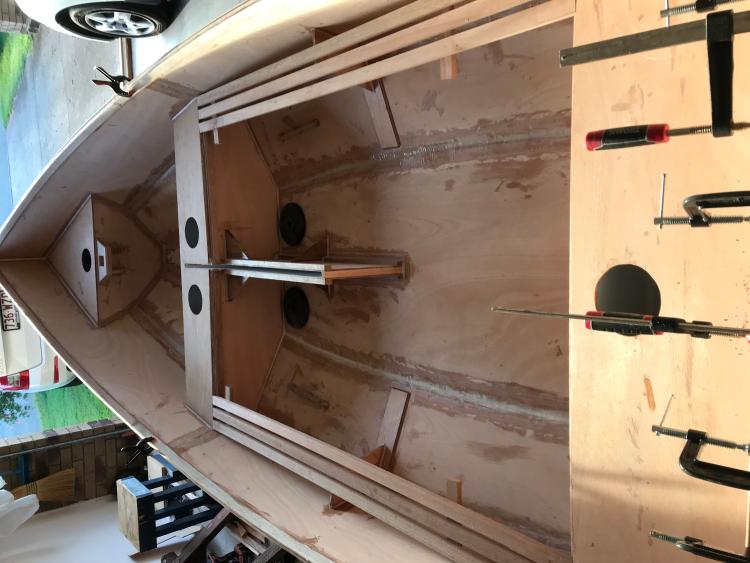 Not much else to report, just tidying up bits and pieces. The inside is so close now, that it's time to slow down a bit and ponder any little design features that I want to glue on before the painting stage. Paul, yes I painted the insides of my tanks white before I glued on the seat tops. Should make finding things easier.  Signing off for this weekend. Jason |
|
|
Excellent Jason
That'll teach it who's boss Second thought, painting inside hollow spaces white has good and bad points. Yes, you can see what's going on, but if you need to reach through a narrow opening to fix something like a hull hole, then scraping off enough paint to make the associated goo stick, is another hard job in a hell hole. Chris |
|
|
This post was updated on .
Jason,
To strengthen the seat support more, two cleats either side of the ply knee will transfer the crew weight onto the 300x100 panel...which is supported by the water. That will also protect the ply knee against accidental sideways kicking during tacking/gybing. Removing paint in a dark hole is indeed hard. Ironically it's far easier to work on MilliBee's stem via the first bulkhead because I painted the hull panels white. The difference is like night and day. I did not paint the stem, to allow fitting a lower winch eye. The 80:20 rule works, paint flat panels within 20mm of their edges. Paul |
|
|
Wow another weekend gone....
Kalliope is now back out in the yard, upside down ready for external hull work. She is safe from rain because she is upside down this time and even our downpours cannot collapse the tarp now (did I share the near disaster storm story from two weeks ago when she was right side up?). I am calling it 90% complete on the inside. Which means it's more like 70%. Honestly though, top coat and fittings is all that is needed now. I gave the entire inside a coat of epoxy with a roller so it isn't thick but it should seal the timber sufficiently and there is plenty of grain left to grab the paint. The inside paint will be single part poly. There is an Aussie brand of marine paint specifically designed to go over GRP and it worked well on Eadie Mae so it will be fine for the inside. I decided to go belts and braces and put a single layer of glass inside the flat bottom and just up the side a little bit to overlap the glass tape on the bottom chine. So the floor will be glassed both sides. 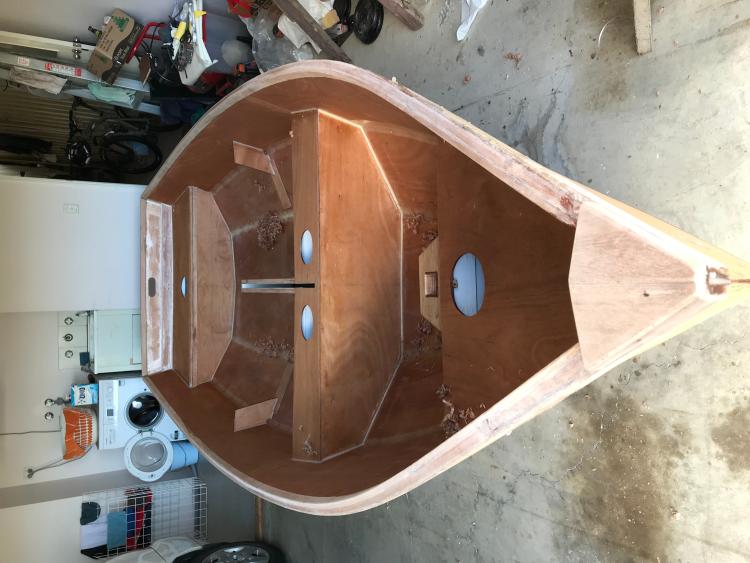 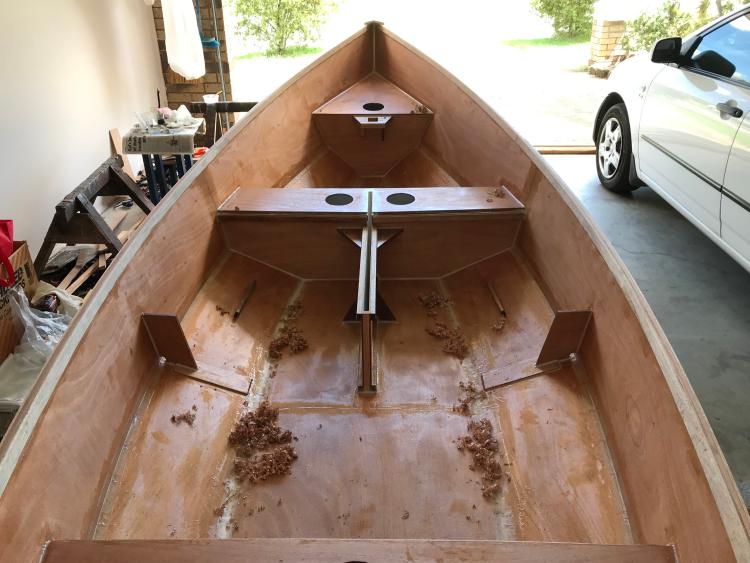 I made a bow knee and glued it to the front but I'm not really sold on it....I think I might take to it with the grinder and make it more shapely. 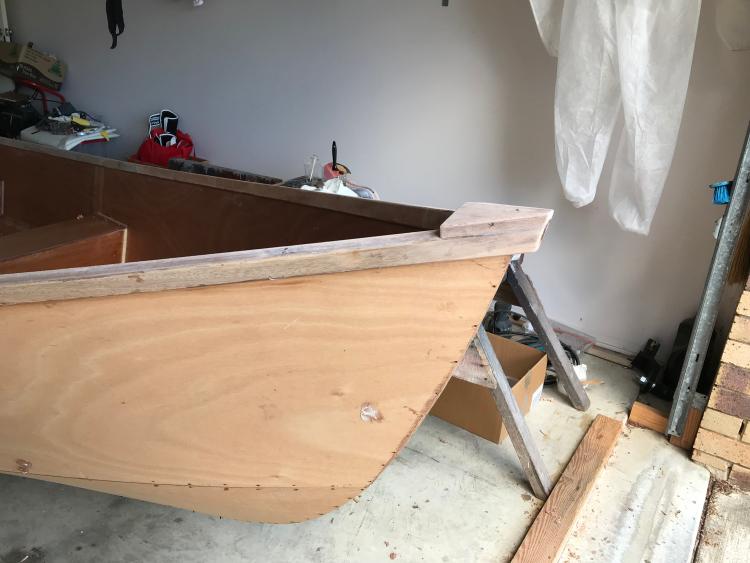 Here she is in the backyard with the first centreboard fitting. I had a bit of trouble getting it into the slot as the slot was a bit tight (is this going to be moderated?). I'll have to adjust the centreboard at the top a little. I need to cut a little more out to allow full vertical swing anyway. 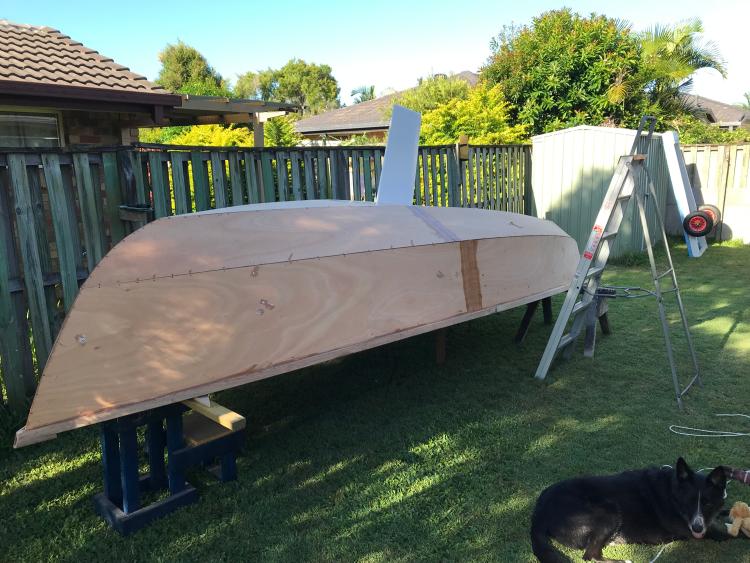  I hope everyone is going OK over there. You could certainly teach us a thing or two about vaccinations. We are ballsing it up over here. Oh I must get a photo of the really nice plank seats I made from meranti hardwood. The turned out really nice. Jason |
|
|
Ho Jason!
It looks as if you may not be getting emails from the mother country. I've just received one from you (20 March) entitled 'Hello?', but I cannot get into your You Tube video which it says "Has been removed by the uploader" and you may not have received one from me on 14th March. Try checking your junk/spam folders I hope you'll see this Chris |
|
|
Crikey, another weekend gone....
Bottom is glassed with single layer of 200g/sqm and I took it over the bottom chine and about 100mm up the lower strake. The line of the glass will be close to the waterline so not very noticeable if at all. So the inside and outside bottom is skinned both sides with glass so should be robust. Runners and skeg glued on. 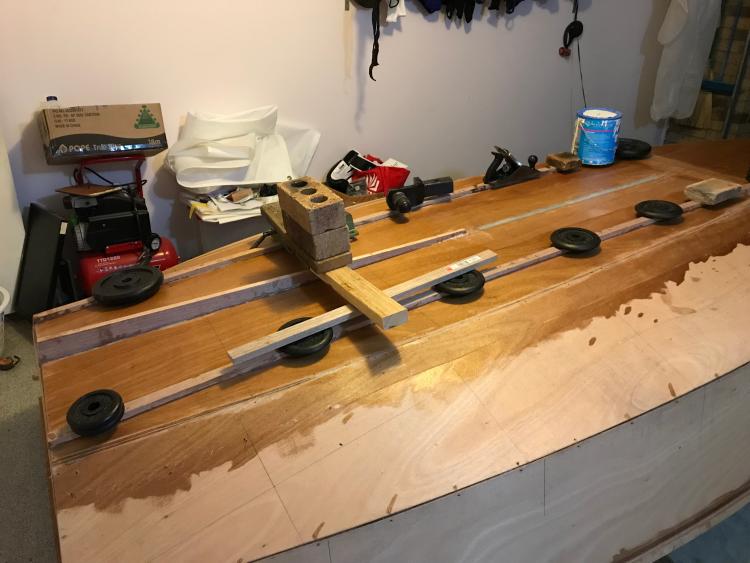 Here is a shot in this morning's faint light. 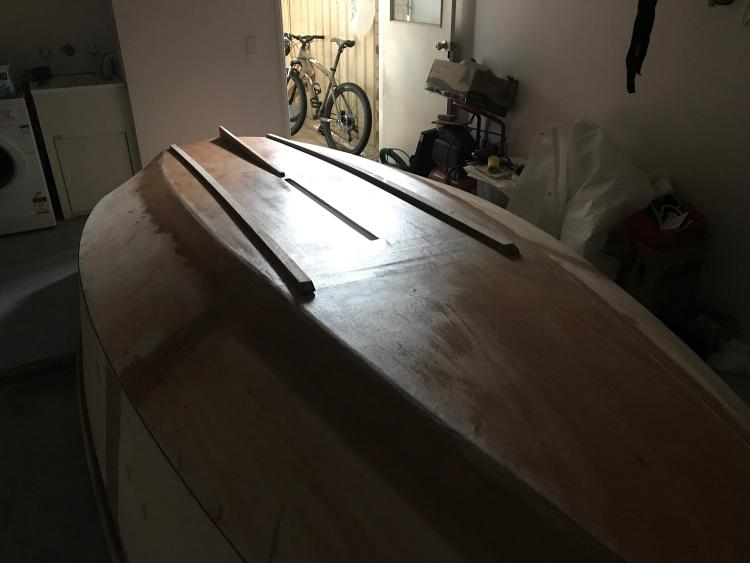 Today has just been sanding and filleting the runners. Jason |
«
Return to Builds in Progress
|
1 view|%1 views
| Free forum by Nabble | Edit this page |