SF Lillie
|
|
Tiller is now laminated and in the process of being finished and the two halves stuck together. Being symmetrical they are quite strong as I found out with Calluna. This one is only just over a metre long overall , but shaped to go around the mast. Hope to post some photos soon.
Richard |
|
|
The former for the tiller made up of odd bits of softwood found around the workshop. The shaded area just visible will be the track of the laminate. The picture next to it is lamination under way.
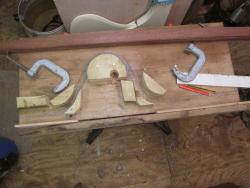 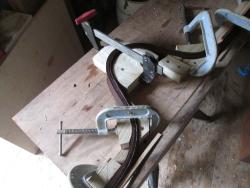 After lamination, a bit rough the two parts just clamped together up against the workshop wall. To get an idea of size the overall length is just over a metre long and four hundred and fifty mm wide 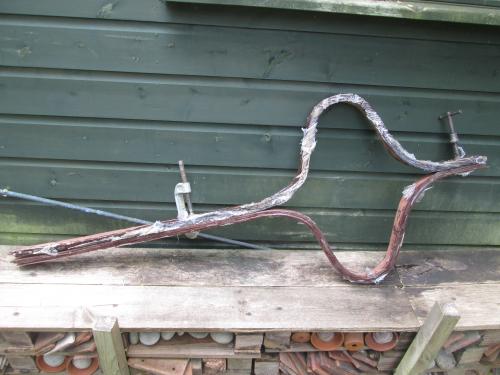 When I go to the boat again I will be able to put the whole lot together and take a photo. I have more photos but they are promised to someone else. Richard |
|
|
The name of the boat is …….Winoote
Richard |
|
|
A few photographs of a bit more progress.
  
|
|
|
Started to plane and glue up the spars. I had to return one of the planks that I had recently purchased as there was a dead knot in the middle. Company obliged without me having to return the one with knot. Started sawing and planing today, will start glueing the yards and booms tomorrow, the mizzen will be done when the replacement arrives.
Richard |
|
|
Just made the travellers for the two sails. Some odd pieces of bronze I had lying around, as you do ! I suppose I could leather them but I don't think that I will not this year anyway.
 Richard |
|
|
Well here commences about a weeks planing as I aim to complete the spars by the end of next week.
The arms are getting vey used to the swing of the plane. The boom and yard for the main are about 3M long. Thank god for Jewson's 'rolls' of abrasive. I did try to make a contraption for using abrasive loops the reverse way around. Roughly got the design but not the final devise. Still got plenty of time left.As Graham put it ' fidely ' bits next. At least I've put my plug in place. Richard |
|
|
In reply to this post by inwe
Richard Since I don't yet have odd lengths of bronze lying around and being a (very) novice metalworker your advice would be welcome... I want to build a bronze horse for the mainsheet on my Ilur (apologies to the purists but my boat will have a boom and I'll not be moving the mainsheet from one side of the boat to the other by hand.) Looking at Bronze rod and bar on the web I find it comes in different types and brazing rods in still more types. Any advice regarding what sort of bronze I should be looking for and what brazing rods would match? Thanks in advance!
|
|
|
Richard, Your build seems to be coming along apace, have you sorted out a trailer yet?
There don't seem to be all that many trailer builders around these days especially since the advent of Type Approval, do you or anyone else have a favourite. I'm in the market for a good combi trailer to suit a 12' boat. regards Graham. |
|
|
Ian Jubb (universally known as Jubby) builds trailers as an adjunct to his boat transport business. Langstone Cutters have bought a lot of specialist stuff from him and he is very good. He is based north of Emsworth.
https://www.sailboatdeliveries.co.uk. |
|
|
In reply to this post by Port-Na-Storm
Usually plenty on the facebook dinghy bits for sale group.
Steve 
|
|
|
In reply to this post by Port-Na-Storm
Well spars are done. There's so many! But unlike Graham I have no sails yet, got to wait.
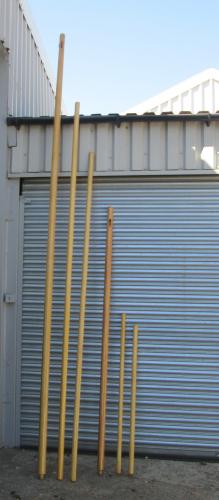 Used up all my varnish too, get another tin. Richard |
|
|
The next task was to put the keel in. A tricky little operation trying to align the bolt hole especially when you haven't got line of sight. Careful marking on the keel with concentric circles enable you to see were the holes were in relation to each other together with a tapered rod and bingo alignment. I had to enlarge the keel box to enable the toggle to pass thro'.
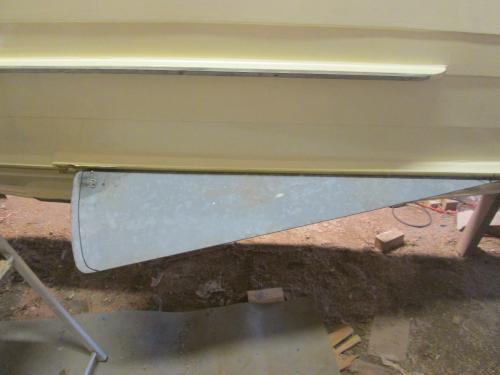 So its now fitted. And to allow an inline pull to raise and lower I constructed a turning block to fit atop the keel box. Tufnol inside teak enables wire rope to turn through 90 degrees. 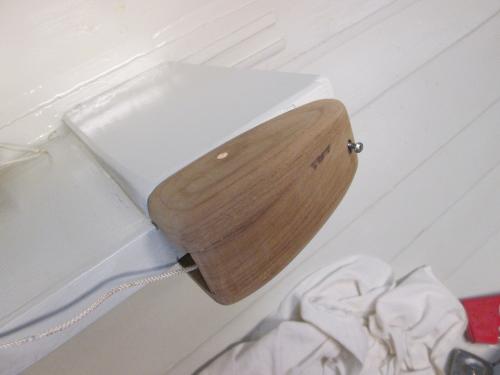 Enough of that. Now to sew leathers on the masts to soften abrasion. This is the first group of leathers the next batch will be on the spars, but for the moment these two will have to do as I need some more twine and possibly a bit more leather. 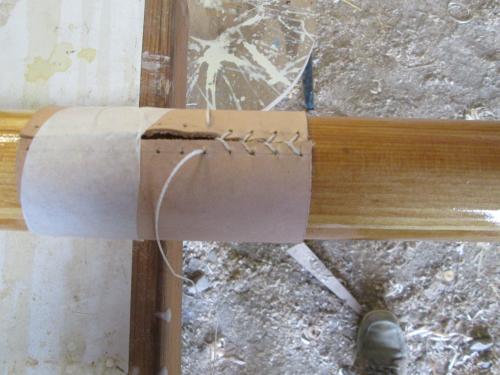   Final picture of boat on its side, you might just see the leathers at the base of the masts. Richard |
|
|
Finding the hole, Richard -
'X' marks the spot, so I pencil in an 'X' centred over the pivot hole on the centreboard/plate and follow the lines through the bolt hole. You could mark little >>'s to help the direction, but it's actually very easy without. Put the centreboard in it's raised position as the case will then locate it more accurately than if extended. If you need to move it then a piece of twine round it's middle normally does and can be withdrawn after you have the beast pinned in place. I don't think I have the equipment (or mentality??) to do the bit about concentric circles.... CW |
|
|
This is the second time Chris that you have made comments about lining up holes and as usual you make over complicated solutions without understanding the complications. When you cannot see through a hole a visual approach becomes all the more difficult .
Richard |
|
|
All right boys, settle down. Here is the correct method of aligning the CB hole when you cannot see through the hole. Tools required, two pieces of fine stout string and a wire clothes hanger. Take the wire coat hanger, straighten it out but leave a small hook in the end. Tie one end of the string to the wire hook and push it through the CB case hole. Remove the wire and tie the second piece of string to the end of the first piece. Now push the wire down the CB slot and hook the string pulling it up out of the slot. Untie the knot and feed one end through the C B hole. Now tie the second piece of string back on. If you have done this correctly you should now have a piece of string which passes through one side of the CB case up through the CB then back down and through the other side of the CB case. Feed the CB into the slot and finally pull the string tight to line up the holes. Tie one end of the string to the wire hook and pull it half way through the hole to firm things up. You should now be able to drift your pivot through your perfectly aligned holes pushing the wire ahead of it. I have done this, it works, no arguments. There has been no charge for this Public Service Broadcast.
Sent from my Xperia by Sony smartphone ---- inwe [via UK HBBR Forum] wrote ---- This is the second time Chris that you have made comments about lining up holes and as usual you make over complicated solutions without understanding the complications. When you cannot see through a hole a visual approach becomes all the more difficult . Richard If you reply to this email, your message will be added to the discussion below:
http://uk-hbbr-forum.967333.n3.nabble.com/SF-Lillie-tp4031184p4031692.html
To start a new topic under Builds in Progress, email [hidden email]
To unsubscribe from UK HBBR Forum, click here. NAML |
|
|
It is so many years since I last had to install a centreboard pivot I have no recollection how it was done. I'm sure it involved several people and heated words.
I'm soaking up the advice offered from all quarters and think I've got it...
Concentric circles with radial lines supplemented with arrows pointing toward the hole and a string threaded through the case and the board to bring things into alignment.
Problem is the Ilur doesn't have a through pivot pin, it uses a stub of bronze rod sticking through the board which slides into vertical slots on the inside of each side of the case.
Seems such a waste of your combined wisdom!
Timmo
|
|
|
The Morbic, also designed by M. Vivier uses the same system, I think I have also seen it on a Wayfarer and at least one other design, it seems so simple and has the advantage that the board can be lifted out whilst afloat without the boat sinking. 😎 Sent from my Xperia by Sony smartphone ---- Timmo [via UK HBBR Forum] wrote ---- It is so many years since I last had to install a centreboard pivot I have no recollection how it was done. I'm sure it involved several people and heated words. I'm soaking up the advice offered from all quarters and think I've got it...
Concentric circles with radial lines supplemented with arrows pointing toward the hole and a string threaded through the case and the board to bring things into alignment.
Problem is the Ilur doesn't have a through pivot pin, it uses a stub of bronze rod sticking through the board which slides into vertical slots on the inside of each side of the case.
Seems such a waste of your combined wisdom!
Timmo
If you reply to this email, your message will be added to the discussion below:
http://uk-hbbr-forum.967333.n3.nabble.com/SF-Lillie-tp4031184p4031694.html
To start a new topic under Builds in Progress, email [hidden email]
To unsubscribe from UK HBBR Forum, click here. NAML |
|
|
In reply to this post by inwe
Ooooh Richard; naughts and crosses to you, my lad!
If I can't directly eyeball the hole then I use a small piece of glass with silvery paint on one side, called a mirror. I've never found it necessary to use the >> additions, similarly the only reason I mentioned twine was to avoid those with no imagination saying that if you put the board/plate fully into the case then you can't get a grip to move it around. I'd actually lever it with a screwdriver, or jog the hull, or some such trick, but I'm no respecter of paintwork. Once found, if you need the hole better aligned, stick a cross head screwdriver (flat blades are mostly too sticky-outy), or if limited for space, a nail held at right-angles in a Mole wrench into the two offset holes and stir it round and round. It will rapidly shunt the board into alignment with the hole in the case. I would still maintain that a simple free-hand cross, with a pencil from behind your ear, is a load less 'complicated' than concentric circles. However if those are what hinges your plate, then who am I to withhold my concent; not that I expect you to be waiting with bated breath for my opinion One of us is a sausage And I don't mind If it's me CW |
|
|
In reply to this post by Port-Na-Storm
Windsurfers also had centre-boards that slotted in from above. Nice and simple, rarely went wrong and you could nudge them with your feet.
On MilliBee I glued blocks with 12 mm holes outside the case. With no lid on the case I could look down and line up coloured tape I stuck over the holes - then wiggle in the 12 mm stainless pin. Then I screwed a lid on the case, in case it had to be removed. Hydraulic car jacks are useful to support the board, jacking up or down to get the board at the ideal height. -Paul |
| Free forum by Nabble | Edit this page |


